Mosaic Knitting: The Magic of Slip Stitch Colorwork
Mosaic knitting, sometimes called slip stitch knitting, is truly the easiest but least-utilized form of colorwork!

For beginners and experienced knitters alike, colorwork can seem daunting. Mosaic knitting, however, is a great way to get into the world of colorwork knitting without learning an entirely new and complicated technique.
Most knitters define colorwork as any method that involves using two or more colors of yarn in a single row; this would exclude simply changing yarn color between rows. The two most common approaches to colorwork knitting are stranded knitting (think Fair Isle) and intarsia knitting. There is a third option, though — mosaic knitting!
Because of the nature of mosaic knit fabrics, there are no floats as in stranded knitting, and you don't have to worry about actually juggling two working yarns in a single row. In fact, if you have ever changed colors of yarn between rows or joined a new skein of yarn at the beginning of a new row, you've already done the hardest part of mosaic knitting. It's truly that easy. In fact, if you've ever tried knitting the brick stitch, you've done mosaic knitting!
For more great projects like this, subscribe to our free email newsletter!

What is Mosaic Knitting
Mosaic knitting is a method of colorwork that involves two simple techniques — slipping stitches and changing colors between rows. Each color is used for two consecutive rows before switching; this is the "dominant" color for that row. Stitches in each row that are not of the dominant color are simply slipped purlwise instead of being worked normally. This is how the movement of color is created and controlled throughout the pattern.
Mosaic knitting can be done flat or in the round, and many stranded motifs can be adopted for mosaic charts as well. While there are some downsides to mosaic knitting, overall it is a very versatile and fun colorwork method to use in just about any kind of pattern.
Why Do Mosaic Colorwork
While this style of colorwork is often seen as an alternative to stranded knitting, but there are some key differences.
Pros:
- It's much easier than stranded knitting.
- The finished fabric maintains most of the stretch that regular stockinette has, unlike stranded knitting.
- You don't have to worry about long, cumbersome floats or maintaining tension throughout your colorwork.
Cons:
- One downside to mosaic knitting has to do with the slipped stitches from previous rows — in order for a stitch in the non-dominant color to be slipped, the stitch below it in the previous row must be the same color.
- Mosaic knitting doesn't allow for large fields of color as with other colorwork methods like intarsia or roositud.
How to Do Mosaic Colorwork
Once you have a mosaic motif or a pattern that you'd like to try, it's time to start knitting! Cast on the number of stitches and get your chart ready. When you're mosaic knitting, there are a few things to remember as you're working:
- Cast on and knit your foundation rows. In mosaic knitting, your first two rows must be a solid color. Most mosaic knitting charts, like the ones below, will include these foundation rows in chart itself.
- If the foundation rows are not included, all you have to do is knit two rows in the opposite color of the one used in the subsequent rows. The purpose of the foundation rows is to give you stitches to slip over the next row to begin your colorwork.
- The first stitch of each row determines what the "dominant" color for that row will be. Any stitches on your chart for that row that are in the dominant color will be worked in pattern as normal; stitches that are in the non-dominant color will be slipped purlwise.
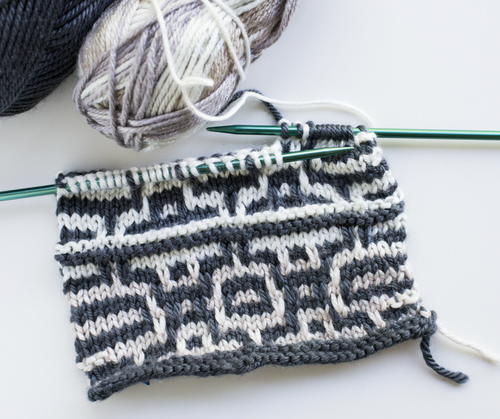
- In the photo below, you can see an incomplete row. On the right-hand needle, you can see the stitches of that row's dominant color, gray, along with one stitch in the non-dominant color that was slipped from the previous row. Simply follow your pattern, slipping any stitches that are in the non-dominant color. Typically you will not see more than one or two consecutive slipped stitches; even two slipped stitches in a row is a rarity.
- Wrong side rows are a breeze to work. You don't even need to look at your pattern, really. All you have to do for wrong side rows is continue in the dominant color from the previous row, purling the knit stitches that are in the dominant color and slipping the stitches of the other color purlwise with the yarn in front.
How to Read a Mosaic Knitting Chart
Like most types of knitting charts, mosaic knitting charts come in two basic formats — RS only and RS/WS charts. Because the wrong side rows of mosaic knitting are so easy to work and are essentially a mirror image of the previous row, there often isn't a need to show those rows in the chart.
While designers sometimes use different symbols for different types of stitches, most mosaic charts will look something like the one below. Here's how to read it:
- Count the number of rows; in charts like the one below, only the right side rows are shown. The total number of rows worked in the final fabric will be twice the number shown on the chart.
- From bottom-up, you'll be working two rows of each color. The stitch that is furthest to the left in each row represents the first stitch you will be knitting in that row and the color represents the dominant color you should use for that pair of rows.
- Starting in the bottom, left-hand corner, moving to the right, work the stitches in your pattern in your dominant color. Stitches in that row that are not in the dominant color should be slipped with the yarn on the wrong side of the pattern.
Stitches that are slipped are represented with this symbol: V
- Once you reach the end of a right side row, the subsequent wrong side row will be worked the same way but in stockinette. That is to say, all of the stitches that were worked in the dominant color in the previous row should be purled, and the slipped stitches should be slipped with the yarn on the wrong side of the pattern.
The other benefit to only showing the right side rows is that the chart itself will more closely resemble the look of the final fabric. The chart below shows both the wrong side and right side rows, but the motif itself is distorted vertically. In stockinette, knit stitches are wider than they are tall. This is part of the reason that each color is used for two rows — if only one row were used, the motif itself would be much shorter and harder to make out.
Charts like the one below, however, are much easier for beginners doing mosaic knitting for the first time because every stitch and row in the pattern is shown.
Try a Swatch
Use the chart above to make a sample swatch to get the hang of mosaic! Once you've got a rhythm down, try your hand at one of our mosaic knitting patterns below.
The final swatch will look a little something like this:
Mosaic Knitting Chart Generators
There are a few algorithms out there on the internet that will generate beautiful mosaic knitting patterns for you, but there are two in particular that we here at AllFreeKnitting particularly enjoy. Because mosaic follows such specific mathematic rules, this particular knitting style lends itself well to auto-generated knitting charts.
The first is this generator by Scott Pakin. This particular generator is super user-friendly and has a "validate" feature that lets you check to see if your pattern is compatible with mosaic knitting.
The other generator we love is The Mosaic Knitting Pattern Generator by Laura Kolger. This generator is great because it lets you set X and Y axis reflections, as well as more specific settings for vertical repetitions and stripes.
1. Mosaic Blanket
2. Swirls and Stripes Mosaic Bag
3. Mosaic Chevron Hat
4. French Mosaic Knit Cowl Pattern
5. Stash Buster Cushion
6. Asthore Bag
7. Slip Stitch Sampler Afghan
8. Ladder Stitch Cowl
9. Slip Stitch Afghan
Roositud Knitting: What Is It and How to Do It
Have you ever tried mosaic knitting?
