Girl's Stockinette Argyle Dress
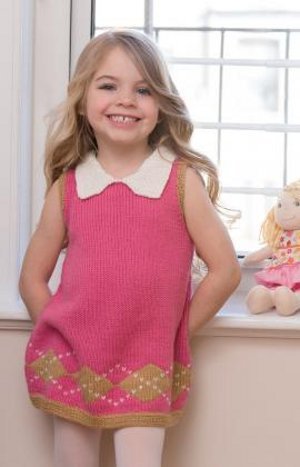
Your little girl will travel from ballet class to soccer practice in style while wearing the Girl's Stockinette Argyle Dress. This darling knit dress pattern is a stylish take on a timeless design. Simple intarsia colorwork diamonds make this pretty pink dress stand out. The Girl's Stockinette Argyle Dress is the perfect year-round piece for dressier occasions. Try pastels for spring, neon hues for summer, and bold reds and greens for the holidays!

Knitting Needle Size6 or 4 mm, Circular Knitting Needles, Double-Pointed Knitting Needles (DPNs)
Yarn Weight(3) Light/DK (21-24 stitches to 4 inches)
Materials:
- RED HEART® Anne Geddes Baby™: 2 (2, 2, 2) balls 764 Taffy A, and 1 ball each of 301 Teddy B, and 100 Lily C.
- Susan Bates® Knitting Needles: 4mm [US 6] straights or circular (for dress) plus one extra needle (for 3-Needle Bind-Off) and 4mm [US 6] set of double pointed needles or 29” (73.5 cm) circular for magic loop method (for collar)
- Bobbins
- Stitch holders
- Yarn needle
GAUGE: 20 sts = 4” (10 cm); 28 rows = 4” (10 cm) in Stockinette st (knit on right side, purl on wrong side)
CHECK YOUR GAUGE. Use any size needles to obtain the gauge.
Dress directions are for size 2 years.
Changes for sizes 4 years, 6 years, and 8 years are in parentheses
Finished Chest: 24 (25, 26, 27)” (61 (63.5, 66, 68.5) cm)
Finished Length: 17 (19¼, 21½, 24)” (43 (49, 54.5, 61) cm)
Special Stitches
M1 = Make 1 (Increase) – Lift strand between needles to left-hand needle and work strand through the back loop, twisting it to prevent a hole, [knit or purl as indicated by pattern st].
ssk = Slip next 2 stitches, one at a time as if to knit, to right needle, insert point of left needle through front of sts, knit these sts together through back loop.
Special Technique
3-Needle Bind-Off = Hold needles of stitches to be seamed parallel and with right sides together, with 3rd needle knit together first stitch from each needle, *knit together next stitch from each needle, pass first stitch over 2nd stitch and off right needle; repeat from * until all stitches have been knit from the 2 parallel needles and only one stitch remains on the right needle. Fasten off.
Notes
1. Dress is worked in two pieces, back and front, beginning at the lower edge. If using a circular needle, work back and forth in rows on circular needle as if working with straight needles. The collar begins with a few rounds of knitting, then it is worked back and forth in rows.
2. Diamonds are worked in intarsia. Do not carry color not in use across wrong side of work. Use a separate bobbin for each section of color. Wind about 5 yards of A and B onto bobbins. The C-colored V’s are worked in duplicate stitch after the dress is complete.
3. The intarsia sections can be worked by following the written instructions or reading the chart. Read right side rows of chart from right to left, and wrong side rows from left to right. The chart also shows placement of the duplicate stitches.
4. When changing colors, do not twist colors, just start the new color by reaching UNDER the dropped one. This way the bobbins will not get tangled.
DRESS
Back
Note: All sizes begin with the same number of stitches at the lower edge. Side decreases will form the correct chest measurement for each size.
With C, cast on 75 sts.
Knit 8 rows.
Increase Row (right side): [K8, M1, k9, M1] 4 times, k7—83 sts. Cut C.
With B, work in Stockinette st (knit on right side, purl on wrong side) for 5 rows.
Intarsia Section
Row 1 (right side): With A, knit.
Row 2: With A, p2; *with A, p9; with B, p1; with A, p10; repeat from * to last st; with A, p1.
Row 3: With A, k1; *with A, k9; with B, k3; with A, k8; repeat from * to last 2 sts; with A, k2.
Row 4: With A, p2; *with A, p7; with B, p5; with A, p8; repeat from * to last st; with A, p1.
Row 5: With A, k1; *with A, k7; with B, k7; with A, k6; repeat from * to last 2 sts; with A, k2.
Row 6: With A, p2; *with A, p5; with B, p9; with A, p6; repeat from * to last st; with A, p1.
Row 7: With A, k1; *with A, k5; with B, k11; with A, k4; repeat from * to last 2 sts; with A, k2.
Row 8: With A, p2; *with A, p3; with B, p13; with A, p4; repeat from * to last st; with A, p1.
Row 9: With A, k1; *with A, k3; with B, k15; with A, k2; repeat from * to last 2 sts; with A, k2.
Row 10: With A, p2; *with A, p1; with B, p17; with A, p2; repeat from * to last st; with A, p1.
Row 11: With A, k1; *with A, k1; with B, k19; repeat from * to last 2 sts; with A, k2.
Row 12: With A, p1; with B, p1; *with B, p20; repeat from * to last st; with A, p1.
Row 13: Repeat Row 11.
Row 14: Repeat Row 10.
Row 15: Repeat Row 9.
Row 16: Repeat Row 8.
Row 17: Repeat Row 7.
Row 18: Repeat Row 6.
Row 19: Repeat Row 5.
Row 20: Repeat Row 4.
Row 21: Repeat Row 3.
Row 22: Repeat Row 2.
Cut all short ends/bobbiins.
Work remainder of piece with B only.
Work in Stockinette st for 4 (6, 8, 10) rows.
Decrease Row (right side): K1, k2tog, knit to last 3 sts, ssk, k1—81 sts.
Work in Stockinette st for 3 (5, 7, 9) rows.
Repeat Decrease Row—79 sts.
Repeat last 4 (6, 8, 10) rows 9 (8, 7, 6) more times—61 (63, 65, 67) sts remain.
Work even in Stockinette st until piece measures 12 (14, 16, 18)” (30.5 (35.5, 40.5, 45.5) cm) from beginning, end with a wrong side row.
Shape Armholes
Row 1 (right side): Bind off 5 sts. knit to end of row—56 (58, 60, 62) sts.
Row 2: Bind off 5 sts, purl to end of row—51 (53, 55, 57) sts.
Row 3 (decrease): K1, ssk, knit to last 3 sts, k2tog, k1—49 (51, 53, 55) sts.
Row 4: Purl.
Rows 5–12: Repeat last 2 rows 4 more times—41 (43, 45, 47) sts.
Work even in Stockinette st until armholes measure 5 (5¼, 5½, 6)” (12.5 (13.5, 14, 15) cm). Place all stitches on a holder for shoulders and back neck.
Front
Work same as back until armholes measure 3 (3¼, 3½, 4)” (7.5 (8.5, 9, 10) cm), end with a wrong side row.
Shape Neck
Row 1 (right side): K14 (15, 16, 17), join 2nd ball of yarn and k13 center sts, slip the 13 center sts onto a holder for front neck, k14 (15, 16, 17) sts—14 (15, 16, 17) sts for each side of neck.
Work both sides at the same time with separate balls of yarn.
Row 2: Purl to end of first side; bind off first 2 sts of 2nd side (for neck), purl to end of 2nd side.
Row 3: Knit to end of first side; bind off first 2 sts of 2nd side, knit to end of 2nd side—12 (13, 14, 15) sts remain for each side of neck.
Rows 4–7 (9, 9, 9): Repeat last 2 rows 2 (3, 3, 3) more times—8 (7, 8, 9) sts remain for each side of neck.
Work even in Stockinette st until front measures same as back to shoulders. Leave sts on needle.
Join shoulders using 3-Needle Bind-Off, leaving center 25 (29, 29, 29) sts of back on holder for back neck.
FINISHING
Armhole Edging
With right side facing and C, pick up and k50 (54, 58, 62) sts evenly spaced across armhole edge.
Knit 3 rows.
Bind off. Repeat across other armhole edge.
Sew side seams.
Collar
Note: Collar is worked in the round for 3 rounds then split in the center front and worked back and forth in rows. With double pointed needles or circular needle (for magic loop method) and C, beginning at center front, knit last 7 sts from front neck holder, pick up and k13 (15, 15, 15) sts across right front neck edge, k25 (29, 29, 29) back neck sts from holder, pick up and k13 (15, 15, 15) sts across left front neck edge, knit remaining 6 sts from front neck holder. Place marker for beginning of round—64 (72, 72, 72) sts.
Round 1: Knit.
Round 2: Purl.
Round 3: Bind off 1 st, knit to end of round, TURN and begin working back and forth in rows—63 (71, 71, 71) sts.
Row 4: K1, M1, *k1, p1; repeat from * to last 2 sts, k1, M1, k1—65 (73, 73, 73) sts.
Row 5: P1, *p1, k1; repeat from * to last 2 sts, p2.
Row 6: K1, M1, *p1, k1; repeat from * to last 2 sts, p1, M1, k1—67 (75, 75, 75) sts.
Row 7: *P1, k1; repeat from * to last st, p1.
Rows 8–11: Repeat Rows 4–7—71 (79, 79, 79) sts.
Row 12: K1, *k1, p1; repeat from * to last 2 sts, k2.
Row 13: *P1, k1; repeat from * to last st, p1.
Repeat last 2 rows until collar measures 3” (7.5 cm).
Bind off.
Duplicate Stitch to Finish Argyle
With C, work duplicate stitch V’s over intarsia diamonds as shown in chart.
Note: Duplicate stitch will need a little “fudging” along side seams.
Weave in ends.


Read NextToddler Summer Top Pattern

