Baby Bear Halloween Hoodie
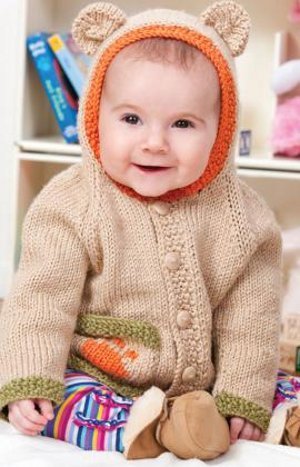
Perfect for baby's first Halloween, the Baby Bear Halloween Hoodie is sure to keep him warm while trick-or-treating. This knit hoodie pattern features a simple stockinette stitch base, darling bear ears, and a sweet little paw print motif on the front pocket. This adorable DIY baby Halloween costume is sure to be passed down in your family for Halloweens to come.

Knitting Needle Size6 or 4 mm, 7 or 4.5 mm, Circular Knitting Needles
Yarn Weight(4) Medium Weight/Worsted Weight and Aran (16-20 stitches to 4 inches)
Materials:
- RED HEART® Soft™: 2 (2, 2, 3) balls 9388 Wheat MC, 1 ball 9522 Leaf A, 1 ball 4422 Tangerine B
- Knitting needles: 4mm [US 6] circular needle, 24” long; 4.5mm [US 7] circular needle, 24” long.
- Stitch holders
- 4 (5, 5, 5) buttons—5/8” diameter
- yarn needle
GAUGE: 18 sts = 4”; 26 rows = 4” in Stockinette st with larger needle.
CHECK YOUR GAUGE. Use any size needle to obtain the gauge.
Finished Chest: 20 (22, 24, 26)”, including bands
Finished Length: 10½ (12, 13, 14)”
Directions are for size 6 months. Changes for sizes 12 months, 18 months, and 24 months are in parentheses.
ABBREVIATIONS:
MC, A, B = Color MC, Color A, Color C
k = knit
k2tog = knit next 2 stitches together
p2tog = purl next 2 stitches together
st(s) = stitch(es); yo = yarn over
[ ] = work directions in brackets the number of times specified
* = repeat whatever follows the * as indicated.
Special Stitches
kfb (Knit into front and back) = Knit next st but do not remove from needle, knit into back loop of same st and remove from needle.
M1 - Make 1 (Increase) = Lift strand between needles to left-hand needle and knit strand through the back loop, twisting it to prevent a hole.
ssk = slip next two stitches knitwise to right needle, insert point of left needle through front of sts, knit these sts together through back loop.
ssp = slip next two stitches knitwise to right needle, insert point of left needle through front of sts, purl these sts together through back loop.
Special Technique
Grafting
Thread yarn needle with long length of yarn. Hold the two needles in the left hand with wrong sides together. Keeping the yarn needle and yarn under the points of the knitting needles, graft the stitches together as follows:
1. *Insert yarn needle through first st of front needle as if to knit and slip the st off.
2. Insert needle through 2nd st of front needle as if to purl, but leave the st on the needle.
3. Insert yarn through first st on back needle as if to purl and slip the st off.
4. Insert yarn through 2nd stitch on back needle as if to knit, but leave st on needle. Repeat from * until all the sts are joined. Take care to draw yarn up so that gauge of grafting equals gauge of knitting. Fasten off. Weave in ends on wrong side
Pattern Stitch
Seed Stitch (multiple of 2 sts)
Row 1 (Right Side): *K1, p1; repeat from * across.
Row 2: *P1, k1; repeat from * across.
Repeat Rows 1 and 2 for Seed st.
NOTES
1. Two sleeves and body are worked separately, from lower edge up to underarm. The pieces are then joined and the yoke worked up to the neck.
2. Pieces are all worked back and forth in rows. Circular needle is used to accommodate large number of stitches.
3. Pocket can be worked from written instructions or following chart.
HOODIE
Sleeves (Make 2)
With smaller needle and A, cast on 26 (30, 32, 34) sts.
Cuff
Beginning with a Right Side row, work in Seed st for 6 rows.
Sleeve
Change to larger needle and MC.
Work in St st (knit on Right Side, purl on Wrong Side) for 2 rows.
Increase Row: K1, M1, knit to last st, M1, k1—28 (32, 34, 36) sts.
Work even (with no increasing) in St st for 5 rows.
Repeat last 6 rows 3 (3, 4, 5) times—34 (38, 42, 46) sts.
Repeat Increase Row—36 (40, 44, 48) sts.
Work even in St st until piece measures 5½ (6¼, 7, 7¾)” from beginning, end with a Wrong Side row.
Next Row (Right Side): Bind off 2 sts, knit to end of row—34 (38, 42, 46) sts.
Next Row: Bind off 2 sts, purl to end of row—32 (36, 40, 44) sts.
Place remaining sts on holder.
Body
With smaller needle and A, cast on 88 (96, 104, 116) sts.
Lower Band
Beginning with a Right Side row, work in Seed st for 6 rows.
Body
Change to larger needle and MC.
Work even in St st until piece measures 6¼ (7, 7½, 7¾)”
from beginning, end with a Right Side row.
Next Row (Wrong Side): P19 (21, 23, 26) for left front, bind off next 4 sts for armhole, P42 (46, 50, 56) sts for back, bind off 4 sts for armhole, purl to end of row for right front.
Yoke
Join Body And Sleeves
Row 1 (Right Side): K19 (21, 23, 26) sts from body (right front), place marker, k32 (36, 40, 44) sts from one sleeve (right sleeve), place marker, k42 (46, 50, 56) sts from body (back), place marker, k32 (36, 40, 44) sts from other sleeve (left sleeve), place marker, k19 (21, 23, 26) sts from
body (left front)—144 (160, 176, 196) sts.
Work even in St st for 3 rows.
Raglan Decrease Row (Right Side): [Knit to 3 sts before next marker, ssk, k1, slip marker, k1, k2tog] 4 times, knit to end of row—136 (152, 168, 188) sts.
Repeat last 4 rows twice—120 (136, 152, 172) sts.
Next Row (Wrong Side): Purl.
Repeat Raglan Decrease Row—112 (128, 144, 164) sts.
Repeat last 2 rows 3 (5, 7, 9) times—88 (88, 88, 92) sts.
Next Row: Purl.
Next Row (Right Side): Bind off 3 (3, 3, 4) sts, *knit to 3 sts before next marker, ssk, k1, slip marker, k1, k2tog, k4, ssk, k2tog, k4, ssk, k1, slip marker, k1, k2tog; repeat from * once more, knit to end of row—73 (73, 73, 76) sts.
Next Row: Bind off 3 (3, 3, 4) sts, purl to end of row—70 (70, 70, 72) sts.
Next Row: Ssk, [knit to 3 sts before next marker, ssk, k1, slip marker, k1, k2tog] 4 times, knit to last 2 sts, k2tog—60 (60, 60, 62) sts.
Next Row: Purl.
Next Row: Ssk, *knit to 3 sts before next marker, ssk, k1, slip marker, k1, k2tog, k1, ssk, k2tog, k1, ssk, k1, slip marker, k1, k2tog; repeat from * once more, knit to last 2 sts, k2tog—46 (46, 46, 48) sts.
Next Row: Purl.
Repeat Raglan Decrease Row—38 (38, 38, 40) sts.
Next Row: Purl.
Hood
Remove markers as you work the next row.
Row 1 (Right Side): K10 (10, 8, 8), kfb in each of next 18 (18, 22, 24) sts, knit to end of row—56 (56, 60, 64) sts.
Work even in St st until hood measures 2¾ (3, 3¾, 4¼)”, end with a Right Side row.
Shape Top of Hood
Next Row: P19 (19, 20, 21), place marker, p18 (18, 20, 22), place marker, purl to end of row.
Decrease Row: [Knit to 3 sts before next marker, ssk, k1, slip marker, k1, k2tog] 2 times, knit to end of row—52 (52, 56, 60) sts.
Work even in St st for 3 rows.
Repeat last 4 rows 2 (2, 2, 1) time(s)—44 (44, 48, 56) sts.
Repeat Decrease Row—40 (40, 44, 52) sts.
Next Row: Purl.
Repeat last 2 rows 3 (3, 4, 6) times—28 sts.
Divide sts evenly onto two needles (14 sts on each needle) and graft top of hood. Alternatively, bind off, fold top of hat in half and sew top seam.
Pockets (Make 2)
With larger needle and MC, cast on 16 sts.
Note: Work pocket by following the written instructions or reading the chart.
Row 1 (Right Side): *K1, p1; repeat from * to end of row.
Row 2: K1, purl to last st, k1.
Row 3: Knit.
Row 4: Repeat Row 2.
Begin Pawprint
Paw Print Chart
Row 5: With MC, k6; with B k4; with MC, k6.
Row 6: With MC, k1, p4; with B, p6, with MC, p4, k1.
Row 7: With MC, k4; with B, k8; with MC, k4.
Row 8: With MC, k1, p3, with B, p8, with MC, p3, k1.
Rows 9 and 10: Repeat Rows 7 and 8.
Row 11: With MC, k5; with B, k6, with MC, k5.
Row 12: With MC, k1, p5; with B p4; with MC, p5, k1.
Row 13: With MC, knit.
Row 14: With MC, k1, p3; with B, p2; with MC, p4; with B, p2; with MC, p3, k1.
Row 15: With MC, k4; [with B, k2; with MC, k1] 2 times; with B, k2; with MC, k4.
Row 16: With MC, k1, p6; with B, p2; with MC, p6, k1.
Rows 17 and 18: Repeat Rows 3 and 4.
Row 19: Repeat Row 3.
Change to smaller needle and A.
Row 20 (Wrong Side): Repeat Row 4.
Work even in Seed st for 6 rows.
Bind off.
Ears (Make 2)
With larger needle and MC, cast on 11 sts.
Row 1 (Right Side): K5, kfb, k5—12 sts.
Row 2: Purl.
Row 3: K5, kfb in each of next 2 sts, k5—14 sts.
Row 4: Purl.
Row 5: K5, kfb in each of next 4 sts, k5—18 sts.
Rows 6–10: Work even in St st for 5 rows.
Row 11: K5, [k2tog] 4 times, k5—14 sts.
Row 12: Purl.
Row 13: K5, [k2tog] 2 times, k5—12 sts.
Row 14: Purl.
Row 15: K5, k2tog, k5—11 sts.
Bind off. Fold ears in half lengthwise so that side edges become base. Sew halves of cast-on edges and bound-off edges together. Sew base seams of ears.
FINISHING
Note: For boy’s sweater, place button band across right front and buttonhole band across left front. For girl’s sweater, place button band across left front and buttonhole band across right front.
Buttonband
Row 1: With Right Side facing, smaller needle and MC, pick up and k61 (70, 76, 82) sts across front edge.
Row 2: P1, *p2tog, k1; repeat from * to last 3 sts, p2tog, p1—41 (47, 51, 55) sts.
Row 3: K1, *p1, k1; repeat from * across.
Row 4: P1, *p1, k1; repeat from * to last 2 sts, p2.
Repeat last 2 rows 2 more times.
Bind off.
Buttonhole Band
Working across other front edge, work same as button band through Row 4.
Row 5 (buttonhole row): K1, p1, k1, yo, ssk, [p1, k1] 4 (4, 4, 5) times, yo, ssk, [p1, k1] 5 (4, 4, 5) times, yo, ssk, [p1, k1] 5 (4, 5, 5) times, yo, ssk, [p1, k1] 0 (4, 5, 5) times, [yo, ssk] 0 (1, 1, 1) time(s), p1, k1.
Row 6: P1, *p1, k1; repeat from * to last 2 sts, p2.
Row 7: K1, *p1, k1; repeat from * across.
Row 8: Repeat Row 6.
Bind off.
Hood Band
Row 1: With Right Side facing, smaller needle and B, pick up and k113 (119, 128, 137) sts around hood opening (including both sides of front neck).
Row 2: P1, *k2tog, p1; repeat from * across—75 (79, 85, 91) sts.
Row 3: Ssk, *p1, k1; repeat from * to last 3 sts, p1, k2tog—73 (77, 83, 89) sts.
Row 4: P2tog, *k1, p1; repeat from * to last 3 sts, k1, ssp—71 (75, 81, 87) sts.
Repeat last 2 rows 2 more times—63 (67, 73, 79) sts.
Bind off.
Weave in ends. Lightly steam block all pieces. Sew pockets to fronts. Sew ears to sides of hood. Sew buttons to button band, opposite buttonholes on buttonhole band.


Read NextSpock Ears
Your Recently Viewed Projects
Susan S
Aug 08, 2018
How sweet is this! And not just for Halloween. A great way to learn and practice garment construction techniques on a smaller scale.
Report Inappropriate Comment
Are you sure you would like to report this comment? It will be flagged for our moderators to take action.
Thank you for taking the time to improve the content on our site.

