Hotness Top
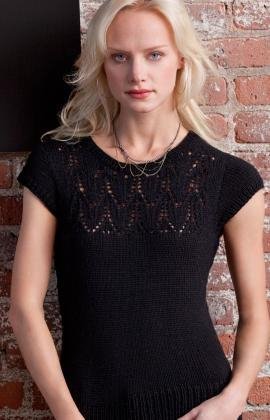
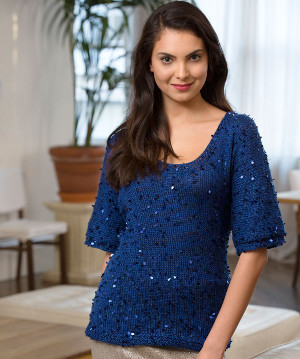
Free knitting patterns aren't always prim and proper, some of them are perfect for nightlife! This gorgeous Hotness Top from Red Heart Yarn is a great example. Crafted with feminine lace detailing along the collar, this gorgeous pattern looks great in black and pastel hues.

Knitting Needle Size7 or 4.5 mm, Circular Knitting Needles
Yarn Weight(4) Medium Weight/Worsted Weight and Aran (16-20 stitches to 4 inches)
XLarge and XXLarge are in parentheses.
Finished Bust: 36 (40, 44, 48, 52)”.
Finished Length: 21½ (22¼, 23, 23¾, 24½,)”.
MATERIALS:
- Stitch Nation by Debbie Stoller™ “Washable Ewe™”: 3 (4, 5, 6, 7) balls 3012 Licorice.
- Knitting Needles: 4.5mm [US 7].
- Circular Knitting Needles: 4.5mm [US 7] 16” long.
- Stitch holders (4), stitch markers (2), yarn needle.
GAUGE: 20 sts = 4”; 28 rows = 4” in St st. CHECK YOUR GAUGE. Use any size needles to obtain the gauge.
SPECIAL ABBREVIATION
ssk: Slip next 2 sts knitwise, one at a time to right needle; insert point of left needle into the fronts of these 2 sts and knit them together from this position.
SK2P: Slip 1, Knit 2 together, Pass slipped stitch over.
SPECIAL STITCHES
K1, p1 Rib (worked over an odd number of sts).
Row 1 (Right Side): K1, * p1, k1; repeat from * to end of row.
Row 2: P1, * k1, p1; repeat from * to end of row.
Tulip Lace (Multiple of 10 + 1 sts)
Row 1 (Right Side): K1, * yo, ssk, k2tog, yo, k1; repeat from * to end of row.
Row 2 and all wrong side rows: Purl.
Row 3: K1, * k1, yo, ssk, k3, k2tog, yo, k2; repeat from * to end of row.
Row 5: K1, * k2, yo, ssk, k1, k2tog, yo, k3; repeat from * to end of row.
Row 7: K1, * k3, yo, sk2p, yo, k4; repeat from * to end of row.
Rows 9, 11 and 13: K1, * ssk, k2, yo, k1, yo, k2, k2tog, k1; repeat from * to end of row.
Row 14: Purl.
Repeat Rows 1 – 14 for Tulip Lace pattern.
TOP INSTRUCTIONS
Back
With knitting needles, cast on 89 (99, 109, 119, 129) sts. Work in K1, p1 rib for 3”, end by working a wrong side row.
Shape Waist
Begin St st, and shape waist by dec 1 st at beginning and end of every 6th row 5 times–79 (89, 99, 109, 119) sts. Inc 1 st at beginning and end of every 8th row 5 times– 89 (99, 109, 119, 129) sts. Work even until back measures 14 (14½, 15, 15½, 16)” from beginning, end by working a wrong side row.
Shape Armholes
Bind off 7 sts at beginning of next 2 rows–75 (85, 95, 105, 115) sts.
Dec 1 st at beginning and end of every right side row 8 times–59 (69, 79, 89, 99) sts. Work even until armhole measures 5½ (5¾, 6, 6¼, 6½)”, end by working a wrong side row.
Shape Back Neck
Next Row: K19 (24, 29, 34, 39) sts, place center 21 sts on holder for back neck; join a second ball of yarn and knit remaining 19 (24, 29, 34, 39) sts. Working both sides at once with separate balls of yarn, bind off 2 sts at each neck edge twice–15 (20, 25, 30, 35) sts each shoulder. Work even until armhole measures 6½ (6¾, 7, 7¼, 7½)”, end by working a wrong side row.
Shape Shoulders
Bind off 5 (6, 9, 10, 11) sts at beginning of next 2 rows, then bind off 5 (7, 8, 10, 12) sts at beginning of next 4 rows.
Front
Cast on and work same as for Back to armhole shaping.
Shape Armholes and Begin Lace Pattern
Next Row (Right Side): Bind off 7 sts, k12, place marker, work Row 1 of Tulip Lace over next 51 (61, 71, 81, 91) sts, place marker, knit to end.
Next Row: Bind off 7 sts, purl to end.
Keeping sts between markers in Lace pattern, continue shaping armholes by dec 1 st at beginning and end of every right side row 8 times–59 (69, 79, 89, 99) sts
Work until armhole measures 4 (4¼, 4½, 4¾, 5)”, end by working a wrong side row.
Shape Neck
Neck Row: Pattern 23 (28, 33, 38, 43) sts, slip next 13 sts onto holder for front neck; join a second ball of yarn and pattern remaining 23 (28, 33, 38, 43) sts. Working both sides at once with separate balls of yarn, bind off 2 sts at each neck edge 4 times–15 (20, 25, 30, 35) sts. Work even in pattern until piece measures same as Back to shoulder. Shape shoulders same as for Back.
Sew side seams.
Sleeves
With right side facing and circular knitting needles, beginning at underarm seam, pick up and k70 (76, 80, 86, 90) sts evenly around armhole. K27 (30, 32, 35, 37), place marker (1), knit next 16 sts for sleeve cap, place marker (2), turn. Slip 1, p to 2 sts past marker 1, turn. Slip 1, knit to 2 sts past marker 2. Continue to work 2 sts more each short row. No wraps necessary. When 14 sts remain at underarm, knit across all sts. Working in the round, * k1, p1; repeat from * around. Work even for 1”. Bind off.
Neck Edging
With right side facing and circular knitting needles, beginning at right shoulder, pick up and k94 sts evenly around neck opening. * K1, p1; repeat from * around. Work even in ribbing for 1”. Bind off. Weave in yarn ends.
Find more free knitting patterns on Red Heart Yarn's company profile page!
Read NextEnchanted Knit Top
Your Recently Viewed Projects
lneuman 2406614
Jul 02, 2020
I am confused about the neck part. It says to leave the 12 center back stitches and the 13 front center stitches on. a holder but it never says what to do with them. Could someone help me out?
RavenFall
Nov 03, 2017
I'm curious, do you think this could be knitted in the round up to the armholes? (I'm not very good at sewing seams. LOL) I'd put markers at the sides, so I'd know where to make the decreases.
achumley0003 31706 34
Jun 29, 2017
This top is my favorite knit pattern. I love how it is designed to fit your curves and it has just enough lace to be sexy and stand out, but not go over board. I made this top when i first learned to knit and it was pretty easy to do, so I think most beginners could figure it out with out much trouble.
skwas2 3614224
Feb 08, 2016
Really enjoyed making this pattern I did make it in black with a sateen sheen yarn and it turned out well. I am not a fan of cap sleeves and decided to make this sleeveless and just completed the ribbing for the edges. It is lightweight enough for spring and summer but easy to wear underneath a blazer now. This is only my second sweater so overall, it was challenging but fun.
KathrynAllison
Feb 08, 2016
Hello skwas2 3614224! We're so glad you enjoyed the pattern. Thank you for taking the time to comment. - Editors of AllFreeKnitting
SusieQR
Aug 09, 2015
I am a little confused with the shape shoulder area. I have made the pattern using the first size (not in parenthese. The directions say, "bind off 5 stitches at the beginning of next two rows (which I assume also includes the purl side), then bind off 5 stitches at the beginning of the next 4 rows. However, there were only 15 stitches to each shoulder side to start? So, I can only bind off five stitches 3 times on each shoulder? Also, s it okay to use a short row bind off here for a smoother look or will this throw off the sleeves? Thanks. Can't really rate the pattern until I am done. Love the look of it in the picture. Hope I get the same sweater when done.
intreble20 8397263
Sep 30, 2014
I am having trouble with the sleeves-I don't understand the directions. Is there a video out there of sleeves being constructed this way?
CarmenRose
Sep 26, 2012
Maybe I did something wrong this was my first time making a sweater but my finished project ended up HUGE for a size Small I used a different worsted weight warn than what the pattern called for and I suspect it must be a heavier worsted because my gauge was loose However despite this my first couple rows still matched the width the diagram shows for size Small so I continued on with the size Small instructions making sure my measurements matched the diagram for both the front and back Well today I seamed the front and back together and the thing turned out HUGE in terms of girth width If I had thought about the when laid flat measurement before I started I would have realized that x and then compared to my own measurement around my belly button which is only about Problem is the length is right for…Read More me which means even if I give it to someone who might fit in it width wise it will likely be too short for them What a waste Anyway the short story is I think the width measurements given in the diagram are way off the gauge may be more accurate since I went off of the measurements and not the gauge Or maybe I am somehow reading the diagram incorrectly If anyone has some insight let me know
ytuckerman 7652431
May 05, 2012
re my comment I would like to add that as I used 4ply cotton and 3.75 needles I used the next size up to my bust measurement and it fitted perfectly .
ytuckerman 7652431
May 04, 2012
I have just finished this pattern. I made it in 4ply cotton with 3.75 needles. it worked beautifully. the sleeve pattern is particularly good as you knit the sleeve from the top down directly into the armhole. I wanted the sleeve a bit longer so instead of knitting the rib where the pattern says to I did the 14 rows of the lace pattern then did the rib .I decreased the rib at the underarm to make the band a little tighter. very good pattern. something else that I liked is that the lace pattern has a stocking stitch border so the armhole decreases dont't interfere with the lace pattern.
CroKnit Boutique
May 04, 2012
I agree with you in every way. I am going to try a nylon/cotten blend that has been in my stash for years because I love the pattern.
siobhan021156 3449 429
May 04, 2012
Lovely top. Why is this a summer top and it is made from wool? Where I live, and the yarn being in black, you would die from the heat. I see that it's a pattern from Red Heart. I suggest that you buy a yarn that is for summer wear such as bamboo or cotton of similar weight. Sure enough, if you buy Red Heart, all your work you put into it will be for naught because it will pill and be destroyed in the washing process and never look the same again.
evazill 8918061
Aug 18, 2015
I have tops and blankets as well as toys that are well used as well as thrown through the washer and dryer and they always turn out great never destroyed and always looking good never shrunken or stretched out of shape and some of these items are 32 years old all the way down to new. I have cotton tops that stretch out of shape and I have spoken tops that someone helped with the laundry and put through the washer and dryer it started out as an adult woman's top and once it came back to me from the dryer it wouldn't fit any of my children.
Report Inappropriate Comment
Are you sure you would like to report this comment? It will be flagged for our moderators to take action.
Thank you for taking the time to improve the content on our site.

