Cabled Sleep Sack
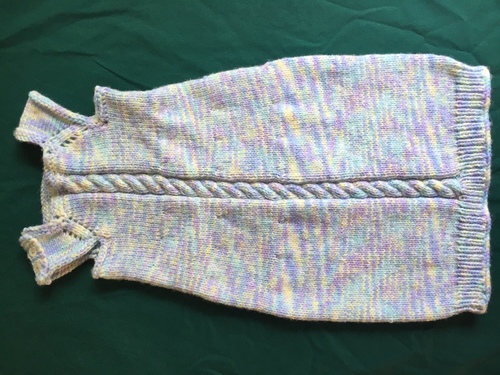
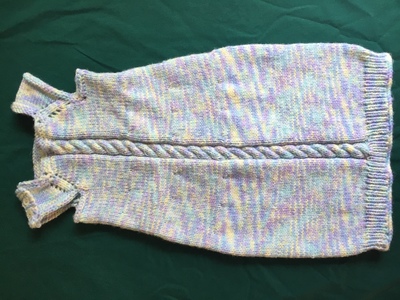
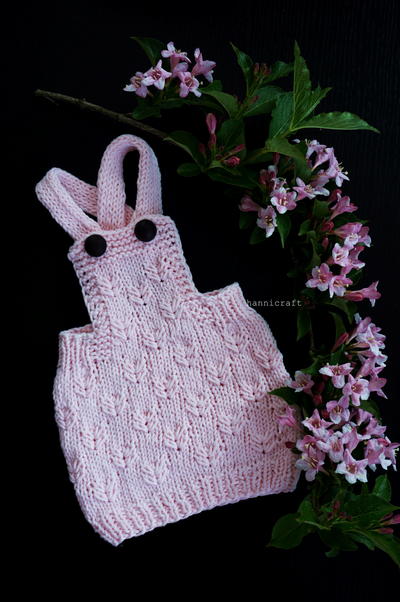
If you've ever wanted to knit a baby blanket but were too overwhelmed by the idea, this Cabled Sleep Sack the pattern for you. A sleep sack is not only quicker to knit, but its also considered safer in the crib than blankets according to www.healthychildren.org. This super soft garment has a lovely cable going down the front and is open at the bottom for easy diaper changes. One sleeve has a button opening to make it even easier to get on and off. Its a great introduction to top-down raglans and cables.

Knitting Needle Size6 or 4 mm, 7 or 4.5 mm, Circular Knitting Needles, Double-Pointed Knitting Needles (DPNs)
Yarn Weight(3) Light/DK (21-24 stitches to 4 inches)
Gauge1 stitches, 2 rows, 3 inches. stockinette stitch
Materials List
- 2-3 skeins Lion Brand Babysoft yarn, Pastel Print
- 16" size US 7 circular needle
- 16" size US 6 circular needle
- Set of size US 7 double pointed needles
- Cable needle
- Scrap yarn
- 2 buttons, dress shirt sized
- Needle and thread
Instructions
Cable Pattern:
Rows 1-5: p2, k6, p2
Row 6: p2, C6F, p2
Yoke
CO 68
R1: K8, pm, K1, pm, K18, pm, K1, pm, K12, pm, K1, pm, K18, pm, K1, pm, K8
R2: (increase row) *K to 1 stitch before marker, YO, K1, slip marker, K1, slip marker, YO, K1* repeat until last marker, slip marker, YO, K1, K to end
R3: K all stitches
R4: (increase row) *K to 1 stitch before marker, YO, K1, slip marker, K1, slip marker, YO, K1* repeat until last marker, slip marker, YO, K1, K to end
R5: K all stitches
R6: K4, purl to 2nd stitch marker, slip marker, p6, k2, p6, k2, p to last 4 stitches, K4
R7: (increase row with buttonhole) K1, K2tog, yo *K to 1 stitch before marker, YO, K1, slip marker, K1, slip marker, YO, k1, k till 1 st. before next stitch marker, YO, K1, slip marker, k1, slip marker, YO, K6, p2, K6, P2, K5, YO, K1, sm, K1, sm, YO, K to end.
R8: Purl to 2nd stitch marker, slip marker, P7, K2, P6, K2, P to last 4 stitches, K4.
R9: (increase row) K to 1 stitch before marker, YO, K1, slip marker, K1, slip marker, YO, K1, k till 1 st. before next stitch marker, YO, K1, slip marker, k1, slip marker, YO, K7, P2, C6F, P2, K till 1 st. before marker, YO, K1, slip marker, K1, slip marker, YO, K to end.
R10: Purl to 2nd stitch marker, slip marker, P8, K2, P6, K2, P to last 4 stitches, K4.
R11: (increase row) K to 1 stitch before marker, YO, K1, slip marker, K1, slip marker, YO, K1, k till 1 st. before next stitch marker, YO, K1, slip marker, k1, slip marker, YO, K8, P2, K6, P2, K till 1 st. before marker, YO, K1, slip marker, K1, slip marker, YO, K to end.
R12: Purl to 2nd stitch marker, slip marker, P9, K2, P6, K2, P to last 4 stitches, K4.
R13: (increase row) K to 1 stitch before marker, YO, K1, slip marker, K1, slip marker, YO, K1, k till 1 st. before next stitch marker, YO, K1, slip marker, k1, slip marker, YO, K9, P2, K6, P2, K till 1 st. before marker, YO, K1, slip marker, K1, slip marker, YO, K to end.
R14: (Buttonhole row) Purl to 2nd stitch marker, slip marker, P10, K2, P6, K2, P to last 4 stitches, K1, YO, K2tog, K1.
R15: (increase row) K to 1 stitch before marker, YO, K1, slip marker, K1, slip marker, YO, K1, k till 1 st. before next stitch marker, YO, K1, slip marker, k1, slip marker, YO, K10, P2, C6F, P2, K till 1 st. before marker, YO, K1, slip marker, K1, slip marker, YO, K to end.
R16: Purl to 2nd stitch marker, slip marker, P11, K2, P6, K2, P to last 4 stitches, K4. Break yarn - 124 stitches.
Body - Back
Place first 16 stitches on scrap yarn. Remove markers as you go. Knit across the back of the yoke (32 stitches), turn work and purl across the 32 stitches. Continue working back and forth in stockinette stitch for 5 more rows (ending on the right side of the fabric). Break yarn.
Place the next 28 stitches on scrap yarn.
Body - Front
R1: K11, P2, k6, P2, K11. Turn work.
R2: P11, K2, P6, K2, P11. Turn.
R3: K11, P2, K6, P2, K11. Turn.
R4: P11, K2, P6, K2, P11. Turn.
R5: K11, P2, C6F, P2, K11. Turn.
R6: P11, K2, P6, K2, P11. Turn.
R7: P11, K2, P6, K2, P11. Don’t break yarn. Transfer the last 16 stitches to some scrap yarn. Now all that remains on the needles is the front and back pieces of the garment.
CO 15 stitches, knit 32 stitches across the back, CO 15 stitches, knit across the front, following the cable pattern. You have now joined the piece in the round - 94 stitches.
K10, place marker.
Knit in the round, following the cable pattern (C6F every 6th round). Knit 18 rounds.
*K5, M1F* into the next stich*, repeat * until 2 stitches before first purl section of the cable pattern. K2, P2, K6, P2, K3, M1F, K5, M1F - 108 stitches.
Knit 20 rows in stockinette stitch, continuing the cable pattern.
*K6, M1F* into the next stitch, repeat * until 2 stitches before first purl section of the cable pattern. K2, continue cable pattern, K4, M1F, K6, M1F - 122 stitches
Knit 22 more rounds in stockinette, continuing with the cable pattern.
*K6, M1F into the next stitch*, repeat * until 2 stitches before first purl section of the cable pattern, K2, continue cable pattern, K5, M1F, K7, M1F - 136 stitches.
Continue knitting, following the cable pattern, until piece measures 17 inches from the bottom of the armhole. Remove marker, knit 9, place marker.
Switch to size 6 circular needles and K1, P1 rib for 10 rows. Bind off.
Sleeve without button opening:
Transfer the top stitches from the scrap yarn to two size 7 double pointed needles. Pick up and knit across the 15 underarm stitches, then pick up and knit 4 stitches. Knit across the top of the sleeve, then pick up and knit 4 stitches (51 stitches).
Purl one round. Bind off.
Sleeve with button opening:
Transfer the stitches on the scrap yarn to two size 7 double pointed needles. Starting with the back panel (the side with the buttonholes), knit across the first double pointed needle. Pick up and knit 4 stitches, then pick up the 15 underarm stitches. Pick up 4 stitches, then knit across the front panel. Turn and knit across. Bind off.
Weave in all ends with a darning needle. Sew on buttons to front panel of sleeve opening. No blocking is necessary.
-
Washing instructions:
Hand wash in cold water with mild detergent. Do not wring dry. Lay flat on a towel and air dry.
Abbreviations
- CO
- Cast on
- PM
- Place marker
- YO
- yarn over
- K2tog
- Knit 2 together
- C6F
- place 3 stitches on cable needle, hold in front, knit next 3 stitches, then knit the 3 stitches from cable needle.
- M1F
- Make 1 Front. An increase stitch. Pick up the top strand of yarn between the needles from the front, with the left needle. Knit into the back loop.
Read Next75+ Free Baby Knitting Patterns
Your Recently Viewed Projects
ulrika 9480095
Apr 29, 2018
There is an error in the pattern. On row 7 of the Body Front I think it should read K11, P2,K6,P2,K11. If you do what it says then you would be doing a wrong side row on the right side.
Report Inappropriate Comment
Are you sure you would like to report this comment? It will be flagged for our moderators to take action.
Thank you for taking the time to improve the content on our site.

