Baby's Striped Pullover

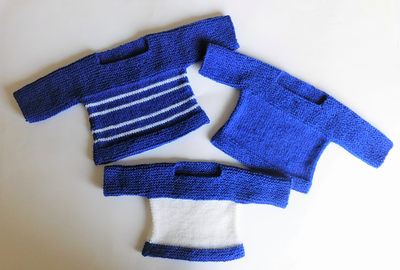
Get back to basics with Babys Striped Pullover. This bold knit pullover pattern is a perfect garment for the sporty baby on the go. This simple stockinette stitch baby sweater is a cozy option for active little ones who love rooting on their favorite team. Dress your tiniest fan in this festive knit sweater for cute game-day garb. No matter which sport is in season, your little one will be ready to root on his favorite team while wearing this darling knit pullover pattern.

Knitting Needle Size7 or 4.5 mm, 8 or 5 mm
Yarn Weight(4) Medium Weight/Worsted Weight and Aran (16-20 stitches to 4 inches)
Gauge15 stitches, 22 rows, 4 inches. stockinette stitch
Materials:
- Red Heart Team Spirit (E797 available in 5 oz (141 g) 244 yd (223 m) skeins): 2 (2,3,3) skeins 0988 Red/Grey
- Susan Bates® Knitting Needles: 5mm [US 8] and 4.5mm [US 7]
- Stitch markers, yarn needle
GAUGE: 15 sts and 22 rows = 4” (10cm) in stockinette st using larger needles.
CHECK YOUR GAUGE. Use any size needles to obtain the gauge
Directions are for size 6 months. Change for sizes 12 and 18 months are in parentheses
Finished Chest:
20 (22, 24)” [51 (56, 61) cm]
Finished Length:
10½ (12, 13½)” [27 (30, 34) cm]
ABBREVIATIONS:
k = knit; p = purl; st(s) = stitch (es); [ ] = work directions in brackets the number of times specified; * = repeat whatever follows the * as indicated
Notes: Front and Back are worked separately then joined at the shoulders. Sleeves are worked down from the top.
BACK
With smaller needles, cast on 37 (41, 45) sts.
Work in stockinette st for 1” (2.5 cm). Change to larger needles. Work even until piece measures 6 (7, 8)” [15 (18, 20) cm], allowing hem to roll about ½” [1 cm]. Place markers at each edge for sleeve placement. Work even until piece measures 10½ (12, 13½)” [27 (30, 34) cm]. Bind off.
FRONT
Work same as for back until piece measures 8½ (10, 11½)” [22 (25, 29) cm], ending after a wrong side row.
Shape Neck
Knit across 11 (13, 15) sts, join second ball of yarn and bind off center 15 sts, continue across last 11 (13, 15) sts. Working both sides of neck with separate balls of yarn at the same time, bind off 2 sts at each neck edge twice. Work even on 7 (9, 11) sts until piece measures same as back to shoulders. Bind off.
Sew left shoulder seam.
Neck
With smaller needles and right side facing, join yarn to right shoulder. Pick up and knit 23 sts across back neck, pick up and knit 8 sts along side front neck, pick up and knit 15 sts across front neck and 8 sts along side front neck—54 sts. Work in stockinette st for 1” (2.5 cm). Bind off loosely.
Sew right shoulder seam and neck edging.
Sleeves
With larger needles and right side facing, join yarn to sleeve placement marker. Pick up and knit 33 (37, 41) sts across edge to other sleeve marker. Work in stockinette st, decreasing 1 st each end of row every 4th row 5 (6, 7) times—23 (25, 27) sts. Work even in stockinette st until sleeve measures 5 (6, 7)” [13 (15, 18) cm] from top. Change to smaller needles and work in stockinette st for 1” (2.5 cm). Bind off.
Sew side and sleeve seams. Weave in ends.

Read NextSpring Day Baby Jacket
Your Recently Viewed Projects
joannehndrs 459845 1
Oct 28, 2017
Hello i have got to see left shoulder together. I can understand how to pick up and knit stitches. But to I start beginning of right shoulder how to I get as inthe pattern red over right shoulder? Do I need to incorporate two button holes?
fancywhite218 9471 185
Oct 14, 2016
Has anyone done this in the stripe pattern? Would you be willing to share where in the pattern you made the change of colors? I would appreciate any help with that.
absauls 6722424
Jun 15, 2015
HI I am having a few issues with the pattern. So far I am at the part where I am shaping the neck. I have followed the instructions to a tee. I also have the correct number of sts to do. My problem is right where it says " Working both sides of neck with separate balls of yarn at the same time, bind off 2 sts at each neck edge twice." So after I have finished binding off I have 1 loop from doing the binding off , next to the loop I have 15 sts to do yet. It seem like there should be something in between the 1 left over bind off loop and the 15 sts. Where do I go from here?????
Lisa
Sep 10, 2015
If the bind off is done correctly, there should not be a loop on the needle unless it is 1 or the 15 stitches to be left on needle. The bind offs will switch from side to side until they are completed, they can't happen on the same row or you will have the issue that you are experiencing now, a loop left over and no corresponding row to go with it. If you continue any way other than switching bind off side to side you will wind up with a big hole in your project. Hope this helps, easier to explain than to write out here.
Report Inappropriate Comment
Are you sure you would like to report this comment? It will be flagged for our moderators to take action.
Thank you for taking the time to improve the content on our site.


