Holiday Sweater Wreath
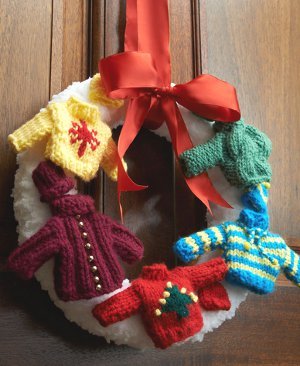
Open your heart and your home this Christmas season with the Holiday Sweater Wreath. This DIY Christmas Wreath is the perfect way to welcome family and friends as they step out of the cold and into the warmth of your abode. This darling knit wreath pattern features a simple base adorned with miniature sweater appliques. Hang this charming DIY Christmas wreath with a red, green, or gold bow for a festive finishing touch.

Knitting Needle Size6 or 4 mm, Double-Pointed Knitting Needles (DPNs)
Yarn Weight(4) Medium Weight/Worsted Weight and Aran (16-20 stitches to 4 inches)
Materials:
- RED HEART® Buttercup® (Art N396 available in 1.76 oz (50 g), 72 yd (66 m) balls): 1 ball 4270 White A
- RED HEART® With Love® (Art. E400 available in solid color 7oz (198g), 370 yd (338m) and multicolor 5oz (141g), 230 yd (211m) skeins) : 1 skein each 1907 Boysenberry B, 1909 Holly Berry C, 1621 Evergreen D, 1201 Daffodil E, 1803 Blue Hawaii F, 1620 Clover G
- Susan Bates® Knitting Needles: 4mm [US 6] double-pointed needles, set of 4
More of What You Need: - Glue (tacky glue or hot glue and glue gun)
- stitch markers
- cable needle (for Cabled Pullover)
- 12” (30.5 cm) Styrofoam® wreath
- eight 6mm gold jingle bells (for Ribbed Pullover)
- 5 yellow 7mm pompoms (for Striped Pullover & Hat)
- 3 green 7mm pompoms (for Cabled Hat)
- 2 yellow and 2 red 7mm pompoms (for Snowflake Hat)
- 1yd/1m 2” (5 cm) wide red satin ribbon
- yarn needle.
- Notes: Pompoms and jingle bells shown: 0.28” (7 mm) Pom-Poms by Darice®, and 0.24” (6 mm) multicolor Bells by Darice®
GAUGE: 18 sts = 4” (10 cm); 20 rows = 4” (10 cm), in Stockinette st (knit on right side, purl on wrong side).
CHECK YOUR GAUGE. Use any size needles to obtain the gauge.
Wreath measures 12” (30.5 cm) diameter.
Each sweater measures 3” (7.5 cm) long and 2½” (6.5 cm) wide (not including sleeves)
ABBREVIATIONS
A, B, C = Color A, Color B, Color C etc
k = knit
p = purl
st(s) = sttich(es)
[ ] = work directions in brackets the number of times specified
* = repeat whatever follows the * as indicated.
SPECIAL STITCH
4/4 RC (4 over 4 right cross) = Slip next 4 stitches to cable needle and hold in back, k4, then k4 from cable needle.
PATTERN STITCHES
1x1 Rib (over even number of sts)
Row 1 (right side): *K1, p1; repeat from * to end of row.
Row 2: Knit the knit sts and purl the purl sts to end of row.
Repeat Row 2 for 1x1 Rib.
1x1 Rib (over odd number of sts)
Row 1 (right side): K1, *p1, k1; repeat from * to end of row.
Row 2: Knit the knit sts and purl the purl sts to end of row.
Repeat Row 2 for 1x1 Rib.
1x1 Rib worked in rounds
(over even number of sts)
Round 1 (right side): *K1, p1; repeat from * around.
Repeat Round 1 for 1x1 Rib.
2x2 Rib (multiple of 4 sts)
Row 1 (right side): *K2, p2; repeat from * to end of row.
Row 2: Knit the knit sts and purl the purl sts to end of row.
Repeat Row 2 for 2x2 Rib.
2x2 Rib (multiple of 4 sts + 2)
Row 1 (right side): K2, *p2, k2; repeat from * to end of row.
Row 2: Knit the knit sts and purl the purl sts to end of row.
Repeat Row 2 for 2x2 Rib.
2x2 Rib worked in rounds (multiple of 4 sts)
Round 1 (right side): *K2, p2; repeat from * around.
Round 2: Knit the knit sts and purl the purl sts to end of round.
Repeat Round 2 for 2x2 Rib worked in rounds.
Notes
1. Styrofoam® wreath is wrapped in yarn. Sweaters and hats are worked separately and glued to the wrapped wreath.
2. Body of each pullover is worked back and forth in rows. Work with double-pointed needles as if working with straight needles, taking care that stitches do not slip off the “ends” of the needles. Use plain straight needles if preferred.
3. Body of each pullover is worked in one piece beginning at lower front edge. When piece reaches shoulders, an opening is made for neck then work continues down to lower back edge.
4. Stitches for sleeves are picked up across side edges of body and worked back and forth in rows. Side and sleeve seams are then sewn.
Notes
5. Stitches for collar on most sweaters are picked up around neck edge and worked in rounds on double-pointed needles. Collar on Striped Pullover is worked back and forth in rows.
6. Each hat is worked in rounds on double-pointed neeldes. If desired, hat can be worked back and forth in rows and then back seam sewn.
7. Color patterns for Christmas Tree Pullover and Snowflake Pullover can be worked by following written instructions or reading the chart. Read right side rows of chart from right to left and wrong sides rows from left to right.
WREATH
With A, tie a knot around the wreath where the Styrofoam® joins, to prevent a bump. Wrap the yarn around the wreath, making sure there are no gaps, creating a solid covering. Every few wraps tighten and twist the yarn on the wreath with your hand. Continue in this manner until the entire wreath is covered. Tuck the end under the wrapped yarn and glue in place.
RIBBED TURTLENECK PULLOVER & HAT

Pullover
Front
With B, cast on 16 sts.
Work in 2x2 Rib until piece measures 3” (7.5 cm) from beginning.
Shape Neck
Next Row: K2, p2, k1, bind off center 6 sts, knit to last 2 sts, p2.
Next Row: K2, p2, k1, cast on 6 sts, p1, k2, p2.
Back
Continue in 2x2 Rib until back measures same as front. Bind off.
Sleeves (work 2)
On each side edge of front place a marker
2” (5 cm) above lower edge. Repeat to place markers on side edges of back.
With right side facing and B, pick up and k10 sts evenly spaced across one side edge between the markers.
Work in 2x2 Rib until sleeve measures about 2” (5 cm).
Bind off. Repeat across other side edge for 2nd sleeve.
Fold front over back and sew side and sleeve seams. Glue 8 bells evenly spaced down center front of pullover.
Turtleneck
With right side facing and B, pick up and k16 sts evenly spaced around neck edge. Distribute sts evenly onto 3 needles (5 sts on each of 2 needles and 6 sts on 3rd needle).
Place marker for beginning of round. Prepare to work in rounds.
Work in 2x2 Rib for 1” (2.5 cm).
Bind off. Fold turtleneck over.
Hat
With B, cast on 16 sts. Distribute sts evenly onto 3 needles (5 sts on each needle of 2 needles and 6 sts on 3rd needle). Place marker for
beginning of round. Prepare to work in rounds.
Work in 2x2 Rib until piece measures 2” (5 cm) from beginning.
Cut yarn, leaving a long tail. Thread tail through remaining stitches and remove from needles. Pull on tail to close top opening.
Weave in end securely. Turn up brim.
Finishing
Weave in all ends.
CHRISTMAS TREE PULLOVER & HAT

Pullover
With C, cast on 12 sts.
Front
Work in 1x1 Rib for 2 rows.
Beginning with a right side (knit) row, work in Stockinette st (knit on right side, purl on wrong side) for 2 rows.
Begin Christmas Tree Chart

Row 1 (right side): With C, k5; with D, k2; with C, k5.
Row 2: With C, p5; with D, p2; with C, p5.
Row 3: With C, k2; with D, k8; with C, k2.
Row 4: With C, p3; with D, p6; with C, p3.
Row 5: With C, k4; with D, k4; with C, k4.
Row 6: With C, p5; with D, p2; with C, p5.
Row 7: With C, k5; with D, k2; with C, k5.
Work in Stockinette st for 4 rows.
Shape Neck
Next Row (wrong side): P4, bind off center 4 sts, purl to end of row.
Next Row: K4, cast on 4 sts, k4.
Back
Continue in Stockinette st until back measures same as front to ribbing.
Work in 1x1 Rib for 2 rows.
Bind off.
Sleeves (work 2)
On each side edge of front place a marker 1¾” (4.5 cm) above lower edge. Repeat to place markers on side edges of back.
With right side facing and C, pick up and k9 sts evenly spaced across one side edge between the markers.
Work in Stockinette st until sleeve measures about 1½” (4 cm).
Work in 1x1 Rib for 2 rows.
Bind off. Repeat across other side edge for 2nd sleeve.
Fold front over back and sew side and sleeve seams.
Crewneck
With right side facing and C, pick up and k12 sts evenly spaced around neck edge. Distribute sts evenly onto 3 needles (4 sts on each needle). Place marker for beginning of round.
Work in 1x1 Rib for ½” (1.5 cm).
Bind off.
Hat
With C, cast on 12 sts. Distribute sts evenly onto 3 needles (4 sts on each needle). Place marker for beginning of round. Prepare to work in rounds.
Work in 1x1 Rib for 2 rounds.
Work in Stockinette st for 1½” (4 cm).
Cut yarn, leaving a long tail. Thread tail through remaining stitches and remove from needles. Pull on tail to close top opening.
Weave in end securely. Turn up brim.
Finishing
Weave in ends. With E, referring to photograph for placement, embroider French Knots on tips of branches and top of Christmas tree.

STRIPED PULLOVER & HAT

Pullover
With F, cast on 12 sts.
Front
Work in 1x1 Rib for 2 rows.
With E, beginning with a right side (knit) row, work in Stockinette st (knit on right side, purl on wrong side) for 2 rows.
With F, work in Stockinette st for 2 rows.
Repeat last 4 rows twice.
With E, work in Stockinette st for 2 rows.
Shape Neck
Next Row (right side): With F, k4, bind off center 4 sts, knit to end of row.
Next Row: With F, p4, cast on 4 sts, p4.
Back
Work in Stockinette st and continue to change color every other row until back measures same as front to ribbing; end with a 2nd E-colored row.
With F, work in 1x1 Rib for 2 rows. Bind off.
Sleeves (work 2)
On each side edge of front place a marker 1¾” (4.5 cm) above lower edge. Repeat to place markers on side edges of back.
With right side facing and F, pick up and k10 sts evenly spaced across one side edge between the markers.
Work in Stockinette st, and change color every other row, until sleeve measures about 1½” (4 cm).
Work in 1x1 Rib for 2 rows.
Bind off. Repeat across other side edge for 2nd sleeve.
Fold front over back and sew side and sleeve seams.
Crewneck
With right side facing and F, beginning and ending at center front of neck, pick up and k12 sts evenly spaced around neck edge.
Work back and forth in rows.
Work in 1x1 Rib for ½” (1.5 cm).
Bind off.
Tie
Cut 2 strands of F and 1 strand of E, each about 12” (30.5 cm) long. Hold all 3 strands together and tie an overhand knot at one end.
Braid the strands for about 4” (10 cm) and tie another overhand knot to secure. Trim ends.
Glue one yellow pompom to each end of braid, and tie piece loosely around neck of pullover.
Hat
With F, cast on 12 sts. Distribute sts evenly onto 3 needles (4 sts on each needle). Place marker for beginning of round. Prepare to work in rounds.
Work in 1x1 Rib for 2 rounds.
With E, work in Stockinette st for 2 rounds.
With F, work in Stockinette st for 2 rounds.
Repeat last 4 rounds once more.
Cut yarn, leaving a long tail. Thread tail through remaining stitches and remove from needles. Pull on tail to close top opening.
Weave in end securely. Turn up brim. Glue 3 yellow pompoms to top of hat.
Finishing
Weave in ends.
CABLED PULLOVER & HAT

With G, cast on 14 sts.
Front
Begin Cable Pattern
Row 1 (right side): P3, k8, p3.
Row 2: K3, p8, k3.
Row 3: P3, 4/4 RC, p3.
Row 4: K3, p8, k3.
Rows 5–8: Repeat Rows 1 and 2 twice.
Repeat Rows 1–8 once more.
Shape Neck
Next Row (right side): P3, k1, bind off center 6 sts, purl to end of row.
Next Row: K3, p1, cast on 6 sts, p1, k3.
Back
Work Cable Pattern Rows 1–8 twice.
Bind off.
Collar
With right side facing and G, pick up and k12 sts evenly spaced around neck edge. Distribute sts evenly onto 3 needles (4 sts on each needle). Place marker for beginning of round.
Next Round: Purl.
Repeat last round for 1” (2.5 cm).
Bind off.
Sleeves (work 2)
On each side edge of front place a marker 1¾” (4.5 cm) above lower edge. Repeat to place markers on side edges of back.
With wrong side facing and G, pick up and p12 sts evenly spaced across one side edge between the markers.
Work in Reverse Stockinette st (purl on right side, knit on wrong side) until sleeve measures about 2” (5 cm).
Bind off. Repeat across other side edge for 2nd sleeve.
Fold front over back and sew side and sleeve seams.
Hat
With G, cast on 12 sts.
Next Round: Purl.
Repeat last round until piece measures about 2” (5 cm) from beginning.
Cut yarn, leaving a long tail. Thread tail through remaining stitches and remove from needles. Pull on tail to close top opening.
Weave in end securely. Glue 3 green pompoms to top of hat.
Finishing
Weave in ends.
SNOWFLAKE PULLOVER & HAT

With E, cast on 13 sts.
Work in 1x1 Rib for 2 rows.
Beginning with a right side row (knit), work in
Stockinette st for 2 rows.
Begin Snowflake Chart

Row 1 (right side): With E, k6; with C, k1; with E, k6.
Row 2: With E, p6; with C, p1; with E, p6.
Row 3: With E, k4; with C, k1; [with E, k1; with C, k1] twice; with E, k4.
Row 4: With E, p5; with C, p3; with E, p5.
Row 5: With E, k3; with C, k7; with E, k3.
Row 6: With E, p5; with C, p3; with E, p5.
Row 7: With E, k4; with C, k1; [with E, k1; with C, k1] twice; with E, k4.
Row 8: With E, p6; with C, p1; with E, p6.
Row 9: With E, k6; with C, k1; with E, k6.
Work in Stockinette st for 2 rows.
Shape Neck
Next Row (wrong side): P4, bind off center 5 sts, purl to end of row.
Next Row: K4, cast on 5 sts, k4.
Back
Continue in Stockinette st until back measures same as front to ribbing.
Work in 1x1 Rib for 2 rows.
Bind off.
Sleeves (work 2)
On each side edge of front place a marker 1¾” (4.5 cm) above lower edge. Repeat to place markers on side edges of back.
With right side facing and E, pick up and k10 sts evenly spaced across one side edge between the markers.
Work in Stockinette st until sleeve measures about 1½” (4 cm).
Work in 1x1 Rib for 2 rows.
Bind off. Repeat across other side edge for 2nd sleeve.
Fold front over back and sew side and sleeve seams.
Crewneck
With right side facing and E, pick up and k14 sts evenly spaced around neck edge.
Distribute sts evenly onto 3 needles (5 sts on each of 2 needles and 4 sts on 3rd needle).
Place marker for beginning of round.
Work in 1x1 Rib for 1” (2.5 cm).
Bind off.
Hat
With E, cast on 12 sts. Distribute sts evenly onto 3 needles (4 sts on each needle). Place marker for beginning of round. Prepare to work in rounds.
Work in 1x1 Rib for 2 rounds.
Work in Stockinette st for 1½” (4 cm). Cut yarn, leaving a long tail. Thread tail through remaining stitches and remove from needles. Pull on tail to close top opening.
Weave in end securely. Turn up brim. Glue 2 red and 2 yellow pompoms to top of hat.
Finishing
Weave in ends.
FINISHING
Arrange sweaters and hats around front of wreath as desired and glue or pin in place. Cut 2 lengths of red satin ribbon, one for hanging loop and one for bow. Glue center of one length to center top of wreath, placing the ribbon horizontally and leaving ends free. Insert 2nd length through center of wreath and tie ends together for hanger. Tie ends of first length into a bow over the top of the hanger length. Weave in ends.
Read NextKnitted Pickle Ornament
Your Recently Viewed Projects
mulberrygalprinces s
Apr 14, 2018
This is so cute. I have never seen a wreath like this before. My grand kids will love it. And if I copy their sweaters and put them on it, they will reLly be excited. I can have all kinds of gun with this. Thank you so much for for sharing this.
The Designing Peng uin
Jan 24, 2017
A design with a triple purpose - the sweaters use up left-over yarn to decorate the wreath and can be used as tree ornaments. What is not to like?
Report Inappropriate Comment
Are you sure you would like to report this comment? It will be flagged for our moderators to take action.
Thank you for taking the time to improve the content on our site.

