Super Sweet Santa Baby Sweater

The Super Sweet Santa Baby Sweater is simply irresistible. Your little elf will look so cute in this red and white knit holiday sweater. This knitted sweater will also keep your baby warm during the holiday season. Christmas is such a special time of the year, so why not make a truly unique handmade knit sweater? This free pattern is quick and easy. You will have an adorable piece of clothing in no time. Plus, when you go visit Santa this year, your little one will perfectly match Jolly St. Nick. Great photo opportunities are in your future! The Super Sweet Santa Baby Sweater will most definitely be a hit among your friends and family members for years to come.

Knitting Needle Size10 or 6 mm, 8 or 5 mm
Yarn Weight(4) Medium Weight/Worsted Weight and Aran (16-20 stitches to 4 inches)
Gauge16 sts = 4” (10 cm); 20 rows = 4” (10 cm) in Stockinette stitch using smaller needle. CHECK YOUR GAUGE. Use any size needle to obtain the tension/gauge.
Finished SizeDirections are for size 3 months; changes for sizes 6, 12, 18 and 24 months are in parentheses. Finished Chest: 18 (20, 22, 24, 26)” [45.5 (51, 56, 61, 66) cm]; Finished Length: 9 (10½, 12, 13½, 15)” [23 (26.5, 30.5, 34, 38) cm]
Materials List
- RED HEART® Soft®: 1 (2, 2, 2, 3) balls 9925 Really Red (A)
- RED HEART® Buttercup®: 1 (2, 2, 2, 2) balls 4270 White (B)
- Susan Bates® Knitting Needles: 5.0mm [US-8] and 6mm [US-10]
- Spare needle for 3-needle bind-off 4 (4, 5, 6, 6) 19mm [¾”] buttons, yarn needle, pompom maker
Baby Sweater
Special Abbreviations
M1 = Make 1 (Inc)—Lift strand between needles to left-hand needle and work strand through the back loop, twisting it to prevent a hole, [knit or purl as indicated by pattern st].
3-Needle Bind-off (seaming 2 pieces together as you bind off)—Place stitches of pieces to be joined on separate needles or each end of a circular needle, hold one behind the other with right sides facing each other in left hand; with a third needle the same size, k2tog (1 from one needle and 1 from the other) - 1 st on right-hand needle, *ktog, in same manner, bind off; repeat from *.
dec = On right side rows, work ssk at beginning and k2tog at end of rows. On wrong side rows, work p2tog at beginning and ssp at end of rows.
Note: Sweater is worked flat in one piece to the underarm, then divided for fronts and back upper body.
Lower Body
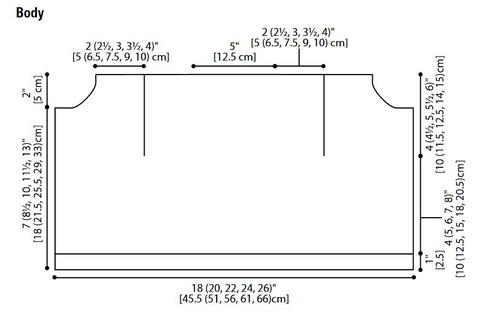
With larger needles and B, cast on 54 (60, 66, 72, 78) sts. Knit 6 rows, cut B. Continue with smaller needles and A.
Increase row (Right Side): *K1, m1, k2; repeat from * to end—72 (80, 88, 96, 104) sts. Work even in St st until piece measures 5 (6, 7, 8, 9)” [12.5 (15, 18, 20.5, 23) cm], end on wrong side row.
Divide for Front and Back
K18 (20, 22, 24, 26), place sts on holder for right front. Place last 18 (20, 22, 24, 26) sts on holder for left front.
Back
Continue on center 36 (40, 44, 48, 52) sts in St st for 4 (4½, 5, 5½, 6)” [10 (11.5, 12.5, 14, 15) cm], end with a wrong side row.
Next row (Right Side): K8 (10, 12, 14, 16) shoulder sts, place on holder; bind off 20 sts for back neck; k8 (10, 12, 14, 16) shoulder sts, place on holder.
Fronts
-
Left Front
Place sts for left front on needle; join A. Beginning with a right side row, work in St st for 2 (2½, 3, 3½, 4)” [5 (6.5, 7.5, 9, 10) cm], end on a right side row.
Next row (Wrong Side): Bind off 5 st, work to end of row.
Dec 1 st at neck edge every right side row 5 times—8 (10, 12, 14, 16) sts. Work even until front measures same as back to shoulder. Place sts on holder. -
Right Front
Place sts for right front on needle; join A. Beginning with a right side row, work in St st for 2 (2½, 3, 3½, 4)” [5 (6.5, 7.5, 9, 10) cm], end with a wrong side row.
Next row (Right Side): Bind off 5 sts, work to end of row. Dec 1 st at neck edge every right side row 5 times—8 (10, 12, 14, 16) sts. Work even until front measures same as back to shoulder.
Place sts on holder.
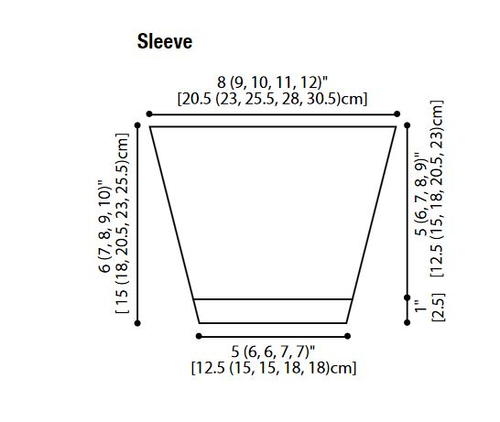
Sleeves
With larger needles and B, cast on 15 (18, 18, 21, 21) sts. Knit 6 rows, cut B. Continue with smaller needles and A.
Increase row (Right Side): *K1, m1, k2; repeat from * to end—20 (24, 24, 28, 28) sts.
Continuing in St st, inc 1 st each side every 4 rows 6 (6, 8, 8, 10) times—32 (36, 40, 44, 48) sts. Work even until sleeve measures 6 (7, 8, 9, 10)” [15 (18, 20.5, 23, 25.5) cm]. Bind off. Repeat for other sleeve.
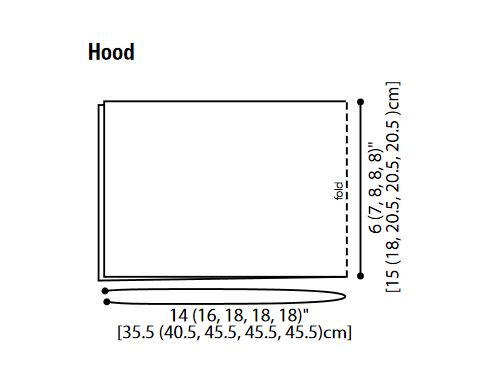
Hood
With smaller needles and A, cast on 56 (64, 72, 72, 72) sts. Work in St st until hood measures 6 (7, 8, 8, 8)” [15 (18, 20.5, 20.5, 20.5) cm]. Slip half the sts to spare needle; fold hood in half with right sides together. Join 3-needle bind-off.
Finishing
Block pieces. Place front and back sts of left shoulder on separate smaller needles; hold with right sides together, join with 3-needle bind-off. Repeat for right shoulder.
Sew sleeve seam; sew sleeve into armhole. Pin center hood seam to center of back neck; pin front edge of hood to front edge of sweater. Pin hood edge to neckline, folding a pleat with extra hood fabric between center back neck and shoulder seams on each side. Sew hood in place.
-
Front Band
With larger needles, B, and beginning at bottom of right front, pick up and knit 21 (24, 30, 36, 38) sts along right front, 42 (48, 54, 54, 54) sts around hood, 21 (24, 30, 36, 38) sts along left front—84 (96, 114, 126, 130) sts. Knit 1 row. -
Buttonhole row (Right Side): K2 (2, 2, 2, 3), [k2tog, yo, k3 (4, 4, 4, 4) sts] 3 (3, 4, 5, 5) times, k2tog, yo, k2 (2, 2, 2, 3); knit to end of row. Knit 3 rows. Bind off.
Sew buttons on left front opposite buttonholes. Weave in ends.
With B, make 3” (7.5 cm) pompom; sew to point of hood. -
Abbreviations
- A, B
- Color A and B
- k
- knit
- p
- purl
- st(s)
- stitch(es)
- St st
- Stockinette stitch
- inc
- increase 1 st
- mm
- millimeters
- [ ]
- work directions in brackets the number of times specified
- *
- repeat whatever follows the * as indicated
Read NextMinutia
Your Recently Viewed Projects
Thanks for your comment. Don't forget to share!
lcarr
Jun 28, 2017
This is such an adorable sweater. It would be cute for any time, not just Christmas. I would love to see a picture from the side so we can see what the back of the hood is like too. I dont have any little ones to knit for, but this pattern is so cute that I want to knit it anyway.
The Designing Peng uin
Jan 24, 2017
This has to be one of the cutest sweaters ever... now to find the little one for whom to knit it...
Report Inappropriate Comment
Are you sure you would like to report this comment? It will be flagged for our moderators to take action.
Thank you for taking the time to improve the content on our site.