Lilypad Dishcloth Pattern
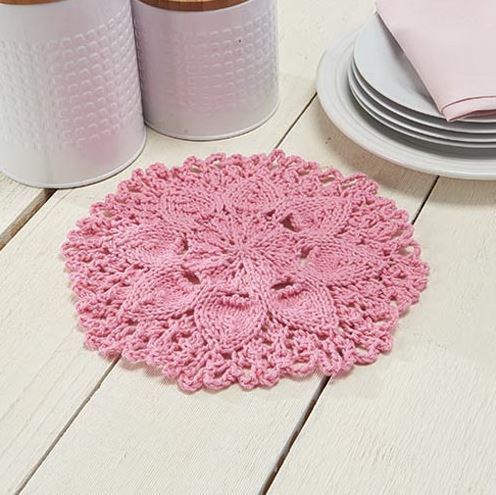
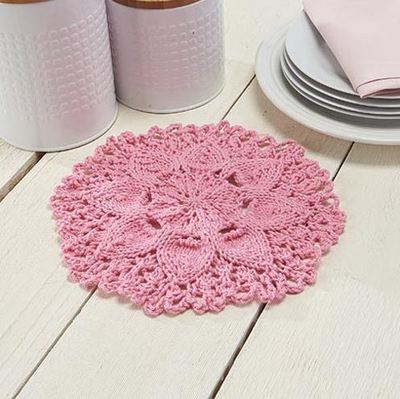
Bring some spring to your kitchen with this Lilypad Dishcloth Pattern. If your skill level is beyond that of simple square dishcloths and you want something more intricate and lovely, this is the dishcloth pattern for you. The layered, lacy floral pattern is to die for, and adds a clean and feminine touch to any kitchen. Though the pink color is delicate and gorgeous, it would look just as great in a regal purple, or a calm, serene blue. Try knitting a few of these and hanging them by your sink for a field-of-flowers effect.

Knitting Needle Size7 or 4.5 mm, Circular Knitting Needles, Double-Pointed Knitting Needles (DPNs)
Yarn Weight(4) Medium Weight/Worsted Weight and Aran (16-20 stitches to 4 inches)
Gauge1 stitches, 2 rows, 3 inches. stockinette stitch
Materials:
- Willow Yarns™ Sudsy (85% cotton/15% polyester;100g/175yd) 732189-0008 Pink Lemonade - (1 ball)
- US size 7 (4.5mm) dpn or size needed to obtain gauge
- US size 7 (4.5mm) 16" circular needle or size needed to obtain gauge
- Yarn needle
- US size G-6 (4mm) crochet hook
Measurements: 11" (28cm)
Abbreviations:
BO: bind off
ch: chain
dpn: double pointed needles
k: knit
pm: place marker
rep: repeat/repeats
rnd/rnds: round/rounds
sc: single crochet
sc3tog: single crochet 3 stitches together
sk2p: slip 1, knit 2 together, pass slip stitch over the knit 2 together— 2 stitches decreased
sl: slip
sl st: slip stitch
St st: Stockinette stitch
st/sts: stitch/stitches
yo/yos: yarn over/yarn overs
Gauge: 16 sts x 20 rows = 4" (10.2cm) in St st. Save time, check your gauge.
Note: This dishcloth starts on dpn, switch to circular needle when sts no longer fit easily on dpn.
Instructions
Make a sl knot on a dpn. (K1, yo) 4 times into sl knot. Pm and join to work in the rnd.
Rnds 1-2: K.
Rnd 3: *Yo, k1; rep from * around - 16 sts.
Rnd 4 and All Even Rnds: K.
Rnd 5: *Yo, k1; rep from * around - 32 sts.
Rnd 7: *Yo, k2; rep from * around - 48 sts.
Rnds 8-10: K.
Rnd 11: *Sk2p, (yo) 3 times, sk2p; rep from * around.
Rnd 12: *K1, (k1, yo, k1, yo, k1, yo, k1) into yos, k1; rep from * around - 72 sts.
Rnds 13-16: K.
Rnd 17: *Yo, k9; rep from * around - 80 sts.
Rnd 19: *Yo, k1, yo, k3, sk2p, k3; rep from * around - 80 sts.
Rnd 21: *Yo, k3, yo, k2, sk2p, k2; rep from * around - 80 sts.
Rnd 23: *Yo, k1, yo, sk2p, yo, k1, yo, k1, sk2p, k1; rep from * around - 80 sts.
Rnd 25: *Yo, k3, yo, k1, yo, k3, yo, sk2p; rep from * around - 96 sts.
Rnd 27: *Yo, k1, yo, sk2p, yo, k3, yo, sk2p, yo, k1, yo, k1; rep from * around - 112 sts.
Rnd 28: K.
Crochet BO:
Working off of needles with crochet hook, sl 1 st to right needle, *sc in next st, ch 5, (sc3tog next 3 sts, ch 5) 3 times, sc in next st, ch 5, sc3tog over next 3 sts, ch 5; rep from * around, sl st in first sc to join. Fasten off.
Finishing
Weave in ends.
Read NextUnbelievably Easy Knit Dishcloth
Your Recently Viewed Projects
paver2
Dec 10, 2017
That is gorgeous! I don't think I could bring myself to wash dishes or anything else with it because it's so pretty. I don't know if I could do he crochet part, but maybe if I tried really hard. It looks simple, but I am not much of a crocheter. I think I would use it for a dresser scarf.
Susan S
May 07, 2017
Gorgeous pattern, perfect for a hostess or bridal shower gift. Good thing I'm taking a crochet class because I wouldn't be able to do the bind off. This one's going on my list to try once I finish the class.
The Designing Peng uin
Jun 26, 2016
looks complicated therefore a challenge to many of us, but when it is finished, success indeed. But too pretty to use in the sink
jhintz 3299362
Dec 24, 2015
For those also doing crochet, this is very similar to the Puritan bedspread pattern. You'd probably want to change the center. End format is a square rather than round.
lindakeeth 9722222
Jul 01, 2015
Has anyone else found that on row 11 you had to do 4 yarn overs NOT 3 in order to get the row to come out correctly???
jgellner
Feb 16, 2018
You are right lindakeeth!! I just rippped twice thinking it was me but it is not the pattern is wrong. You need to do 4 yarn overs in Row 11 to make Row 12 work and end up with 72 stitches at the end.
Report Inappropriate Comment
Are you sure you would like to report this comment? It will be flagged for our moderators to take action.
Thank you for taking the time to improve the content on our site.

