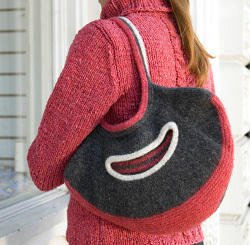
Adventure Ready Felted Backpack
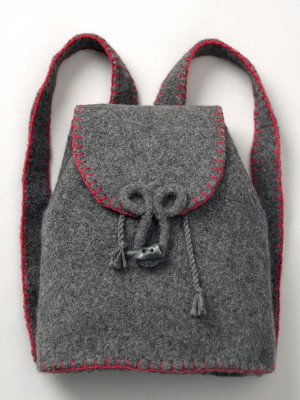
Whether youre going on a trip or your child is headed off to school, the Adventure Ready Felted Backpack wont let you down. The process of felting will ensure that this bag is durable and ready for anything. Felting is also a very forgiving process for knitters trying out new skills. When the yarn is felted together, most mistakes in the knitting tend to disappear during the felting process. The natural water-resistant qualities of wool also add a nice level of practicality to this knit bag.

Knitting Needle Size7 or 4.5 mm, Circular Knitting Needles, Double-Pointed Knitting Needles (DPNs)
Yarn Weight(4) Medium Weight/Worsted Weight and Aran (16-20 stitches to 4 inches)
Gauge20 stitches, 26 rows, 4 inches. stockinette stitch
MATERIALS
- Patons® Classic Wool (100 g / 3.5 oz)
- Main Color (MC) (225 Dk Grey Mix) 5 balls
- Contrast A (207 Rich Red) 1 ball
- Size 4.5 mm (U.S. 7) knitting needles.
- Size 4.5 mm (U.S. 7) circular knitting needle 16 ins [40 cm] long.
- Pair of size 4.5 mm (U.S. 7) double pointed knitting needles or size
- needed to obtain tension.
- 1 toggle.
- Small hole punch tool.
INSTRUCTIONS
Main Section
With circular needle and MC, cast on 156 sts. Join in rnd, placing a marker on first st.
Knit until work from beg measures 15 ins [38 cm]. Cast off.
Base and Flap (make alike)
With MC, cast on 40 sts.
Proceed in stocking st until work from beg measures 17½ ins [44.5 cm] ending with RS facing for next row. Cast off.
Straps (make 2)
With MC, cast on 11 sts.
1st row: (RS). *K1. P1. Rep from * to last st. K1.
Rep last row for seed st pat until Strap measures 27 ins [68.5 cm]. Cast off.
Toggle Loop
With pair of double pointed needles and MC, cast on 4 sts.
1st row: K4. *Do not turn. Slide back to beg of needle. K4.
Rep from * until work from beg measures 15 ins [38 cm]. Cast off.
FINISHING
Felt all pieces (see “How to Felt Instructions”).
Felted piece for Straps should measure approx 1½ ins [4.5 cm] wide and 23 ins [58.5 cm] long. Felted piece for Main Section should be approx 25 ins [63.5 cm] around and 11¼ ins [28.5 cm] high. Felted piece for Base or Flap should measure approx 6¾ ins [17 cm] wide and 13 ins [33 cm] long.
Cut Base to an oval shape 10 ins [23 cm] wide by 5 ins [12.5 cm] high. Pin to bottom of Main Section. With A, blanket st Base to Main Section. Make 8 small holes with hole punch tool round top edge of Bag for drawstring 1¼ ins [3 cm] down from top edge, spaced approx 3¼ ins [8.5 cm] apart.
Cut Flap shape 9 ins [23 cm] long by 7½ ins [19 cm] wide, having oval shape at front and straight edge at back. With A, blanket st around Flap. Sew Flap to back of Main Section under row of drawstring holes.
Trim Straps to measure 24 ins [61 cm] long. With A, blanket st sides of Straps. Mark center st at top and base of Main Section (center back). Sew ends of Straps on either side of marked st at top of Main Section, under row of drawstring holes. Sew other ends of Straps 4 ins [10 cm] either side of marked st at base.
Trim toggle loop to measure 11 ins [28 cm] long. Sew toggle loop to Flap as illustrated. Sew toggle to correspond to loop.
Twisted Cord: Cut 4 strands of MC 95 ins [235 cm] long. With all strands tog hold one end and with someone holding other end, twist strands to the right until they begin to curl. Fold the 2 ends tog and tie in a knot so they will not unravel. The strands will now twist themselves tog. Adjust length if desired. Weave through drawstring holes of Bag having cords meet at center front.
Important to know before felting:
- It is important to record all the measurements and changes before and after felting. You will be able to either adjust or repeat the method to produce reliable and consistent
- results.
- Always test a sample. Different colored yarns may felt differently. Some colors have to undergo the felting more than once in order to achieve the desired result.
- As yarn will be going into very hot water, color-fastness can be affected. Again, testing a sample will give you an indication of how the color will be affected in very hot water.
- Any knitting that has been properly felted will have a distinct texture. The knitted or crocheted piece becomes very dense and matted. This will be one of the key criteria for determining that felting has occurred.
HOW TO FELT INSTRUCTIONS
FELTING
- Put pieces in top-loading washing machine. Put in a pair of jeans or large towel (in non-interfering color) for extra agitation. Using low water level, run a Hot/Cold cycle for 15 min.
- Add 2 tablespoons of baking soda for a small load. After one cycle, check for size. Repeat as necessary.
- Run through the rinse and dry spin cycle.
- Lay felted piece on a dry towel, away from direct heat or sunlight.
- Shape piece to correct measurements.
- Allow to dry thoroughly. Do not use a clothes dryer.
- If an edge ripples, baste a thread through the edge and gather in. Remove the thread after felted item is dry.
- When piece is dry, use tailor's chalk to mark cutting (trimming) lines.
AFTERCARE
- You have spent a lot of time and care completing these items through their knitting/crocheting and felting stages. A little thought to aftercare will ensure that you will have these beautiful felted items for many years to come.
- After you have subjected your item to the felting process, you may think that it has gone through the most vigorous and tortured wash that yarn could ever endure. Now you assume that you can throw that felted item into the hot wash cycle along with your sheets. Do not do it! Treat your newly felted item with caution and care in order to avoid
- further shrinkage or distortion.
- Felted handmade items can always be improved with brushing.
- Even a slight pressing will give a smoother appearance to felted fabric. Always press lightly using a steam iron and a damp cloth. Never press down on the fabric but hold the iron just above the fabric.
Read NextReady to Go Knitted Tote

