Polka Dot Hat and Mittens
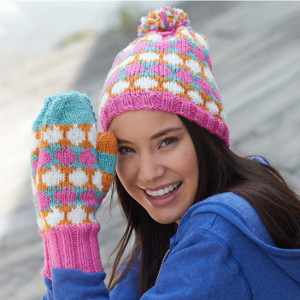
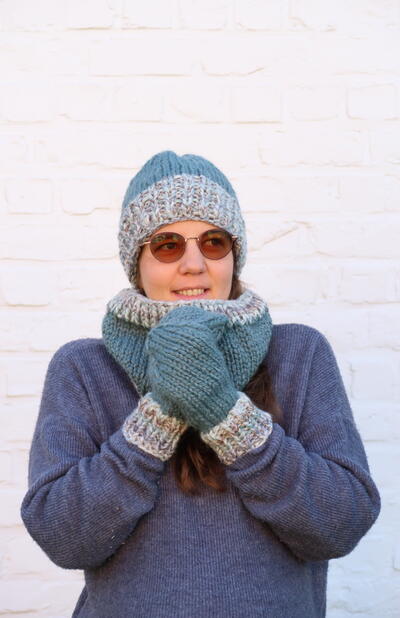
Don't be caught out in the cold without your very own Polka Dot Hat and Mittens. Learn how to knit a hat that's absolutely adorable, complete with a yarn pom pom on top. Keep yourself both warm and incredibly stylish during the chillier weather to come. That's not all, though. With this knit hat pattern, you also get one for knit mittens. After all, you cant have a hat without mittens. Both of these free knitting patterns come with instructions to create the Polka Dot Hat and Mittens combo for everyone.

Knitting Needle Size5 or 3.75 mm, 6 or 4 mm, 8 or 5 mm, Double-Pointed Knitting Needles (DPNs)
Yarn Weight(4) Medium Weight/Worsted Weight and Aran (16-20 stitches to 4 inches)
Gauge1 stitches, 2 rows, 3 inches. stockinette stitch
Materials:
- Bernat® Satin™ (3.5 oz/100 g; 200 yds/182 m) Contrast A Sage (04232) - 1 ball; Contrast B Maitai (04732) - 1 ball; Contrast C Goldenrod (04609) - 1 ball; Contrast D Silk (04007) - 1 ball
- Mittens: Set of four sizes U.S. 5 (3.75 mm) and U.S. 6 (4 mm) double-pointed knitting needles or size needed to obtain gauge
- Hat: Set of four sizes U.S. 6 (4 mm) and U.S. 8 (5 mm) double-pointed knitting needles or size needed to obtain gauge
- Stitch holder
- Stitch marker
GAUGE:
Mittens: 20 sts and 26 rows = 4” [10 cm] with larger needles in stocking st.
Hat: 18 sts and 24 rows = 4” [10 cm] with larger needles in stocking st.
Measurements: To fit 4/6 yrs ( 8/10 yrs - Lady - Man).
Abbreviations:
Approx = Approximately
Beg = Beginning
Cont = Continue(ity)
Inc = Increase(ing)
K = Knit
K2tog = Knit next 2 stitches together
Kfb = Increase 1 stitch by knitting into front and back of next stitch
P = Purl
Pat = Pattern
PM = Place marker
Rem = Remain(ing)
Rep = Repeat
Rnd(s) = Round(s)
RS = Right side
Slm = Slip marker
Ssk = Slip next 2 stitches knitwise one at a time. Pass them back onto left-hand needle, then knit through back loops together
St(s) = Stitch(es)
To g = Together
WS = Wrong side
Instructions:
Note: The instructions are written for smallest size. If changes are necessary for larger sizes the instructions will be written thus ( ). Numbers for each size are shown in the same color throughout the pattern. When only one number is given in black, it applies to all sizes.
RIGHT MITTEN
Note: When working from chart, carry color not in use loosely across WS of work, but never over more than 5 sts. When it must pass over more than 5 sts, weave it over and under color in use on next st or at center point of sts it passes over. The colors are never twisted around one another.
**With B and set of 4 smaller needles, cast on 24 (28 - 36 - 40) sts.
Divide sts onto 3 needles: 8 (8 - 12 - 12), 8 (8 - 12 - 12), 8 (12 - 12 - 16).
Join in rnd, placing a marker on first st.
1st rnd: *K2. P2. Rep from * around. Rep last rnd of (K2. P2) ribbing for 2 (2½ - 3 - 3½)" [5 (6 - 7.5 - 9) cm].
Change to larger set of needles.
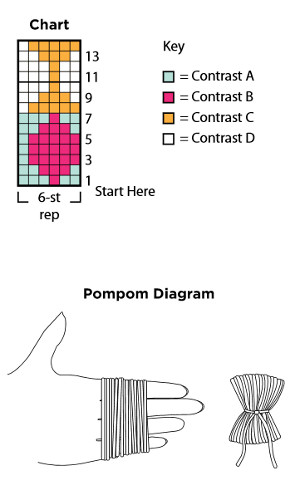
Next rnd: With C, knit, inc 0 (2 - 0 - 2) sts evenly around. 24 (30 - 36 - 42) sts. Work Chart to end of chart, reading rnds from right to left until 7th (9th - 11th - 13th) row of chart is complete, noting 6-st rep will be worked 4 (5 - 6 - 7) times.**
Chart is shown below.
Shape thumb gusset: 1st rnd: Work Chart across first 13 (16 - 19 - 22) sts. PM. With background color (A or C), kfb in each of next 2 sts. PM. Work Chart to end of rnd.
2nd rnd: Work Chart to first marker. Slm. With background color, K4. Slm. Work Chart to end of rnd.
3rd rnd: Work Chart to first marker. Slm. Kfb. With background color, K2. Kfb. Slm. Work Chart to end of rnd.
4th rnd: Work Chart to end of rnd, knitting sts between markers with appropriate background color. Keeping cont of Chart, rep last 2 rnds, until there are 8 (10 - 12 - 14) sts between markers.
***Next rnd: Work Chart to first marker. Slip next 8 (10 - 12 - 14) sts onto a st holder (thumb sts), removing all markers. Cast on 2 sts. Work Chart to end of rnd. 24 (30 - 36 - 42) sts rem.
Cont working chart until work above ribbing measures approx 4½ (5½ - 6 - 7)" [11 (14 - 15 - 18) cm], ending on a 7th or 14th row of Chart.
Lady and Man sizes only: With A, knit 4 rnds.
All sizes: Rearrange sts as follows: 12 (15 - 18 - 21) sts on 1st needle. 6 (7 - 9 - 10) sts on 2nd needle. 6 (8 - 9 - 11) sts on 3rd needle.
Shape top: With A, 1st rnd: 1st needle: K1. ssk. Knit to last 3 sts. K2tog. K1.
2nd needle: K1. ssk. Knit to end of needle.
3rd needle: Knit to last 3 sts. K2tog. K1.
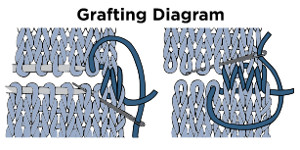
2nd rnd: Knit. Rep last 2 rnds until 16 (18 - 20 - 22) sts rem. Break yarn, leaving a long end. Graft 2 sets of 8 (9 - 10 - 11) sts tog.
Thumb: With A, knit 8 (10 - 12 - 14) sts from st holder. Pick up and knit 2 sts at base of thumb. Divide these 10 (12 - 14 - 16) sts onto 3 needles. Join in rnd, placing marker at first st.
Knit 6 rnds. Break A.
With C, knit in rnds until work from pick up rnd measures 1 (1½ - 2¼ - 2½)" [2.5 (4 - 5.5 - 6) cm].
Next rnd: *K2tog. Rep from * around. 5 (6 - 7 - 8) sts. Break yarn, leaving a long end. Thread end through rem sts.
Draw up tightly and fasten securely.***
LEFT MITTEN
Work from ** to ** as given for Right Mitten.
Shape thumb gusset: 1st rnd: Work Chart across first 11 (14 - 17 - 20) sts. Pm. With background color (A or C), inc 1 st in each of next 2 sts. Pm. Work Chart to end of rnd.
2nd rnd: Work Chart to first marker. Slm. With MC, K4. Slm. Work Chart to end of rnd.
3rd rnd: Work Chart to first marker. Slm. Kfb. With background color (A or C), K2. Kfb. Slm. Work Chart to end of rnd.
4th rnd: Work Chart to end of rnd, knitting sts between markers with background color (A or C).
Keeping cont of Chart, rep last 2 rnds until there are 8 (10 - 12 - 14) sts between markers.
Work from *** to *** as given for Right Mitten.
HAT
With B and set of four smaller double-pointed needles, cast on 76 (84 - 88 - 96) sts.
Divide sts on 3 needles: 24 (28 - 28 - 32), 24 (28 - 28 - 32), 28 (28 - 32 - 32). Join in rnd, placing marker on first st.
1st rnd: *K2. P2. Rep from * around. Rep last rnd of (K2. P2) ribbing 5 times more.
Change to larger set of needles.
Next rnd: With B, knit, inc 2 (0 - 2 - 0) sts evenly around. 78 (84 - 90 - 96) sts.
Work Chart, reading rnds from right to left, until work from beg measures approx 5 (6 - 7 - 7) ” [12.5 (15 - 18 - 18) cm], noting 6-st rep will be worked 13 (14 - 15 - 16) times, ending on a 7th or 14th rnd.
Man size only: With B, knit 4 rnds.
All sizes: Shape top: 1st rnd: With B, *K 11 (12 - 13 - 14). K2tog. Rep from * around. 72 (78 - 84 - 90) sts.
2nd rnd: *K 10 (11 - 12 - 13). K2tog. Rep from * around. 66 (72 - 78 - 84) sts.
3rd rnd: *K 9 (10 - 11 - 12). K2tog. Rep from * around. 60 (66 - 72 - 78) sts.
4th rnd: *K 8 (9 - 10 - 11). K2tog. Rep from * around. sts. 54 (60 - 66 - 72) sts.
5th rnd: *K 7 (8 - 9 - 10). K2tog. Rep from * around. 48 (54 - 60 - 66) sts.
6th rnd: *K 6 (7 - 8 - 9). K2tog. Rep from * around. 42 (48 - 54 - 60 ) sts.
7th rnd: *K 5 (6 - 7 - 8). K2tog. Rep from * around. 36 (42 - 48 - 54) sts.
8th rnd: *K 4 (5 - 6 - 7). K2tog. Rep from * around. 30 (36 - 42 - 48) sts.
9th rnd: *K 3 (4 - 5 - 6). K2tog. Rep from * around. 24 (30 - 36 - 42) sts.
10th rnd: *K2 (3 - 4 - 5). K2tog. Rep from * around. 18 (24 - 30 - 36) sts.
11th rnd: *K 1 (2 - 3 - 4). K2tog. Rep from * around. 12 (18 - 24 - 30) sts.
Sizes 8/10 yrs, Lady and Man only: 12th rnd: *K 1 (2 - 3) K2tog. Rep from * around. 12 (18 - 24) sts.
Lady and Man sizes only: 13th rnd: *K1 (3). K2tog. Rep from * around. 12 (18) sts.
Man size only: 14th rnd: *K1. K2tog. Rep from * around. 12 sts.
All sizes: Break yarn, leaving a long end. Draw end tightly through rem sts.
Pompom:
Holding A, B, C and D tog, wind around 4 fingers approx 25 times. Remove from fingers and tie tightly in center. Cut through each side of loops. Trim to a smooth round shape. Sew pom-pom to top of Hat.
Read NextWinchester Plaid Mittens
Your Recently Viewed Projects
Hippie Chick
Nov 29, 2018
This is such a cute hat and mittens set. I originally found the link to this pattern included in a collection of mittens here on your site. I was very impressed with the way they looked and was directed to this page for the pattern. I still love this set and will be saving this pattern. I would love to include this with my Christmas gifts this year.
ChaCha Rizzo
Jan 24, 2017
Thank you for including a quick tutorial on making a pom pom without a fancy device! i love this free hat pattern, thank you.
Report Inappropriate Comment
Are you sure you would like to report this comment? It will be flagged for our moderators to take action.
Thank you for taking the time to improve the content on our site.

