Napa Rib Collar Poncho
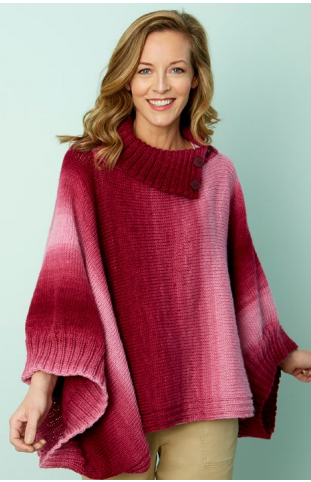
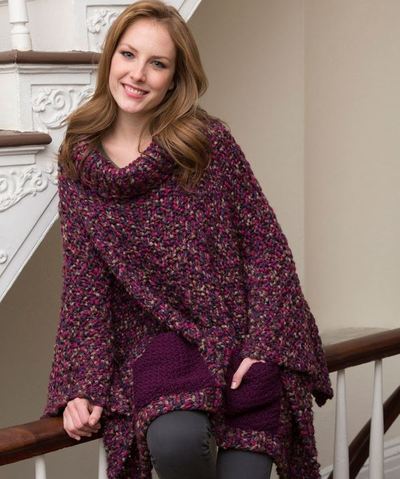
The Napa Rib Collar Poncho features shaded yarn and an easy-to-wear style that will keep you warm and looking great. This free knitting pattern is written in three sizes, so you can adjust the poncho accordingly. The beautiful ombre yarn used in this free poncho knitting pattern is so striking. The shades of pink and red mix and mingle to create a truly unique design. Plus, the ribbed collar with buttons adds a little something extra to this piece. The slouchy look of this garment ensures you will stay cozy and comfortable all day long. Give this knitted poncho a try and you will not be disappointed with the result.

Knitting Needle Size9 or 5.5 mm, Circular Knitting Needles
Yarn Weight(4) Medium Weight/Worsted Weight and Aran (16-20 stitches to 4 inches)
Gauge17 sts = 4" (10 cm); 23 rows = 4" (10 cm) in Stockinette st. CHECK YOUR GAUGE. Use any size needles to obtain the gauge.
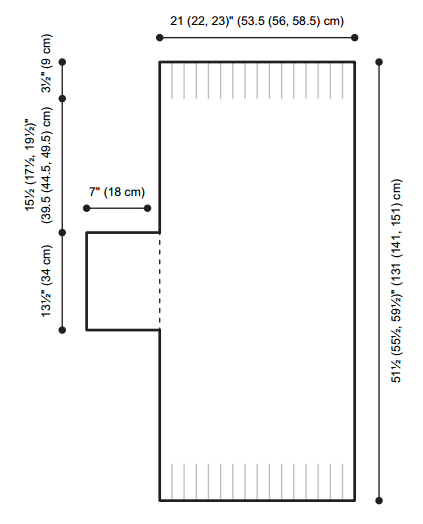
Finished SizePoncho measures 51½ (55½, 59½)" (131 (141, 151) cm) in width and 21 (22, 23)" (53.5 (56, 58.5) cm) in length.
Materials List
- RED HEART ® Super Saver Ombre™: 4 (5, 5) skeins 3965 Anemone
- Susan Bates® Circular Knitting Needles: 5.5mm [US 9] 36" (95 cm) or longer
- Susan Bates® split lock stitch markers
- Three 1" (2.5 cm) decorative buttons, large stitch holder, yarn needle
Check out this free eBook to find even more printable patterns perfect for any day of the year -"15 Free Cute Knitting Patterns for Every Season" eBook
Instructions
Directions are for size S/M; changes for sizes L/XL and 2X/3X are in parentheses.
NOTES
1. Poncho is knit from right to left (cuff to cuff), separating at center to create neck hole.
2. Collar is picked up and knit back and forth in rows on circular needle.
3. Buttons are decorative as there are no buttonholes.
2 x 2 RIB
Worked over a multiple of 4 sts + 2:
Row 1 (right side): * K2, p2; repeat from * to last 2 sts, k2.
Row 2: * P2, k2; repeat from * to last 2 sts, p2.
Repeat Rows 1 and 2 for 2 x 2 Rib.
Poncho
Cast on 178 (186, 194) sts, and work in 2 x 2 Rib for 3½" (9 cm), ending after a wrong side row.
Next 2 rows:
Row 1 (right side): Work 12 sts in established rib, knit to last 12 sts, work in established rib to end.
Row 2: Work 12 sts in established rib, purl to last 12 sts, work in established rib to end.
Repeat the last 2 rows until piece measures 19 (21, 23)" (48.5 (53.5, 58.5) cm) from beginning, ending after a wrong side row.
Split for Neck
Next row (right side): Work 89 (93, 97) sts as established for front, place remaining 89 (93, 97) sts on a holder for back.
Work as established across 89 (93, 97) front sts only for 13½" (34 cm), ending after a right side row.
Place all back sts back onto the needle, and all front sts on a holder.
With right side facing, join yarn to back sts and work as established for 13½" (34 cm), ending after a right side row.
Rejoin Neck
Place all front sts back into the needle. Work as established across all sts for 15½ (17½, 19½)" (39.5 (44.5, 49.5) cm), ending after a wrong side row.
Work in 2 x 2 Rib for 3½" (9 cm), ending after a wrong side row.
Bind off all sts in rib pattern.
Collar
With right side facing and starting at left shoulder edge of neck opening, pick up 58 sts across front neck edge, then 58 more sts across back neck edge, then cast on 6 sts – 122 sts.
Work in 2 x 2 Rib for 7" (18 cm), beginning and ending with a wrong side row.
Bind off all sts in rib pattern.
Sew 6 cast-on sts to inside front of collar.
Sew 1 button at base of collar, going through both thicknesses.
Fold front collar down, and sew remaining 2 buttons at side edge of front of collar as shown in photo. Sew front to back at bottom edges of 3½" (9 cm) ribbed cuffs.
Finishing
Weave in all loose ends.
-
Click image to enlarge
Abbreviations
- k
- knit
- p
- purl
- st(s)
- stitch(es)
- * or **
- repeat whatever follows the * or ** as indicated
Read NextFade to Grey Easy Poncho Pattern
Your Recently Viewed Projects
rainfairy63 802749 3
Jan 23, 2018
This is gorgeous - BUT - since it's been 17 months since Lisa left a question, it would be seriously nice to see it answered before I start this. ARE the sleeves done "in the round" or ARE they seamed????? How hard it that?
snovoselac 6787808
Jan 23, 2018
It looks to me as though the poncho is slipped over your head and the "sleeves" just drape over your arms, no cuffs as such. I looked at the diagram and at the picture, and that's the way it looks to me. If you had cuffs, it looks as though your arm movements would be pretty restricted.
rainfairy63 802749 3
May 18, 2018
Thank you! I was put off by the line in the pattern "cuff to cuff" and hadn't read it thoroughly. My mistake. Thank you - very helpful!
Lisa
Aug 12, 2017
I do love the look of this poncho but I'm having an issue with the pattern. I've read through it 3 times now and it seems like it is knit in the round because the pictures here and on red heart .com make the sleeves looked like they are joined, but no where in the instructions does it indicate to join anything not even with a seam.
Pam 8477643
May 10, 2018
The very last line of the pattern, admittedly in the section regarding the collar, says to seam the cuffs for 3.5.
Gracie
May 11, 2017
This looks super comfortable and warm. The ombr yarn adds interest and the collar and buttons add style and interest. It is an easy knit too. Pink is not my favorite color to wear, but I think any color would look nice in this design.
KathrynAllison
Apr 21, 2017
I love the ombre effect of the yarn used for this poncho. The colors are so cheery and the design looks very comfortable.
3cats2love
Apr 20, 2017
This is a simple yet really pretty poncho pattern. I really like the ribbing on the cuffs and bottom edges - it keeps them from curling up. The collar and buttons are really stylish touches. I'm sure this would be lovely in almost any shade of ombre yarn, or even a self striping yarn.
Report Inappropriate Comment
Are you sure you would like to report this comment? It will be flagged for our moderators to take action.
Thank you for taking the time to improve the content on our site.

