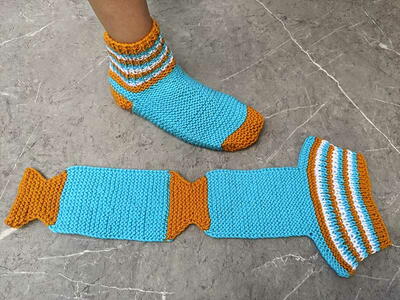
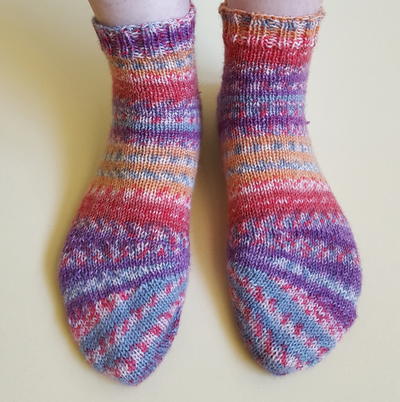
Lazy Day Knit Socks
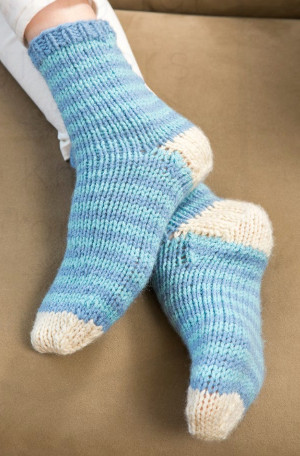
Lounging around the house is best done in a pair of hand knit socks. You won't want to take the Lazy Day Knit Socks off of your feet once you put them on. Your feet will stay nice and warm when you wear these cozy socks around the house. No matter what the weather is like outside, the bright colors of these socks will instantly put you in a good mood. Knitting up these socks gives you ultimate control over the fit and shape, meaning that you can create the socks of your dreams.

Knitting Needle Size8 or 5 mm, 9 or 5.5 mm
Yarn Weight(4) Medium Weight/Worsted Weight and Aran (16-20 stitches to 4 inches)
Materials
RED HEART® With Love®: 1 skein each 1805 Bluebell A, 1502 Iced Aqua B and 1303 Aran C
Susan Bates® Double-pointed needles: one set each 5mm [US 8] and 5.5mm [US 9]
Yarn needle
Stitch markers
GAUGE: 16 sts = 4” [10 cm]; 22 rows = 4” [10 cm] in St st with larger needles. CHECK YOUR GAUGE. Use any size needles to obtain the gauge.
Note: Directions are for sock size 7-9; changes for 9-11 and 10-12 are in parentheses
Special Stitches
SKP- Slip 1, K1, pass slip st over
K2tog-Knit 2 sts together
P2tog-Purl 2 sts together
Stripe Pattern
Rounds 1-2: A
Rounds 3-4: B
Instructions
SLIPPER SOCK (Make 2)
Cuff
With smaller size needles and A, cast on 26 (30, 34) sts. Divide sts evenly around needles.
Join to work in rounds, being careful not to twist sts. Place marker for beginning of round.
Rounds 1: *K1, p1, repeat from * around.
Repeat Round 1 until piece measures 1” [2.5 cm] from beginning.
Next Row: Change to larger size needles and work 22 (28, 34) rounds in Stripe Pattern (2 rows A, 2 rows B) ending with B (A, B).
Heel
Place 14 (16, 18) sts on needle 1 for Heel.
Leave remaining 12 (14, 16) unworked sts on needle 2 (instep).
Heel Flap
Row 1: Change to C. Slip 1 st purl-wise, purl to end of row, turn.
Row 2: *Slip 1 st knit-wise, knit 1; repeat from * across row, turn.
Repeat Rows 1-2, 6 (6, 6) times–14 (14, 14) rows.
Turn Heel
Row 1: P7 (8, 9), p2tog, p1, turn.
Row 2: Slip 1, k1 (1, 1), k2tog, k1, turn.
Row 3: Slip 1, p2 (2, 2), p2tog, p1, turn.
Row 4: Slip 1, k3 (3, 3), k2tog, k1, turn.
Row 5: Slip 1, p4 (4, 4), p2tog, p1, turn.
Row 6: Slip 1, k5 (5, 5), k2tog, k1, turn.
8 sts remain for size 7-9.
For size 9-11
Row 7: Slip 1, p6, p2tog, turn.
Row 8: Slip 1, k6, k2tog, turn.
8 sts remain for size 9-11.
For size 10-12
Row 7: Slip 1, p6, p2tog, p1, turn.
Row 8: Slip 1, k7, k2tog, k1 turn.
10 sts remain for size 10-12.
Gusset
With right side facing, pick up and knit 7 (7, 7) sts along left side of Heel Flap, place marker for First Gusset, knit across remaining 12 (14, 16) unworked sts on second needle, place
marker for Second Gusset, pick up and knit 7 (7, 7) sts along opposite side of Heel Flap, knit 4, (4, 5) sts, place marker for beginning of round– 34 (36, 40) sts.
Note: Beginning of round should now be above center of back heel.
Divide sts around needles as follows
Needle 1: 11 (11, 12) sts.
Needle 2: 12 (14, 16) sts.
Needle 3: 11 (11, 12) sts.
Work Heel Gusset decrease rounds as follows:
Round 1:
Needle 1: Knit to last 4 sts, k2tog, k2.
Needle 2: Knit all sts.
Needle 3: K2, SKP, knit to end —32 (34, 38) sts total remain on needles.
Round 2: Knit all sts. Change to B (A, B).
Rounds 3-8 (6, 6): Repeat Rounds 1-2 until 7 (8, 9) sts remain on Needles 1 and 3-26 (30, 34) sts total remain on needles.
Foot
Rounds 15-30 (36, 42): Continue working Round 2 in Stripe Pattern (2 rows A, 2 rows B).
Shape Toe
Change to C.
Round 1:
Needle 1: Knit, to last 3 sts, SKP, k1.
Needle 2: K1, k2tog, knit to last 3 sts, SKP, k1.
Needle 3: Knit to last 3 sts, SKP, k1. K1, k2tog, knit to end—22 (26, 30) sts total remain on needles.
Round 2: Knit all sts.
Repeat Rounds 1-2 until 10 (14, 14) sts remain.
FINISHING
Graft toe sts together as explained below.
Grafting
Thread yarn needle with long length of yarn.
Hold the two needles in the left hand with wrong sides together. Keeping the yarn needle and yarn under the points of the knitting needles, graft the stitches together as follows:
*1. Insert yarn needle through first st of front needle as if to knit and slip the st off.
2. Insert needle through 2nd st of front needle as if to purl, but leave the st on the needle.
3. Insert yarn through first st on back needle as if to purl and slip the st off.
4. Insert yarn through 2nd stitch on back needle as if to knit, but leave st on needle.
Repeat from * until all the sts are joined.
Take care to draw yarn up so that gauge of grafting equals gauge of knitting. Fasten off. Weave in ends on wrong side.

Read NextLazy Day Knit Socks
Your Recently Viewed Projects
Thanks for your comment. Don't forget to share!
pashakd 6978012
Nov 23, 2019
Not the best pattern. There is at least one mistake. I struggled the whole way through...will go back too my favourite toe-up sock.
jenniestp 0691991
Nov 23, 2018
are there any corrections on the Lazy Day Knit Socks pattern. thanks J stp
schiebet
Mar 03, 2017
This would be a good starter sock pattern because it uses the worsted weight yarn. I'm not an avid sock knitter because I have a difficult time keeping the beginning of each round tight. I usually end up patching a loose connection. Does anyone know of a way to make sure the round stays nice and tight?
aileendean 9793608
Sep 02, 2017
when I knit the second stitch at the start of each needle, I give a little pull on the yard to make sure the first stitch is held tight. Works for me!
niceli2021
Dec 06, 2016
just what i'm looking for...gonna make a couple pair of these for my granddaughters christmas ...they have been asking for socks..now is as good a time as any
Report Inappropriate Comment
Are you sure you would like to report this comment? It will be flagged for our moderators to take action.
Thank you for taking the time to improve the content on our site.