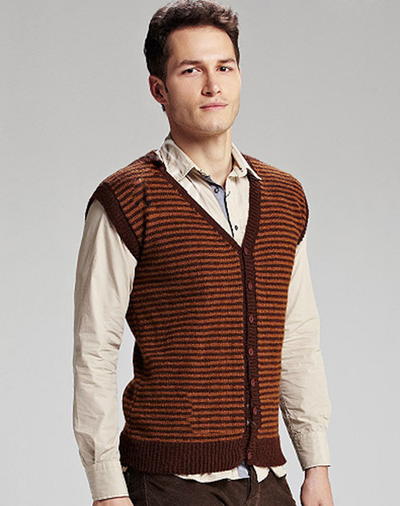
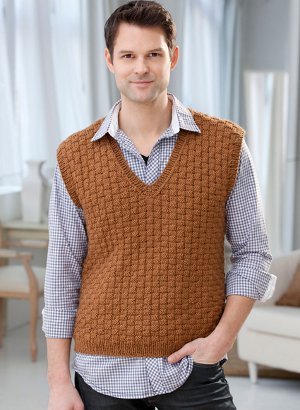
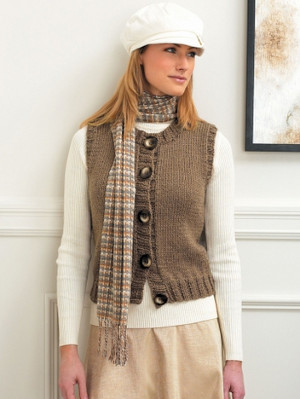
Country Nights Cabled Vest
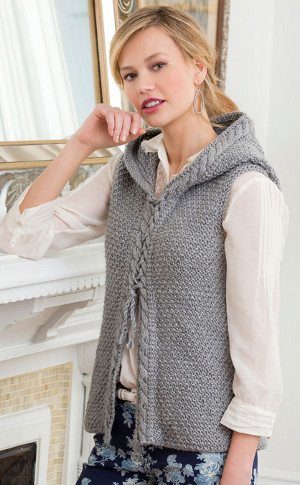
Dont let chilly nights get you down. The fashionable Country Nights Cabled Vest is the perfect way to stay warm while looking fantastic. This free knit vest pattern is a great project for knitters interested in sweaters. Everyone knows that sleeves are the worst part of knitting sweaters, and knitting a vest means that you get to skip the tedious sleeves. Seed stitch gives the body of this vest a nice, textured look.

Knitting Needle Size8 or 5 mm
Yarn Weight(4) Medium Weight/Worsted Weight and Aran (16-20 stitches to 4 inches)
Materials
- RED HEART® Soft®: 5 (6, 7, 8, 9) balls 9440 Light Grey Heather
- Susan Bates® Circular Knitting Needles: 5mm [US 8], 16” [40 cm] and 24” [60 cm] long; 4.5 mm [US 7], 32” (81 cm) long
- Cable needle
- stitch holders
- stitch markers
- yarn needle
GAUGE: 16 sts = 4” (10cm); 24 rows = 4” (10cm) in Pattern st using larger needle. CHECK YOUR GAUGE. Use any size needles to obtain the gauge.
Directions are for size Small; changes for sizes Medium, Large, X-Large and 2X are in parentheses.
Bust: 32 (36, 40, 44, 48)” (81 (92, 101.5, 112, 122) cm)
Length: 23½ (24, 24½, 27, 27)” (59.5 (61, 62, 68.5, 68.5) cm)
NOTES
Vest is worked in one piece, back and forth in rows from lower edge to Armholes. Fronts and Back are worked separately to shoulders. Sts are picked up along edges and Cable Edging is joined by working last st of Edging with picked up sts. Circular needle is used to accommodate large number of sts.
SPECIAL ABBREVIATIONS
K1-f/b: Knit 1 front and back (inc) Knit next st, then knit it through back loop.
PATTERN STITCHES
Row 1 (Wrong Side): Knit.
Row 2: *K1, p1; repeat from * to end.
Row 3: Knit.
Row 4: *P1, k1; repeat from * to end.
Repeat Rows 1-4 for Pattern st.
INSTRUCTIONS
BODY
With larger and longer needle, cast on 128 (144, 160, 176, 192) sts.
Beginning with Row 1, work in Pattern st until piece measures 15 (15, 15, 17, 17)” (38 (38, 38, 43, 43) cm) from beginning, end with Row 4.
Divide for Armholes
Dividing Row (Wrong Side): K24 (28, 32, 34, 38) and slip to a stitch holder for Left Front, bind off 8 (8, 8, 12, 12), knit until 64 (72, 80, 84, 92) sts have been worked and slip to a stitch holder for Back, bind off 8 (8, 8, 12, 12), knit to end of row – 24 (28, 32, 34, 38) sts for Right Front.
Right Front
Working on Right Front sts only and keeping in Pattern st, decrease 1 st at Armhole edge every other row 4 (4, 6, 6, 8) times – 20 (24, 26, 28, 30) sts.
Work until Armhole measures 6½ (7, 7½, 8, 8)” (16.5 (18, 19, 20.5, 20.5) cm), end with a wrong side row.
Shape Neck
Bind off 6 (8, 10, 12, 12) sts at beginning of next right side row – 14 (16, 16, 16, 18) sts.
Decrease 1 st at neck edge every other row twice more – 12 (14, 14, 14, 16) sts.
Work until Armhole measures 8½ (9, 9½, 10, 10)” (21.5 (23, 24, 25.5, 25.5) cm), end with Row 4.
Bind off.
Back
With right side facing, join yarn and keeping in Pattern st, work across 64 (72, 80, 84, 92) sts from Back stitch holder.
Decrease 1 st at each side edge every other row 4 (4, 6, 6, 8) times – 56 (64, 68, 72, 76) sts.
Work until Armhole measures 8½ (9, 9½, 10, 10)” (21.5 (23, 24, 25.5, 25.5) cm), end with Row 4.
Bind off.
Left Front
With right side facing, join yarn and keeping in Pattern st, work across 24 (28, 32, 34, 38) sts from Left Front stitch holder.
Work until Armhole measures 6½ (7, 7½, 8, 8)” (16.5 (18, 19, 20.5, 20.5) cm), end with a right side row.
Note: Don't forget to work the armhole decreases denoted in the instructions for the Right Front when maintaining your pattern st.
Shape Neck
Bind off 6 (8, 10, 12, 12) sts at beginning of next wrong side row – 14 (16, 16, 16, 18) sts.
Decrease 1 st at neck edge every other row twice more – 12 (14, 14, 14, 16) sts.
Work until Armhole measures 8½ (9, 9½, 10, 10)” (21.5 (23, 24, 25.5, 25.5) cm), end with Row 4.
Bind off.
FINSHING
Sew Shoulder seams.
Hood
With wrong side facing, join yarn at beginning of neck shaping on Left front, pick up and knit 12 sts to Shoulder, place marker, pick up and knit 16 (18, 20, 22, 22) sts to center of Back Neck, place marker, pick up and knit 16 (18,
20, 22, 22) sts along remaining Back Neck to Shoulder, place marker, pick up and knit 12 sts to beginning of Neck shaping on Right Front – 56 (60, 64, 68, 68) sts.
Beginning with Row 1, work in Pattern st for 3 rows.
Increase Row (Wrong Side): *Knit to 1 st before marker, [k1-f/b] twice; repeat from * twice more, knit to end of row – 62 (66, 70, 74, 74) sts.
Repeat Increase Row every 4th row twice more – 74 (78, 82, 86, 86) sts
Work until Hood measures 10” (25.5cm), removing 2 side markers, keeping marker at center of Back Neck, end with a right side row.
Decrease Row (Wrong Side): Knit to 2 sts before center Back Neck marker, [k2tog] twice, knit to end of row – 72 (76, 80, 84, 84) sts.
Repeat Decrease Row every other row 8 more times – 56 (60, 64, 68, 68) sts.
Work until Hood measures 13” (33cm) from beginning.
Bind off.
Fold bind-off row in half and sew closed.
Cable Edging
With right side facing and smaller needle, join yarn at lower edge of Right Front, pick up and knit 1 st every other row along front edge of Right Front, Hood and Left Front, end at lower edge of Left Front, place marker for Vest sts, cast on 12 sts.
Row 1 (Wrong Side): K3, p6, k2, knit last st before marker with next st along edge of Vest to join last st of Cable Edging with first Vest st.
Leave remaining Vest sts unworked.
Row 2: Slip 1 knitwise, k1, p1, k6, p1, k2 – 12 sts.
Row 3: K3, p6, k2, knit last st together with next Vest st – 12 sts.
Row 4: Slip 1 knitwise, k1, p1, slip next 3 sts to cable needle and hold in front, k3, k3 from cable needle, p1, k2.
Row 5: Repeat Row 3.
Row 6: Repeat Row 2.
Repeat Rows 1-6 until all Vest sts have been worked, end at lower edge of Right Front.
Bind off.
Armhole Edgings
With right side facing and larger and shorter needle, join yarn at center of Armhole shaping, pick up and knit 68 (72, 76, 80, 80) sts evenly spaced around Armhole edge. Join to work in rounds. Place marker for beginning of round. [Purl 1 round, knit 1 round] twice. Bind off.
Repeat along opposite Armhole.
Weave in ends.
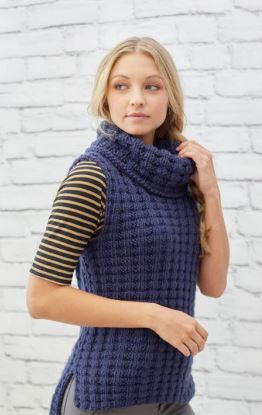
Read NextButton Up Vest
Your Recently Viewed Projects
Thanks for your comment. Don't forget to share!
The Designing Peng uin
Jan 24, 2017
This vest has great appeal -- vests can pull an outfit together or add that touch of warmth needed ( in look and in fact) -- the previous poster mentioned toggle buttons -- I have a set of bone toggles a friend carved from bone and now I know how I am going to use them.
Christine
Nov 06, 2015
I really enjoyed knitting this vest. I did the band in a different colour. Really like the two tone look and for the closure I 'm going to try a hook and eye if that does not work toggle buttons.
ahuggett415201 309 2255
Apr 15, 2014
Hi, Thanks for your comment; we will add your note about the armhole decreases to the pattern for further clarity. As to the cord in the front, an iCord/iRope would probably be a great way to solve the problem. Unfortunately, the original instructions do not offer any more clarity on this point. It looks as though you should be able to make your own iCord and then lace the front together. I hope that helps! Editors of AllFreeKnitting
happyro 4716877
Apr 14, 2014
I am just about to complete this beautiful vest and find that there are NO instructions for the weaved "lace-like" string through the front cabled stitches. Also there is a mistake in the instructions...The Right Front Armhole notes the decrease 1 st at amrhole edge every other row but it is NOT indicate it for the Left front. Only an advanced knitter will pick that up.... It is a beautiful pice (so far) but I am thinking maybe an iRope is the way to go for the woven lace along the front cable to keep it closed. HELP PLEASE
Report Inappropriate Comment
Are you sure you would like to report this comment? It will be flagged for our moderators to take action.
Thank you for taking the time to improve the content on our site.