Adventures in Lace Knit Cardigan
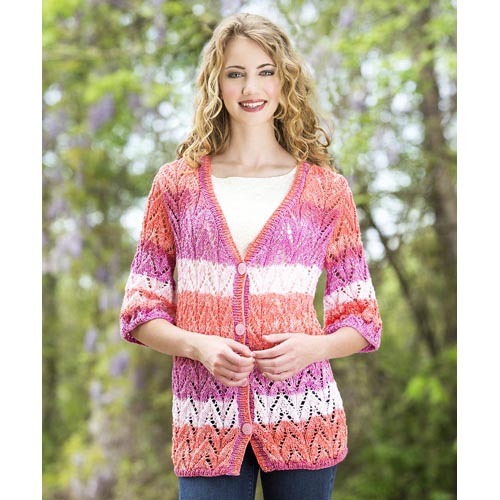
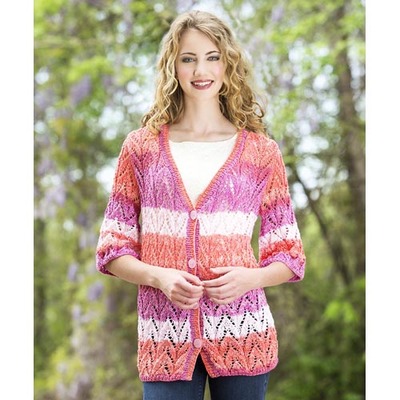
This free knitting pattern is a dazzling combination of lace and bright colors. The Adventures in Lace Knit Cardigan is fit for both the spring and summer months. However, you'll be wanting to layer this pretty knit sweater over your long-sleeve tops in order to transition it into cold-weather months. It's simply too beautiful not to wear all year long! You can even make this cardigan knitting pattern in neutral tones if bright colors aren't your style. This lace knitting pattern looks great with a pair of jeans for an afternoon lunch date or shopping trip. All of your friends will want to know where you bought such a beautiful sweater.

Knitting Needle Size6 or 4 mm, Circular Knitting Needles
Gauge1 stitches, 2 rows, 3 inches. stockinette stitch
Materials:
- Premier Yarns® Deborah Norville Serenity Garden (100% dralon microfiber; 65g/185 yds): 800-23 Bouquet – 5 (6, 7) balls
- Needles: US Size 6 (4 mm) 32” circular needle or size needed to obtain gauge
- 4 - ” Buttons
- Stitch markers
- Tapestry needle
Measurements:
Sizes: Small (Large, 2X)
Bust: 31 ½ (41 ¼, 51)”
Length: 26 (27, 29 ¾)”
Upper Arm: 11 (13 ½, 16)”
Sleeve Length: 9 ¼
Abbreviations:
beg = begin(ning)
cont = continue
dec(‘d) = decrease(d)
foll = follows
k = knit
k2tog = knit 2 sts together – 1 st dec’d
meas = measures
mult = multiple
p = purl
patt = pattern
rem = remaining
rep = repeat
RS = right side
ssk = slip next 2 sts individually knitwise, slip them back to left needle in this position, knit them together through the back loops (1 st dec’d)
st(s) = stitch(es)
WS = wrong side
yo = yarnover
Gauge:
18 sts x 26 rows = 4” in St st
Instructions:
STITCH GUIDE
K1, P1 Ribbing
(even number of sts)
Row 1: * K1, p1; rep from * to end.
Rep Row 1 for patt.
Gothic Arches
(worked over a mult of 11 sts + 3)
Row 1 (RS): K4, * k2tog, yo, p2, yo, ssk, k5; rep from *, end last rep k4.
Row 2 and all WS rows: Work each st as it appears on this side of work (k the k sts and p the p sts).
Row 3: K3, * k2tog, yo, k1, p2, k1, yo, ssk, k3; rep from * to end.
Row 5: K2, * k2tog, yo, k2, p2, k2, yo, ssk, k1; rep from*, end last rep k2.
Row 7: K1, k2tog, * yo, k3, p2, k3, yo, k3tog; rep from *, end last rep ssk, k1.
Rows 9 & 11: K2, * yo, k2, k2tog, p2, ssk, k2, yo, k1; rep from *, end last rep k2.
Row 12: Work each st as it appears on this side of work.
Rep rows 1 – 12 for pattern.
PATTERN NOTES
Cardigan is worked in pieces, when are then seamed together. Button band is picked up and worked last.
When working armhole shaping and you cannot complete a full pattern repeat, work these stitches in Stockinette stitch.
Armhole and neck shaping occurs simultaneously.
Sleeves are intended to be wider at the bottom and get smaller as you reach the armhole.
Back
Cast on 71 (93, 115) sts.
Next row (WS): Beg K1, P1 Ribbing, work in patt to end. Rep last row, 2 more times.
Next row (RS): K1, work Gothic Arches patt beg on Row 1 to last st, k1.
Next row (WS): P1, work Gothic Arches patt on Row 2 to last st, p1.
Cont to work in patt as established until 10 (10, 11) reps of patt have been completed 120 (120, 132) rows, ending with WS row; Back meas 18 ½ (18 ½, 20 ¼).
Shape Armholes
Bind off 4 (8, 11) sts at the beg of next 2 rows – 63 (77, 93) sts.
Dec row (RS): K2, k2tog, work in patt to last 4 sts, ssk, k2 – 2 sts dec, 61 (75, 91) sts rem.
Next row (WS): Work in patt as established.
Rep Dec row as above every RS row 1 (5, 9) more time(s) – 59 (65, 73) sts.
Work even in patt until Armhole meas 7 ½ (8 ½, 9 ½), ending with WS row.
Bind of all sts.
Right Front
Cast on 38 (49, 60) sts.
Next row (WS): Beg K1, P1 Ribbing, work in patt to end. Rep last row, 2 more times.
Next row (RS): K1, work Gothic Arches patt beg on Row 1 to last st, k1.
Next row (WS): P1, work Gothic Arches patt on Row 2 to last st, p1.
Cont to work in patt as established until 10 (10, 11) reps of patt have been completed 120 (120, 132) rows,
ending with WS row; Front meas 18 ½ (18 ½, 20 ¼)”.
Shape Armhole, Neck
Neck Dec row (RS): K2, k2tog, work in patt as established to end – 1 st dec’d, 37 (48, 59) sts rem.
Next row (WS): Bind off 4 (8, 11) sts, work in patt as established to end – 4 (8, 11) sts dec’d, 33 (40, 48) sts rem.
Neck + Armhole Dec row (RS): K2, k2tog, work in patt to last 4 sts, k2tog, k2 – 2 sts dec’d, 31 (38, 46) sts rem.
Next row and all foll WS rows: Work in patt as established to end.
Dec at Armhole edge every RS row, 1 (5, 9) more time(s), and at the same time, dec at Neck edge every RS
row, 13 (16, 20) more times. After all Neck and Armhole shaping is complete, 17 sts rem.
Cont to work in patt as established until armhole meas 7 ½ (8 ½, 9 ½)”, ending with WS row. Bind off all sts.
Left Front
Cast on 38 (49, 60) sts.
Next row (WS): Beg K1, P1 Ribbing, work in patt to end. Rep last row, 2 more times.
Next row (RS): K1, work Gothic Arches patt beg on Row 1 to last st, k1.
Next row (WS): P1, work Gothic Arches patt on Row 2 to last st, p1.
Cont to work in patt as established until 10 (10, 11) reps of patt have been completed 120 (120, 132) rows,
ending with WS row; Front meas 18 ½ (18 ½, 20 ¼)”.
Shape Armholes, Neck
Next row (RS): Bind off 4 (8, 11) sts, work in patt to last 4 sts, k2tog, k2 – 5 (9, 12) sts dec’d, 33 (40, 48) sts rem.
Next row and all foll WS rows: Work in patt as established to end.
Neck + Armhole Dec row (RS): K2, ssk, work in patt to last 4 sts, k2tog, k2 – 2 sts dec’d, 31 (38, 46) sts.
Next row (WS): Work in patt as established to end.
Dec at Armhole edge every RS row, 1 (5, 9) more time(s), and at the same time, dec at Neck edge every RS row, 13 (16, 20) more times. After all Neck and Armhole shaping is complete, 17 sts rem.
Cont to work in patt as established until armhole meas 7 ½ (8 ½, 9 ½)”, ending with WS row. Bind off all sts.
Sleeves (make two)
Cast on 71 (82, 93) sts.
Next row (WS): Beg K1, P1 Ribbing, work in patt to end. Rep last row, 2 more times.
Next row (RS): K1, work Gothic Arches patt beg on Row 1 to last st, k1.
Next row (WS): P1, work Gothic Arches patt on Row 2 to last st, p1.
Dec row (RS): K2, ssk, work in patt to last 4 sts, k2tog, k2 – 2 sts dec, 69 (80, 91) sts rem.
Next row (WS): Work in patt as established.
Rep Dec row as above every other RS row, 10 more times – 20 sts dec’d, 49 (60, 71) sts rem.
Cont to work in patt as established until 5 reps of patt have been completed (60 rows); Sleeve meas 9 ¼”.
Shape Cap
Next row (RS): Bind off 4 (8, 11) sts at the beg of next 2 rows – 41 (44, 49) sts rem.
Dec row (RS): K2, k2tog, work in patt to last 4 sts, ssk, k2 – 2 sts dec’d, 39 (42, 47) sts rem.
Next row (WS): Work in patt as established.
Rep Dec row every RS row, 8 (3, 2) more times, the rep Dec row every other RS row 3, 3 (7, 9) times. Bind off 2 (4, 5) sts at beg of next 2 rows. Bind off rem 13 (14, 15) sts.
Finishing
Sew Shoulder seams. Sew Sleeve Caps into Armholes. Sew Sleeve and Side seams.
Front Edging
Place removable markers for 4 buttonholes along Right Front edging as foll: 1 marker 4” from bottom edge, 1 marker 1” below beg of Neck Shaping, and 2 markers evenly shaped in between.
With RS facing and beg at bottom Right Front opening, pick up and knit 84 (84, 92) sts up Right Front to beg of Neck shp, 44 (50, 56) sts up Right Neck, 24 (30, 38) sts along Back Neck edge, 44 (50, 56) sts down Left Neck, 84 (84, 92) sts down Left Front – 280 (298, 334) sts.
Next row (WS): Beg K1, P1 Ribbing, work in patt to end. Rep last row, 2 more times.
Next row (RS): * Work in patt to Buttonhole marker, k2tog, yo; rep from * for each marked Buttonhole, work in patt to end. Cont to work in K1, P1 Ribbing for 3 rows.
Bind off all sts in patt.
Weave in ends and block. Sew buttons onto Left Front edging, opposite buttonholes.
Read NextEasy Silk Cardi
Your Recently Viewed Projects
pattistrong 271948 5
Mar 16, 2018
I am using 115 stitches. On the back, the first row(after the ribbing) it says to k1 at the beginning and at the end. That's 2 stitches. Then for the Gothic Arches it has k4 at the beginning and at the end. That leaves 105 stitches for the repeated pattern and 105 divided by 11 does not come out even. Am I not understanding something?
janice 9516973
Nov 06, 2016
To print patterns like this which are embedded in the webpage, copy and paste it to your Word Processing page. It takes a few minutes to delete unnecessary material, but then you have the pattern formatted the way you want it. Print this version!
Report Inappropriate Comment
Are you sure you would like to report this comment? It will be flagged for our moderators to take action.
Thank you for taking the time to improve the content on our site.

