Knit Kimono Sweater
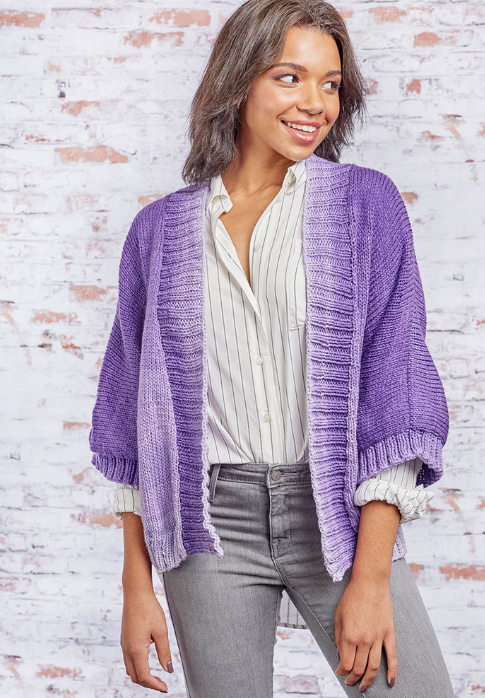
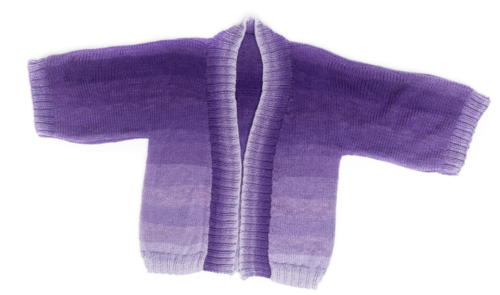
The Knit Kimono Sweater is a beautiful layering piece to add to your wardrobe. The ombre violet color is reminiscent of a bright spring day. The drape of the sweater will look stylish and flattering on just about anyone. Plus, the sleeve length ensures proper range of motion, so you don't need to worry about being hindered by an impractical design. This free sweater knitting pattern includes instructions for multiple sizes. Participate in the trend of wearing slightly oversized clothing by working up this beauty today. You will not be disappointed with the end result.
NotesDirections are for size Extra Small; changes for sizes Small, Medium, Large, and Extra-Large are in parentheses.

Knitting Needle Size8 or 5 mm, Circular Knitting Needles
Yarn Weight(4) Medium Weight/Worsted Weight and Aran (16-20 stitches to 4 inches)
Gauge18 sts = 4” (10 cm); 24 rows = 4” (10 cm) in St st. CHECK YOUR GAUGE. Use any size needles to obtain the gauge.
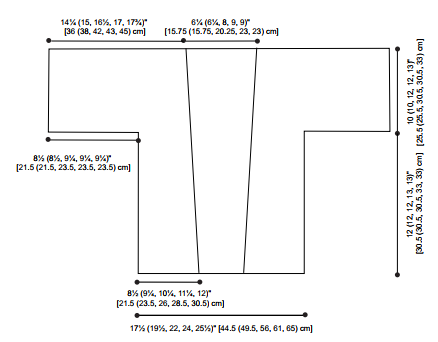
Finished SizeTo fit bust measurement: 34 (38, 42, 46, 50)" [86.25 (96.5, 106.5, 116.75, 127) cm]
Materials List
- RED HEART® Super Saver Ombre™: 3 (4, 4, 5, 5) skeins 3969 Violet
- Susan Bates® Circular Knitting Needles: 5mm [US 8] 24" (61 cm) or longer
- Stitch holders
- Yarn needle
Looking for more adorable knit cardigan patterns? Take a look at this collection -
Instructions
Special Abbreviation
ssk (slip, slip, knit) = slip next two stitches knitwise to right needle, insert point of left needle through front of sts, knit these sts together – 1 st dec.
Special Techniques
Cable Cast On = Turn work so stitches are on left needle, *insert needle between first and 2nd stitch on left needle, wrap and draw loop through (as if making a knit st), slip the new stitch back onto the left needle; repeat from * until the desired number of stitches have been cast-on.
Three-Needle Bind Off: Place the live sts for both sides of the shoulder onto a needle. You will have an equal number of sts on both needles. Hold needles parallel with wrong sides together in your left hand. Take a third needle in your right hand and * insert it knitwise into the first stitch on the needle closest to you and at the same time knitwise into the first stitch on the back needle. Wrap as for a knit stitch and draw the working yarn through both stitches to make one stitch, which is now on the right hand needle.* Repeat from * to * so that there are now two stitches on the right hand needle. Using the tip of one of the needles in your left hand, lift the first stitch worked over the second stitch worked to bind off.
Note
For color matching on front, begin Right Front and Left Front at the same place in the color gradation. For color matching on Back, begin at the same place as fronts and alternate two skeins, working 2 rows with one skein and 2 rows with a second skein.
Left Front
Cast on 38 (42, 46, 50, 54) sts.
Row 1: K1, *p2, k2; repeat from * to last st, k1.
Repeat Row 1, working in Double Rib until piece measures 2" (5 cm). Change to St st. Work in St st until piece measures 6" (15.25 cm), ending with a Wrong Side row.
Left Front Neck
Next row (dec): K1, work in St st to last 3 sts, k2tog, k1 – 37 (41, 45, 49, 53) sts. Work dec row every 8 rows for a total of 12 (12, 14, 16, 16) times.
AT THE SAME TIME, when piece measures 12 (12, 12, 13, 13)" [30.5 (30.5, 30.5, 33, 33) cm] from cast on and ending with a Wrong Side row, use Cable Cast On to cast on 38 (38, 42, 42, 42) sts for sleeve – 64 (68, 74, 76, 80) sts.
Work across all sts until sleeve measures 10 (10, 12, 12, 13)" [25.5 (25.5, 30.5, 30.5, 33) cm]. Place sts on a st holder.
Right Front
Cast on 38 (42, 46, 50, 54) sts.
Row 1: K1, *k2, p2; repeat from * to last st, k1.
Repeat Row 1, working in Double Rib until piece measures 2" (5 cm). Change to St st. Work in St st until piece measures 6" (15.25 cm), ending with a Wrong Side row.
Right Front Neck
Next row (dec): K1, ssk, work in St st to last st, k1 – 37 (41, 45, 49, 53) sts. Work dec row every 8 rows for a total of 12 (12, 14, 16, 16) times.
AT THE SAME TIME, when piece measures 12 (12, 12, 13, 13)" [30.5 (30.5, 30.5, 33, 33) cm] from cast on and ending with a Right Side row, use Cable Cast On to cast on 38 (38, 42, 42, 42) sts for sleeve – 64 (68, 74, 76, 80) sts. Work across all sts until sleeve measures 10 (10, 12, 12, 13)" [25.5 (25.5, 30.5, 30.5, 33) cm]. Place sts on a st holder.
Back
Cast on 80 (88, 100, 108, 116) sts.
Row 1 (Right Side): K3, *p2, k2; repeat from * to last st, k1.
Row 2: K1, p2, *k2, p2; repeat from * to last st, k1.
Repeat Rows 1-2, working in Double Rib until piece measures 2" (5 cm).
Change to St st. Work in St st until piece measures 12 (12, 12, 13, 13)" [30.5 (30.5, 30.5, 33, 33) cm] from cast on, ending with a Wrong Side row.
Next row (Right Side): Using Cable Cast On, cast on 38 (38, 42, 42, 42) sts for right sleeve, work even in St st to end of row – 118 (126, 142, 150, 158) sts.
Next row: Using Cable Cast On, cast on 38 (38, 42, 42, 42) for left sleeve, work even in St st to end of row – 156 (164, 184, 192, 200) sts.
Work across all sts until sleeve measures 10 (10, 12, 12, 13)” [25.5 (25.5, 30.5, 30.5, 33) cm] or to match Left Front and Right Front.
Finishing
Using three-needle bind off, join Back to Fronts. Bind off 28 (28, 36, 40, 40) sts center Back sts.
-
Sleeve Cuffs
With Left Front and Right Side facing, pick up and knit 90 (90, 98, 98, 104) sts.
Row 1: K1, *k2, p2; repeat from * to last st, k1.
Repeat Row 1, working in Double Rib until cuff measures 1½" (3.75 cm) or desired length.
Bind off.
Repeat for Right Front and Back cuffs.
With yarn needle, sew Sleeve and side seams of Right Front and Left Front to Back. -
Shawl Collar
At bottom edge of Right Front and with Right Side facing, pick up and knit 115 (115, 113, 117, 117) sts to shoulder seam, pick up and knit 28 (28, 36, 40, 40) sts across Back neck, and pick up and knit 115 (115, 113, 117, 117) sts to bottom edge of Left Front – 258 (258, 262, 274, 274) sts.
Row 1 (Wrong Side): P2, *k2, p2; repeat from * to end of row.
Work in Double Rib until the rib measures 3" (7.5 cm) or desired width.
Bind off all sts loosely.
With yarn needle, weave in all ends. Block sweater. -
Click image to enlarge
Abbreviations
- dec
- decrease(s)(d)(ing)
- K
- knit
- k2tog
- knit the next 2 stitches together
- mm
- millimeters
- P
- purl
- st(s)
- stitch(es)
- St st
- Stockinette stitch
- *
- repeat whatever follows the * as indicated
Are you a fan of the kimono style sweater? Why or why not?
Read NextAdventures in Lace Knit Cardigan
Your Recently Viewed Projects
Beverly
Dec 01, 2020
I have printed out the pattern BUT a "pop up" ad prints on the lower right side of the paper covering the directions. Isn't there a download to avoid losing instructions this way? What rating? right now it would be zero
Lisa
Dec 03, 2020
This website hosts the patterns, they do not own them. this is a Red Heart pattern and even though they have gone under you can access their patterns on the yarnspirations website. The pattern ratings are for the patterns, not your annoyance at the way it printed or did not print.
fredrica13 6485347
Aug 05, 2020
I need the kimono knit pattern. Unableto print. Please email pattern to fredrica13@comcast.net. Your patterns are lovely, usually more accessible
Kristina K
Aug 05, 2020
Hello fredrica13, in order to print this pattern, please click on the big blue "More" button right above the image and select the option to print. We hope this helps! Happy knitting! -Editors of AllFreeKnitting
Tricia108
Mar 14, 2018
What a beautiful sweater. I prefer loose fitting sweaters, and loose fitting clothing in general. I am small but don't like anything too tight. This is one pattern that I would not substitute the yarn. I really like the ombre effect. The instructions are easy to follow. You could make this in different colors for varying seasons. I always need an extra layer since I get cold so easily. This will be perfect. Thank you.
sclindsay 2956963
Mar 17, 2018
I am having a problem and wondering if u could help. I am decreasing 1 stitch every 8 rows and when its 13 inches long I still have 45 stitches on where Im upstanding I should only have 34 when I add on the 42 for my sleeve. What am I doing wrong
Lisa
Mar 22, 2018
You didn't say which size you are making but based on the numbers you provided it appears to be medium. You should be decreasing 13 more stitches by working the decrease row every 8th row. The total decrease amount of stitches for that size is 14 stitches from the original 46 sts on the needle. When you finish the decreases you should be at 13" from the beginning, if you have too many stitches after that, you are not decreasing correctly. If you are arriving at the 13" before you are finished decreasing than you have a gauge problem.
Hippie Chick
Feb 13, 2018
A very stylish layering accessory to add to almost any wardrobe, but would probably look best when paired with jeans and a tee. Pattern includes instructions for sizes extra small up to size extra large. The ombre violet purple colors are subtle yet bold enough to make a statement.
KathrynAllison
Jan 26, 2018
I love the kimono style sweater. I actually own a few styles like this and they're very warm without adding a lot of bulk.
Report Inappropriate Comment
Are you sure you would like to report this comment? It will be flagged for our moderators to take action.
Thank you for taking the time to improve the content on our site.

