Color Lovers Knit Cardigan
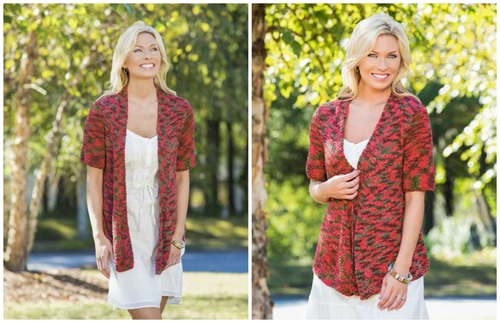
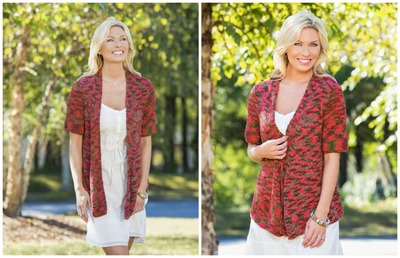
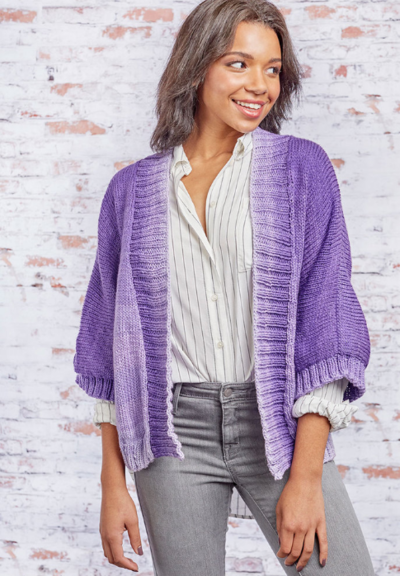
This free knitting pattern is perfect for those color lovers looking for a photo-worthy knit cardigan to show off. You can make your own Color Lovers Knit Cardigan by following this free knitting tutorial which includes instructions for multiple sizes. You'll be ready to stroll the streets in this short sleeve cardigan because it's the ideal extra layer for chilly spring or summer days. The beautiful colors of this cardigan are sure to be the envy of all your friends, and this knit sweater will look its best layered over a pretty summer dress or paired with your favorite jeans.

Knitting Needle Size8 or 5 mm
Yarn Weight(3) Light/DK (21-24 stitches to 4 inches)
Gauge1 stitches, 2 rows, 3 inches. stockinette stitch
Materials:
- Deborah Norville Collection® Hipster by Premier Yarns® (90% rayon from bamboo, 10% polyamide; 85g/161 yds): DN457-02 Raspberry Bush 6 (7,7,8,8,9) balls
- US Size 8 (5 mm) straight knitting needle or size needed to obtain gauge
- Tapestry needle
- Stitch holders
Measurements:
Extra Small (Small, Medium, Large, 1X, 2X)
*Photos show Size Small
Bust: 32 (36, 40, 44, 48, 52)”
Length: 21 (22, 22½, 23½, 23¾, 24½)”
Abbreviations:
approx: approximately
bef: before
beg: beginning
dec’d: decreased
m: marker
meas: measures
ndls: needles
patt: pattern
pm: place marker
RS: right side
rem: remaining
rep: repeat
sl m: slip marker
ssk: slip, slip, knit the 2 sts slipped tog through the back loopapprox
st (s): stitches
tog: together
WS: wrong side
Gauge:
16 sts x 20 rows = 4” in St st
Instructions:
Stitch Guide:
Moss Stitch (multiples of 4 sts + 2)
Row 1 (RS): * K2, p2; rep from * to last 2 sts, end k2.
Row 2 (WS): * P2, k2; rep from * to last 2 sts, end p2.
Row 3: * P2, k2; rep from * to last 2 sts, end p2.
Row 4: * K2, p2; rep from * to last 2 sts, end k2.
Rep Rows 1-4 for patt.
Back
Cast on 66 (74, 82, 90, 98, 106) sts. Beg with Row 1, work in Moss st until Back meas 2½”, ending with WS row.
Next row (RS): Knit.
Next row (WS): Purl.
Cont in St st until Back meas 13½ (14, 14, 14½, 14½, 15)”, ending with WS row.
Bind off 4 (5, 6, 7, 8, 9) sts at beg of next 2 rows – 58 (64, 70, 76, 82, 88) sts rem.
Dec row (RS): K1, k2tog, knit to last 3 sts, ssk, k1 – 2 sts dec’d. Rep Dec row every RS row, 1 (2, 3, 4, 4, 5)
more time(s).
Cont in St st until Armholes meas 7½ (8, 8½, 9, 9¼, 9½)”, ending with WS row. Bind off all sts.
Left Front
Cast on 66 (74, 82, 90, 94, 98) sts. Beg with Row 1, work in Moss st until Left Front meas 2½”, ending with WS row.
Next row (RS): Knit to last 10 sts, pm, work in Moss Stitch patt to end.
Next row (WS): Work in Moss Stitch patt to m, sl m, purl to end.
Shape Front Opening
Dec row (RS): Knit to 3 sts bef m, ssk, k1, sl m, work in patt to end – 1 st dec’d. Rep Dec row every other RS row, 7 (3, 1, -, -, -) more times, then rep Dec row every RS row, 28 (37, 44, 51, 52, 52) times – 36 (41, 46, 51, 52, 52) sts dec’d.
Note: Neck decs will cont throughout remainder of Front and Armhole Shaping.
Cont in patt until Left Front meas 13½ (14, 14, 14½, 14½, 15)”, ending with WS row.
Shape Armhole
Bind off 4 (5, 6, 7, 8, 9) sts at beg of next row. Work a WS row even.
Dec row (RS): K1, k2tog, work in patt to end – 1 st dec’d at Armhole edge. Rep Dec row every RS row, 1 (2, 3, 4, 4, 5) more time(s).
Cont to work in patt, dec’ng at Front Opening as described in previous section. When all dec’s are complete, 24 (25, 26, 27, 29, 31) sts rem. Work even in patt over rem sts until Armhole meas 7½ (8, 8½, 9, 9¼, 9½)”, ending with WS row.
Next row (RS): Bind off 14 (15, 16, 17, 19, 21) sts, place rem 10 sts on holder for Collar, making a note of the last row of Moss St that was worked.
Right Front
Cast on 66 (74, 82, 90, 94, 98) sts. Beg with Row 1, work in Moss st until Right Front meas 2½”, ending with WS row.
Next row (RS): Work in Moss Stitch patt over 10 sts, pm, knit to end.
Next row (WS): Purl to m, sl m, work in Moss Stitch patt to end.
Shape Front Opening
Dec row (RS): Work in patt to m, sl m, k1, k2tog, knit to end – 1 st dec’d. . Rep Dec row every other RS row, 7 (3, 1, -, -, -) more times, then rep Dec row every RS row, 28 (37, 44, 51, 52, 52) times – 36 (41, 46, 51, 52, 52) sts dec’d.
Note: Neck decs will cont throughout remainder of Front and Armhole Shaping.
Cont in patt until Right Front meas 13½ (14, 14, 14½, 14½, 15)”, ending with RS row.
Shape Armhole
Bind off 4 (5, 6, 7, 8, 9) sts at beg of next row.
Dec row (RS): Work in patt to last 3 sts, ssk, k1 – 1 st dec’d. Rep Dec row every RS row, 1 (2, 3, 4, 4, 5) more time(s).
Cont to work in patt, dec’ing at Front Opening as described in previous section. When all dec’s are complete, 24 (25, 26, 27, 29, 31) sts rem. Work even in patt over rem sts until Armhole meas 7½ (8, 8½, 9, 9¼, 9½)”, ending with RS row.
Next row (WS): Bind off 14 (15, 16, 17, 19, 21) sts, place rem 10 sts on holder for Collar, making a note of the last row of Moss St that was worked.
Sleeves
Cast on 50 (54, 58, 62, 66, 70) sts.
Beg with Row 1, work in Moss st until Sleeve meas 2½”, ending with WS row.
Next row (RS): Knit.
Next row (WS): Purl.
Cont in St st until Sleeve meas 4 (4, 4½, 4½, 5, 5) ” ending with WS row.
Shape Cap
Bind off 4 (5, 6, 7, 8, 9) sts at beg of next 2 rows – 42 (44, 46, 48, 50, 52) sts rem.
Dec row (RS): K1, k2tog, knit to last 3 sts, ssk, k1 – 2 sts dec’d. Rep Dec row every RS row, until 12 sts rem.
Bind off rem 12 sts.
Finishing
Sew Shoulder seams.
Collar
Return Left Front Collar sts to ndls. Cont in Moss Stitch patt until Collar meas approx. 3¼ (3½, 3¾, 4, 4¼, 4¼)”, or half the width of Back Neck. Bind off sts. Rep for Right Front Collar sts. Sew bind-off edges of Left and Right Collars tog. Sew edge of Collar to Back Neck Edge.
Sew Sleeve Caps into Armholes. Sew Sleeve and Side Seam.
Weave in ends. Block lightly.
Read NextEasy Silk Cardi
Your Recently Viewed Projects
jeanwebb 4867876
Sep 15, 2020
This pattern is strange. Why do the 2 fronts eacg have same amount of stitches as the back when it should be about half the amount
Ingrid the Knitter
Sep 20, 2020
This is a Drape Front cardigan, meaning that it will hang down in points at the front, you cast on more stitches and then decrease as you go, by the time you get to the top you should have the appropriate amount of stitches that is usually a few more than half the back for each side. I hope this helps.
The Designing Peng uin
Jun 25, 2016
love the style of this jacket as well as the length - although I think I would knit in a solid colour perhaps a charcoal or banker's grey?
Report Inappropriate Comment
Are you sure you would like to report this comment? It will be flagged for our moderators to take action.
Thank you for taking the time to improve the content on our site.

