How to Hand Paint Roving
In this free knitting video tutorial, we'll learn how to hand paint wool roving using basic items from the kitchen. Just watch Rebecca's Roush's simple tutorial to learn how it's done! Once your roving is dyed, you can spin the yarn to create a multitude of knit projects.
How to Hand Paint Roving
I have been fascinated with dyeing yarn for a long time, but there is a limit to the colors one can achieve after the yarn has been spun. If you dye fiber before the spinning has occurred, you can mix colors in the yarn fiber itself adding my complexity to your creativity. I recently began spinning on a drop spindle, and as soon as I figured that out I knew it was time for me to try to dye roving. So, you want to learn how to dye your own roving? Read on!

Materials:
- Various containers for soaking the yarn and mixing dyes
- Fiber - In this tutorial I started with 100g of KnitPicks Full Circle Roving in the color Pigeon.
- Acid - I am partial to white vinegar, but you can also use citric acid. You will achieve different results with different amounts of acid.
- Food Coloring - I prefer liquid form for my dyeing projects, but you can feel free to use any type of food coloring to dye your roving.
- Syringe (Optional) - I like to use a plastic syringe to apply dye to the yarn, but you can also pour dye directly onto the fiber.
- Plastic Wrap - This will be used both to protect the work surface and to wrap up the fiber so it can be heated.
- Rubber Gloves - use to protect your hands from getting stained.
- A Microwave oven - We will heat the fiber in the microwave to set the dye.
- A microwave safe plate - to use while heating the roving
- Water
Instructions:
1. Fill a container to soak your fiber with water and add 3T of white vinegar. Gently coil your roving into a doughnut that will fit in your soaking pot. Soak for 30 min.
2. While the wool is soaking, lay plastic wrap over the work surface in an area large enough for the roving to fit on. This will later be used to wrap the fiber to be heated in the microwave.
3. Mix your dyes. The volume of dye you can add to your fiber depends on how saturated the fiber is post-soaking. In this tutorial, I added 25 drops of food coloring to ½ cup of water for each color and ended up with more dye than I needed.
4. When the yarn is done soaking, pour out the excess fiber and gently lay the roving out on the plastic wrap.
5. Using a syringe or other applicator, start painting your roving. Have fun playing with crazy colors, different shapes. Pat the fibers where necessary to spread the dyes.
6. Roll up the plastic wrap and roving like a jelly roll and arrange it so it fits on your microwave safe plate. I also like to think about it like rolling up a sleeping bag, but without the extra squeezing.
7. Heat the yarn in the microwave for 2 min at a time until the fiber is audibly steaming (hissing) or is hot to touch. Let the fiber cool until you can touch it comfortably (which can take 10-20 min), then repeat this process 1 more time. Take care to not agitate the yarn when checking on it because roving is even more prone to felting than yarn!
8. Allow the yarn to cool completely, unwrap and GENTLY wash with lukewarm water and mild dish soap until the water runs clear.
9. Hang to dry
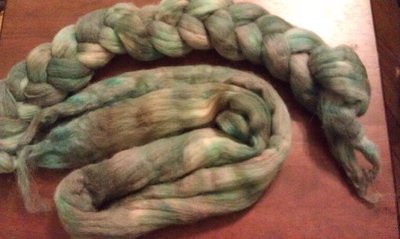
10. Admire your beautiful hand painted roving and get ready to start spinning it!
Now you have some beautiful fiber that you can spin and knit! You want to make sure you dye enough fiber for your project, because hand painted colorways can be difficult to replicate. Every spinner works differently, so different people working from identically dyed rovings will get very different looking yarns. If you aren’t ready to spin the yarn yet, check out our accompanying video on how to braid the roving to store it safely.

Read NextHow To Knit Seed Stitch

