Anchors Away Baby Romper
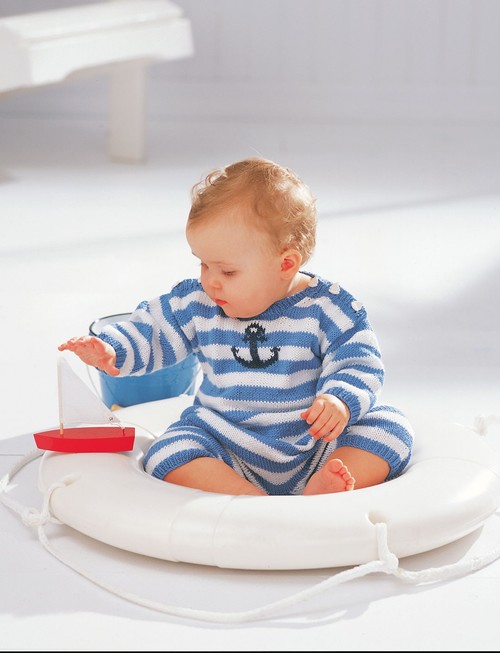
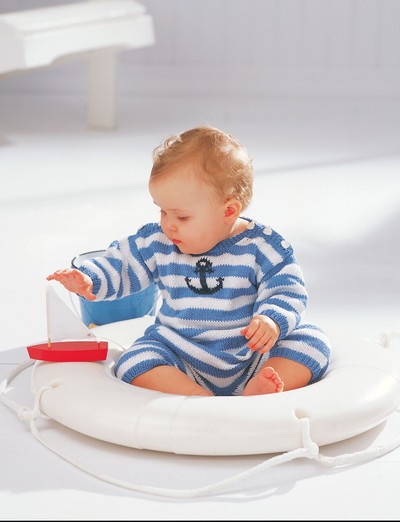
Sail away with this adorable free baby knitting pattern! Your little one can get in on the nautical trend with this Anchors Away Knit Baby Romper. This easy knitting pattern shows you how to knit a onesie for your little one that is just too cute with fun stripes and a trendy nautical detail. The onesie knitting pattern includes instructions for multiple sizes for babies aged 3-12 months. You can customize this pattern by using the yarn colors of your choice. We're sure this baby knitting pattern will become one of your favorites because it's such a great option for summer.

Knitting Needle Size3 or 3.25 mm, 5 or 3.75 mm
Yarn Weight(3) Light/DK (21-24 stitches to 4 inches)
Gauge1 stitches, 2 rows, 3 inches. stockinette stitch
Materials:
- Patons® Grace (50 g/1.75 oz): (Main Color Blue) 3 (3-4) balls
- Patons® Grace (50 g/1.75 oz): (Contrast A White) 3 (3-4) balls
- Sizes 3¼ mm (U.S. 3) and 3¾ mm (U.S. 5) knitting needles or size needed to obtain tension.
- 4 Stitch holders.
- 6 Buttons.
- Small quantity of Navy for Anchor embroidery.
- Pattern
Measurements:
Chest measurement
3 mos: 16 ins [40.5 cm]
6 mos: 17 ins [43 cm]
12 mos: 19 ins [48 cm]
Finished chest
3 mos: 22 ins [56 cm]
6 mos: 24 ins [61 cm]
12 mos: 26 ins [66 cm]
Gauge:
24 sts and 32 rows = 4 ins [10 cm] with larger needles in stocking st.
Abbreviations:
Alt = Alternate(ing)
Beg = Beginning
Cont = Continue(ity)
Dec = Decrease(ing)
Inc = Increase(ing)
K = Knit
MC = Main Color
Pat = Pattern
PM = Place marker
Rem = Remain(ing)
RS = Right side
St(s) = Stitch(es)
WS = Wrong side
Instructions:
NOTE: The instructions are written for smallest size. If changes are necessary for larger sizes the instructions will be written thus ( ).
Stripe Pat
With A, work 6 rows stocking st.
With MC, work 6 rows stocking st.
These 12 rows form Stripe Pat.
BACK
***Left Leg: **With MC and smaller needles, cast on 27 (29-31) sts.
1st row: (RS). *K1. P1. Rep from * to last st. K1.
2nd row: *P1. K1. Rep from * to last st. P1.
Rep last 2 rows (K1. P1) ribbing twice more (6 rows in all), inc 1 (0-2) st(s) evenly across last row. 28 (29-33) sts.
Change to larger needles and proceed in Stripe Pat, AT THE SAME TIME, inc 1 st each end of 7th and every following 6th (6th-8th) row until there are 36 (39-43) sts.
Cont even in Stripe Pat until Leg from beg measures 5 (6-7½) ins [12.5 (15-19) cm] ending with RS facing for next row.** Break yarn and leave sts on a spare needle.
Right Leg:
Work from ** to ** as given for Left Leg. DO NOT BREAK YARN.
Proceed as follows:
Join Legs: Next row: (RS). Work Stripe Pat across 36 (39-43) sts of Right Leg. Turn. Cast on 4 sts. Turn and work Stripe Pat across 36 (39-43) sts of Left Leg. 76 (82-90) sts.
Cont even in Stripe Pat until work from joining row measures 3 (3½-4) ins [7.5 (9-10) cm] ending with RS facing for next row.
Keeping cont of Stripe Pat, dec 1 st each end of needle on next and following 10th (12th-12th) rows until there are 66 (72-78) sts.***
Cont even in Stripe Pat until work from joining row measures 12½ (13¾-15) ins [32 (35-38) cm], ending with RS facing for next row.
Back neck shaping: Next row: Work Stripe Pat across 22 (24-27) sts (neck edge). Turn. Leave rem sts on a spare needle.
Dec 1 st at neck edge on next 2 rows. 20 (22-25) sts.
Work 1 row even. Leave sts on a st holder.
With RS of work facing, slip next 22 (24-24) sts onto a st holder. Join yarn to rem sts and work
Stripe Pat to end of row.
Dec 1 st at neck edge on next 2 rows. 20 (22-25) sts.
Work 1 row even. Leave sts on a st holder.
FRONT
Noting that Left Leg is Right Leg and Right Leg is Left Leg, work from *** to *** as given for Back.
Cont even in Stripe Pat until work from joining row measures 11¼ (12½-13½) ins [28.5 (32-34.5) cm] ending with RS facing for next row.
Front neck shaping: Next row: Work Stripe Pat across 26 (29-32) sts (neck edge). Turn. Leave rem sts on a spare needle.
Dec 1 st at neck edge on next 2 (4-2) rows, then on following alt rows until there are 20 (22-25) sts.
Cont even in Stripe Pat until work from beg measures same length as Back to shoulder. Leave sts on a st holder.
With RS of work facing, slip next 14 sts on a st holder. Join yarn to rem sts and work Stripe Pat to end of row.
Dec 1 st at neck edge on next 2 (4-2) rows, then on following alt rows until there are 20 (22-25) sts.
Cont even in Stripe Pat until work from beg measures same length as Back to shoulder. Leave sts on a st holder.
SLEEVES
With MC and smaller needles, cast on 39 (41-43) sts and work 6 rows in (K1. P1) ribbing as given for Back Left Leg, inc 5 sts evenly across last row. 44 (46-48) sts.
Change to larger needles and proceed in Stripe Pat, AT THE SAME TIME, inc 1 st each end of needle on 5th and following 6th (4th-4th) rows until there are 54 (54-56) sts.
Sizes 6 and 12 mos only: Inc 1 st each end of needle on following 6th rows from previous inc until there are (60-66) sts.
All Sizes: Cont even in Stripe Pat until work from beg measures 5½ (6½-7½) ins [14 (16.5-19) cm], ending with RS facing for next row. Cast off.
FINISHING
Back Neckband: With RS of work facing, MC and smaller needles, pick up and knit 3 sts down right back neck edge. K22 (24-24) from Back st holder, dec 1 st at center. Pick up and knit 3 sts up left back neck edge. 27 (29-29) sts.
Beg on a 2nd row, work 5 rows in (K1. P1) ribbing as given for Back Left Leg.
Right Back Shoulder Band: With RS of work facing, MC and smaller needles, K20 (22-25) from right back shoulder st holder, inc 2 (2-3) sts evenly across, then pick up and knit 5 sts across side of Back neckband. 27 (29-33) sts. Beg on a 2nd row, work 5 rows in (K1. P1) ribbing as given for Back Left Leg. Cast off in ribbing.
Left Back Shoulder Band: With RS of work facing, MC and smaller needles, pick up and knit 5 sts across side of Back neckband, then K20 (22-25) from left back shoulder st holder, inc 2 (2-3) sts evenly across. 27 (29-33) sts. Beg on a 2nd row, work 5 rows in (K1. P1) ribbing as given for Back Left Leg. Cast off in ribbing.
Front Neckband: With RS of work facing, MC and smaller needles, pick up and knit 14 sts down left front neck edge. K14 (14-16) from Back st holder, dec 1 st at center. Pick up and knit 14 sts up right front neck edge. 41 (41-43) sts.
Beg on a 2nd row, work 5 rows in (K1. P1) ribbing as given for Back Left Leg.
Left Front Shoulder Band: With RS of work facing, MC and smaller needles, K20 (22-25) from left front shoulder st holder, inc 2 (2-3) sts evenly across, then pick up and knit 5 sts across side of Front neckband. 27 (29-33) sts.
Beg on a 2nd row, work 3 rows in (K1. P1) ribbing as given for Back Left Leg.
4th row: Rib across 5 sts. *Cast off 2 sts. Rib across 6 (7-9) sts (including st on needle after cast off ). Rep from * once more. Cast off 2 sts. Rib to end of row. 3 buttonholes.
Work 1 more row in ribbing casting on 2 sts over cast off sts. Cast off in ribbing.
Right Front Shoulder Band: With RS of work facing, MC and smaller needles, pick up and knit 5 sts across side of Front neckband. K20 (22-25) from right front shoulder st holder, inc 2 (2-3) sts evenly across. 27 (29-33) sts.
Beg on a 2nd row, work 3 rows in (K1. P1) ribbing as given for Back Left Leg.
4th row: Rib across 2 sts. *Cast off 2 sts. Rib across 6 (7-9) sts (including st on needle after cast off ). Rep from * once more. Cast off 2 sts. Rib to end of row. 3 buttonholes.
Work 1 more row in ribbing casting on 2 sts over cast off sts. Cast off in ribbing.
Lap Front Shoulder Bands over Back Shoulder Bands and sew tog at sleeve edge. Place markers on side edges of Front and Back 4½ (5-5½) ins [11.5 (12.5-14) cm] down from top of shoulder. Sew in sleeves between markers. Sew side and sleeve seams. Sew leg inseams. Sew buttons to correspond to buttonholes. Work Chart with Navy in duplicate stitch at center front as illustrated, placing top of chart 5 sts down from center front neck edge.
Read Next75+ Free Baby Knitting Patterns
KathrynAllison
Aug 09, 2018
This little romper is too cute! The anchor on the front makes it perfect for lazy summer days. Plus, the stripes are a classic style.
Report Inappropriate Comment
Are you sure you would like to report this comment? It will be flagged for our moderators to take action.
Thank you for taking the time to improve the content on our site.

