Love and Lace Knit Cardigan Pattern
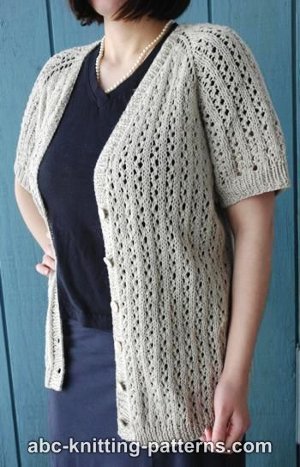
This lace cardigan knitting pattern is easier than you might think to work up!
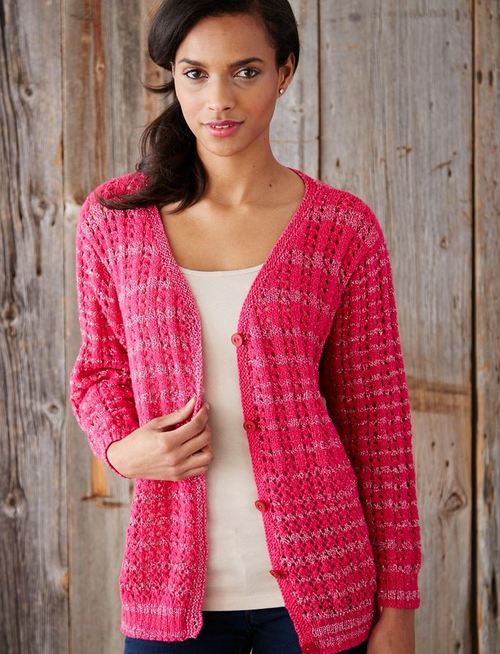
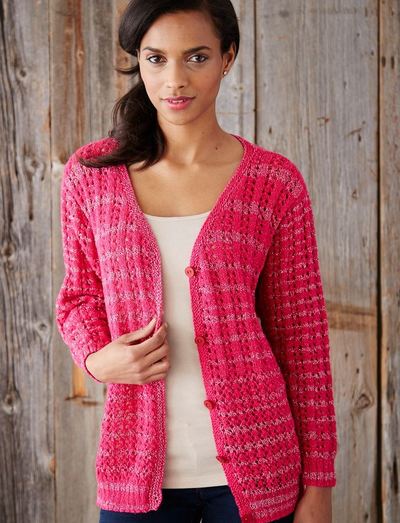
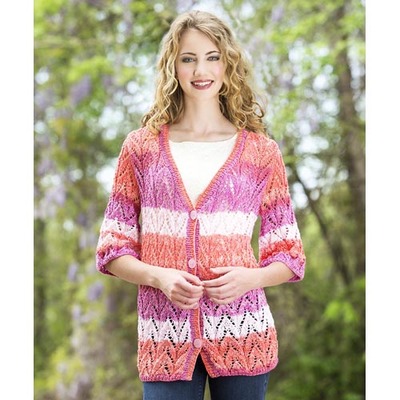
Sometimes the best thing you can do is surround yourself with the things you love. If lace and sweaters are some of your favorite things, you're going to want to knit this Love and Lace Knit Cardigan. This open knit cardigan is warm enough to protect you from cold breezes, but cool enough to wear in the warmer months. The hot pink color is vibrant and adorable, making it great for teens and adults alike. Try knitting it in your favorite color to surround yourself with even more things that make you happy.

Knitting Needle Size5 or 3.75 mm, 7 or 4.5 mm, Circular Knitting Needles
Yarn Weight(3) Light/DK (21-24 stitches to 4 inches)
Gauge22 stitches and 30 rows = 4 inches in stockinette stitch with larger needles
Materials List
-
Patons® Glam Stripes™ (2.1 oz/60 g; 261 yds/239 m) Fuschia (09728)
Size XS/S: 5 balls
Size M: 6 balls
Size L: 6 balls
Size XL: 7 balls
Size 2/3XL: 9 balls
Size 4/5XL: 10 balls
- Sizes U.S. 5 (3.75 mm) and U.S. 7 (4.5 mm) knitting needles or size needed to obtain gauge.
- Size U.S. 5 (3.75 mm) circular knitting needle 36” [90 cm] long.
- 1 st holder.
- 2 st markers.
- 5 buttons
Pattern
The instructions are written for smallest size. If changes are necessary for larger sizes the instructions will be written thus (). When only one number is given in black, it applies to all sizes.
Sizes:
To fit bust measurement
Extra-Small/Small: 28-34” [71-86.5 cm]
Medium: 36-38” [91.5-96.5 cm]
Large: 40-42” [101.5-106.5 cm]
Extra-Large: 44-46” [112-117 cm]
2/3 Extra-Large: 48-54” [122-137 cm]
4/5 Extra-Large: 56-62” [142-157.5 cm]
Finished bust
Extra-Small/Small: 36½” [92.5 cm]
Medium: 41” [104 cm]
Large: 45½” [115.5 cm]
Extra-Large: 48” [122 cm]
2/3 Extra-Large: 56” [142 cm]
4/5 Extra-Large: 63” [160 cm]
BACK
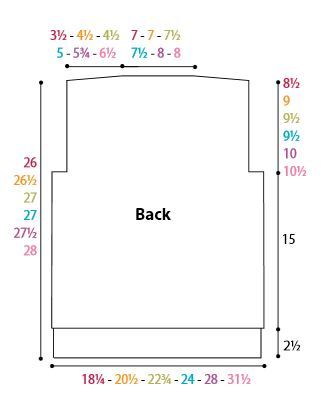
With smaller needles cast on 101 (113-125-131-155-173) sts.
1st row: (RS). *K2. P1. Rep from * to last 2 sts. K2.
2nd row: *P2. K1. Rep from * to last 2 sts. P2.
Rep last 2 rows (K2. P1) ribbing for 2½” [6 cm], ending on a 2nd row.
Change to larger needles and proceed in pat as follows:
1st row: (RS). K4. *yo. Sl1. K2tog. psso. yo. K3. Rep from * to last st. K1.
2nd row: Purl.
3rd row: K1. *yo. Sl1. K2tog. psso. yo. K3. Rep from * to last 4 sts. yo. Sl1. K2tog. psso. yo. K1.
4th row: Purl.
Rep last 4 rows for Allover Lace Pat until work from beg measures approx 11” [28 cm], ending on a 4th row of pat.
1st row: (RS). Knit.
2nd row: Purl.
3rd row: K1. *yo. Sl1. K2tog. psso. yo. K3.
Rep from * to last 4 sts. yo. Sl1. K2tog. psso. yo. K1.
4th row: Purl.
Rep last 4 rows for Vertical Lace Pat until work from beg measures 17½” [44.5 cm], ending on a WS row.
Shape armholes:
Keeping cont of Vertical Lace Pat, cast off 12 (12-18-18-24-30) sts at beg of next 2 rows. 77 (89-89-95-107-113) sts.
Cont in pat until armhole measures 8½ (9-9½-9½-10-10½) ” [21.5 (23-24-24-25.5-26.5) cm], ending on a WS row.
Shape shoulders:
Keeping cont of pat, cast off 9 (12-12-13-16-17) sts at beg of next 2 rows, then 10 (13-13-14-16-18) sts at beg of following 2 rows. Leave rem 39 (39-41-41-43-43) sts on a st holder.
LEFT FRONT
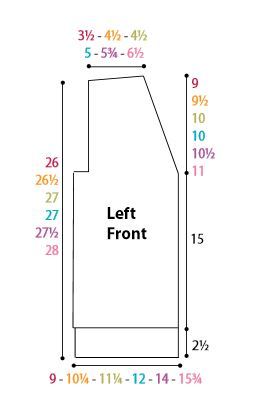
**With smaller needles cast on 50 (56-62-65-77-86) sts and work 2½” [6 cm] in (K2. P1) ribbing as given for Back, ending on a 2nd row.**
Change to larger needles and proceed in pat as follows:
1st row: (RS). K1 (1-1-4-4-1). *yo. Sl1. K2tog. psso. yo. K3. Rep from * to last st. K1.
2nd row: Purl.
3rd row: K4 (4-4-1-1-4). *yo. Sl1. K2tog. psso. yo. K3. Rep from * to last 4 sts. yo. Sl1. K2tog. psso. yo. K1.
4th row: Purl.
Rep last 4 rows for Allover Lace Pat until work from beg measures approx 11” [28 cm], ending on a 4th row of pat.
1st row: (RS). Knit.
2nd row: Purl.
3rd row: K4 (4-4-1-1-4). *yo. Sl1. K2tog. psso. yo. K3. Rep from * to last 4 sts. yo. Sl1. K2tog. psso. yo. K1.
4th row: Purl.
Rep last 4 rows for Vertical Lace Pat until work from beg measures 17½” [44.5 cm], ending on a WS row.
Shape armhole and neck edge:
Keeping cont of Vertical Lace Pat, cast off 12 (12-18-18-24-30) sts at beg of next row. 38 (44-44-47-53-56) sts. Work 1 row even in pat.
Dec 1 st at neck edge on next and following alt rows until there are 29 (35-35-38-44-47) sts, then on following 4th rows until there are 19 (25-25-27-32-35) sts.
Cont in pat until armhole measures same length as Back, ending on a WS row.
Shape shoulder:
Keeping cont of pat, cast off 9 (12-12-13-16-17) sts at beg of next row. Work 1 row even. Cast off rem 10 (13-13-14-16-18) sts.
RIGHT FRONT
Work from ** to ** as given for Left Front.
Change to larger needles and proceed in pat as follows:
1st row: (RS). K4. *yo. Sl1. K2tog. psso. yo. K3. Rep from * to last 4 (4-4-1-1-4) st(s). (yo. Sl1. K2tog. psso. yo) 1 (1-1-0-0-1) time. K1.
2nd row: Purl.
3rd row: K1. *yo. Sl1. K2tog. psso. yo. K3.
Rep from * to last 1 (1-1-4-4-1) st(s). (yo. Sl1. K2tog. psso. yo) 0 (0-0-1-1-0) time. K1.
4th row: Purl.
Rep last 4 rows for Allover Lace Pat until work from beg measures approx 11” [28 cm], ending on a 4th row of pat.
1st row: (RS). Knit.
2nd row: Purl.
3rd row: K1. *yo. Sl1. K2tog. psso. yo. K3. Rep from * to last 1 (1-1-4-4-1) st(s). (yo. Sl1. K2tog. psso. yo) 0 (0-0-1-1-0) time. K1.
4th row: Purl.
Rep last 4 rows for Vertical Lace Pat until work from beg measures 17½” [44.5 cm], ending on a RS row.
Shape armhole and neck edge:
Keeping cont of Vertical Lace Pat, cast off 12 (12-18-18-24-30) sts at beg of next row. 38 (44-44-47-53-56) sts.
Dec 1 st at neck edge on next and following alt rows until there are 29 (35-35-38-44-47) sts, then on following 4th rows until there are 19 (25-25-27-32-35) sts
Cont in pat until armhole measures same length as Back, ending on a RS row.
Shape shoulder:
Keeping cont of pat, cast off 9 (12-12-13-16-17) sts at beg of next row. Work 1 row even. Cast off rem 10 (13-13-14-16-18) sts.
SLEEVES
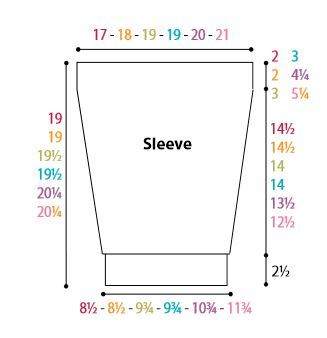
With smaller needles cast on 44 (44-47-47-50-53) sts.
Work 2½” [6 cm] in (K2. P1) ribbing as given for Back, ending on a 2nd row and inc 3 (3-6-6-9-12) sts evenly across last row. 47 (47-53-53-59-65) sts.
Change to larger needles.
1st row: (RS). Knit.
2nd row: Purl.
3rd row: K1. *yo. Sl1. K2tog. psso. yo. K3. Rep from * to last 4 sts. yo. Sl1. K2tog. psso. yo. K1.
4th row: Purl.
Rep last 4 rows for Vertical Lace Pat.
Work a further 4 rows in pat.
Keeping cont of pat, inc 1 st each end of next and following 4th rows until there are 89 (93-99-99-103-109) sts, taking inc sts into pat.
Cont even in Lace Pat until work from beg measures 17 (17-16½-16½-16-15) ” [43 (43-42-42-40.5-38) cm], ending on a WS row. Place markers at each end of last row.
Cont even in pat until work from markers measures 2 (2-3-3-4¼-5¼) ” [5 (5-7.5-7.5-11-13) cm], ending on a WS row.
Shape top:
Cast off 13 (13-14-14-14-15) sts at beg of next 6 rows. Cast off rem 11 (15-15-15-19-19) sts.
Button and Buttonhole Band:
Sew shoulder seams. With RS facing and circular needle, pick up and knit 87 sts up Right Front edge between cast on edge and first front dec, then 43 (47-49-49-51-55) sts up front edge to shoulder. K39 (39-41-41-43-43) from Back st holder, dec 2 sts evenly across. Pick up and knit 43 (47-49-49-51-55) sts down Left Front neck edge to first front dec and 87 sts down front edge to cast on edge. 297 (305-311-311-317-325) sts. Do not join.
Working back and forth across needle in rows, proceed as follows:
Knit 3 rows (garter st).
Next row: (RS). K3. *Cast off 2 sts. K18 (including st on needle after cast off ). Rep from * 3 times more. Cast off 2 sts. Knit to end of row. 5 buttonholes.
Next row: Knit, casting on 2 sts over cast off sts.
Next row: Knit.
Cast off knitwise (WS).
Sew in sleeves, placing rows above markers along cast off sts of Front and Back.
Sew side and sleeve seams. Sew on buttons to correspond to buttonholes.
Abbreviations
- Alt
- Alternate
- Approx
- Approximately
- Beg
- Beginning
- Cont
- Continue(ity)
- Dec
- Decrease(ing)
- Inc
- Increase(ing)
- K2tog
- Knit next 2 stitches together
- Psso
- Pass slipped stitch over
- Rem
- Remaining
- Sl1
- Slip next stitch knitwise
Read NextNorthern Lights Cardigan
Your Recently Viewed Projects
geogalgreen
Mar 19, 2019
There must be a typo in the gauge. It says "Gauge1 stitches, 2 rows, 3 inches. stockinette stitch." With a DK weight of yarn and those needle sizes, there is no way one stitch or two rows will equal 3 inches.
Kristina K
Mar 20, 2019
Hi geogalgreen, thanks for pointing out this error! We've updated the pattern with the correct gauge. Happy knitting! -Editors of AllFreeKnitting
Sashprd58 9177727
Sep 17, 2018
There are at least 2 errors in the printed version of this pattern. You have listed at the beginning 2 sizes of needles, 5 7, but further down only listing #5 for instructions. As for the gauge, I seriously doubt that 1 stitch will equal 3 inches.
Kristina K
Sep 18, 2018
Hi Sashprd58, both needle sizes are listed in both the materials and the pattern itself. Size 5 and 7 straight needles are listed in the materials, as well as size 5 circular needles. As for the pattern, you can can see under "BACK" it instructs you to begin with smaller needles (size 5) and just one paragraph later instructs you to switch to larger needles (size 7). When it comes to the gauge, we always recommend knitting up a swatch to achieve the gauge and switching needle sizes accordingly. We hope this helps! Happy knitting! -Editors of AllFreeKnitting
Liz
Feb 16, 2017
I am having a lot of problems with this sweater. I have 50 yrs experience but there is something not right about this pattern. I've spent over 10 hours pulling out work and am just about ready to give up. Starting on the back, right after the 2 1/2 inch border you start a 4 row pattern. There are never the same number of stitches on the needle. I think there is a mistake on row 4. Can anyone help me?
Lisa
Sep 20, 2020
I notice your question is a few years old, but it was never answered. The stitch count remains constant for each stitch that is reduced, there is a yo to compensate for it, so the stitch count remains constant. Row 4 is a purl, so there is no mistake in that row. The pattern repeat is 6 stitches, it may be helpful to you or someone who is knitting the pattern, to place markers every 6 stitches inside the border stitches to make it easier to complete it.
april281978 398378 6
May 13, 2016
I have been looking for a pattern for a light weight cardigan and this is it. The pattern sounds fairly simple. I shall give this a try over the upcoming summer months.
IncurableRomantici st
May 01, 2015
Feel like I've been looking for this one forever! Thank you.
Report Inappropriate Comment
Are you sure you would like to report this comment? It will be flagged for our moderators to take action.
Thank you for taking the time to improve the content on our site.

