Cozy Cabled Poncho
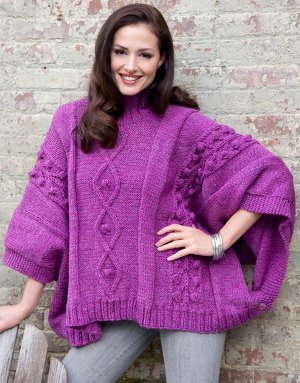
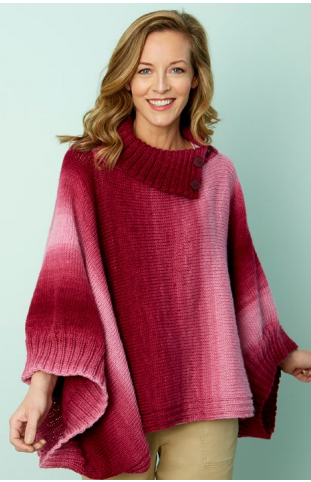
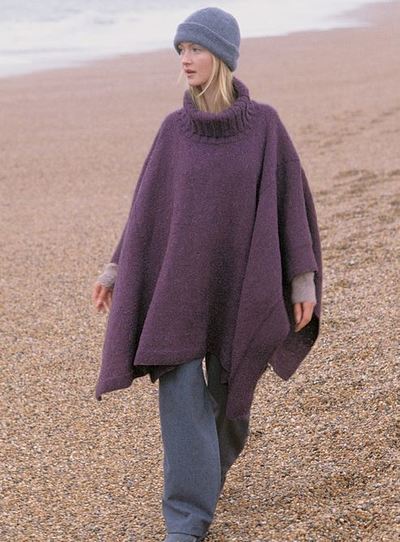
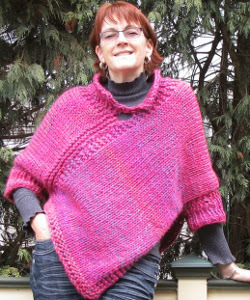
For days when comfort is key, reach for the Cozy Cabled Poncho. This wonderfully warm knit poncho pattern features a delightful diamond cable and bobble stitch design and a comfy, over-sized fit. Buttoned at the sides for a blanket-like feel, this orchid-colored beauty is sure to grace your year-round wardrobe on chilly days and breezy nights. Perfect for casual comfort or upscale style, the Cozy Cabled Poncho is a must-knit pattern.

Knitting Needle Size8 or 5 mm, Circular Knitting Needles
Yarn Weight(4) Medium Weight/Worsted Weight and Aran (16-20 stitches to 4 inches)
Gauge16 stitches, 20 rows, 4 inches. stockinette stitch
Materials:
- RED HEART® Super Tweed® (E779,available in tweed 5 oz (141g), 266 yd (243m) skeins): 6 (6, 7, 7) skeins 7708 Pinkberry.
- Susan Bates® Knitting Needles: 5mm [US 8] circular needles, 16” (40 cm) and 29” (73.5 cm) long
- Two 1” (25 mm) buttons
- stitch markers
- cable needle
- yarn needle
GAUGE: 16 sts = 4” (10 cm); 20 rows = 4” (10 cm) in pattern.
CHECK YOUR GAUGE. Use any size needles to obtain the gauge.
Directions are for size Small. Changes for sizes Medium, Large, and X-Large are in parentheses
Finished Length: 25 (26, 27, 28)” (63.5 (66, 68.5, 71 cm), measured from back neck down to lower edge (not including collar)
Finished Width: 46 (48, 50, 52)” (117 (122, 127, 132) cm)
ABBREVIATIONS
k = knit
k2tog = knit next 2 sts together
p = purl
p2tog = purl next 2 sts together
rev St st = reverse Stockinette stitch
st(s) = stitch(es)
St st = Stockinette stitch
wyib = with yarn in back
* = repeat whatever follows the * as indicated.
Special Stitches
bobble = (K1, yo, k1, yo, k1) in same stitch, turn, p5, turn, k5, turn, p5, turn, k3tog through the back loops (tbl), k2tog, pass first stitch over 2nd stitch and off needle.
M1 = Make 1 (Increase) – Lift strand between needles to left-hand needle and work strand through the back loop, twisting it to prevent a hole, [knit or purl as indicated by pattern st].
1/1 LC (1 over 1 Left Cross) = Slip next stitch to cable needle and hold in front, k1, then k1 from cable needle.
1/1 RC (1 over 1 Right Cross) = Slip next stitch to cable needle and hold in back, k1, then k1 from cable needle.
2/1 LPC (2 over 1 Left Purl Cross) = Slip next 2 stitches to cable needle and hold in front, p1, then k2 from cable needle.
2/1 RPC (2 over 1 Right Purl Cross) = Slip next stitch to cable needle and hold in back, k2, then p1 from cable needle.
2/1/2 LPC (2 over 1 over 2 Left Purl Cross) = Slip next 3 stitches to cable needle and hold in front, k2, slip last st from cable needle to left hand needle and purl it, then k2 from cable needle.
Pattern Stitches
Bobble Vine Pattern (over 17 sts)
Row 1 (right side): 1/1 RC, p5, k1, slip 1 with yarn in back (wyib), k1, p5, 1/1 LC.
Row 2 and all wrong side rows: K7, p3, k7.
Row 3: 1/1 RC, p4, 1/1 RC, slip 1 wyib, 1/1 LC, p4, 1/1 LC.
Row 5: 1/1 RC, p3, 1/1 RC, p1, slip 1 wyib, p1, 1/1 LC, p3, 1/1 LC.
Row 7: 1/1 RC, p2, 1/1 RC, p2, slip 1 wyib, p2, 1/1 LC, p2, 1/1 LC.
Row 9: 1/1 RC, p1, bobble, p4, slip 1 wyib, p4, bobble, p1, 1/1 LC.
Row 10: K7, p3, k7.
Repeat Rows 1–10 for Bobble Vine pattern.
Diamond Cable Pattern (over 19 sts)
Row 1 (right side): P7, 2/1/2 LPC, p7.
Row 2: K7, p2, k1, p2, k7.
Row 3: P6, 2/1 RPC, p1, 2/1 LPC, p6.
Row 4: K6, p2, k3, p2, k6.
Row 5: P5, 2/1 RPC, p3, 2/1 LPC, p5.
Row 6: K5, p2, k5, p2, k5.
Row 7: P4, 2/1 RPC, p5, 2/1 LPC, p4.
Row 8: K4, p2, k7, p2, k4.
Row 9: P3, 2/1 RPC, p7, 2/1 LPC, p3.
Row 10: K3, p2, k9, p2, k3.
Row 11: P2, 2/1 RPC, p9, 2/1 LPC, p2.
Row 12: K2, p2, k11, p2, k2.
Row 13: P2, k2, p5, bobble, p5, k2, p2.
Row 14: K2, p2, k11, p2, k2.
Row 15: P2, 2/1 LPC, p9, 2/1 RPC, p2.
Row 16: K3, p2, k9, p2, k3.
Row 17: P3, 2/1 LPC, p7, 2/1 RPC, p3.
Row 18: K4, p2, k7, p2, k4.
Row 19: P4, 2/1 LPC, p5, 2/1 RPC, p4.
Row 20: K5, p2, k5, p2, k5.
Row 21: P5, 2/1 LPC, p3, 2/1 RPC, p5.
Row 22: K6, p2, k3, p2, k6.
Row 23: P6, 2/1 LPC, p1, 2/1 RPC, p6.
Row 24: K7, p2, k1, p2, k7.
Repeat Rows 1–24 for Diamond Cable pattern.
Notes
1. Poncho is knit in one piece beginning at lower back edge. Work proceeds up to and over shoulders, then down to lower front edge.
2. Poncho is knit back and forth in rows. Circular needle is used to accommodate large number of stitches. Work back and forth as if working with straight needles.
3. Designer recommends draping a piece of fabric or a shawl across your shoulders to determine how wide and long you want your poncho to fit.
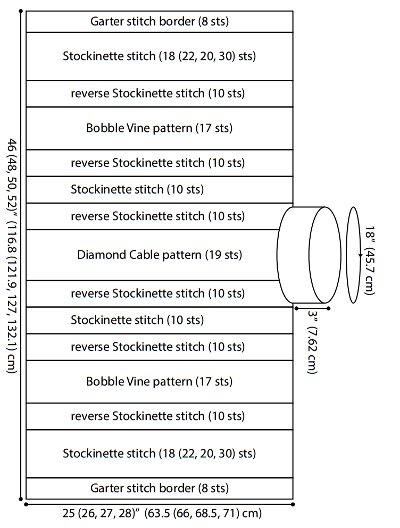
4. Stitch markers are used to separate stitches into sections of St st (knit on right side, purl on wrong side), rev St st (purl on right side, knit on wrong side), Bobble Vine pattern, and Diamond Cable pattern. Refer to the pattern layout diagram for a thorough understanding of the arrangement of the patterns across poncho.
5. Bobble Vine pattern and Diamond Cable pattern can be worked by reading the written instructions or following the charts.
PONCHO
Beginning at lower back edge with longer circular needle, cast on 186 (194, 202, 210) sts.
Lower Back Ribbing
Row 1 (right side): K8, *p2, k2; repeat from * to last 10 sts, p2, k8.
Row 2: K8, *p2, p2; repeat from * to last 10 sts, k10.
Repeat last 2 rows until piece measures 2” (5 cm) from beginning, end with a wrong side row.
Set Up Patterns
Set-Up Row (right side): K8 for Garter st border, place marker, k18 (22, 26, 30) for St st section, place marker, p10 for rev St st section, place marker, p17 for Bobble Vine pattern, place marker, p10 for rev St st section, place marker, k10 for St st section, place marker, p10 for rev St st section, place marker, p18, p2tog for Diamond cable pattern, place marker, p10 for rev St st section, place marker, k10 for St st section, place marker, p10 for rev St st section, place marker, p17 for Bobble Vine pattern, place marker, p10 for rev St st section, place marker, k18 (22, 26, 30) for St st section, place marker, k8 for Garter st border—185 (193, 210, 209) sts.
Next Row: Knit to marker, slip marker, purl to next marker, slip marker, k37 slipping next 3 markers as you come to them, purl to next marker, slip marker, k39 slipping next 3 markers as you come to them, purl to next marker, slip marker, k37 slipping next 3 markers as you come to them, purl to next marker, slip marker, knit to end of row.
Begin Bobble Vine and Diamond Cable Patterns
Row 1 (right side): Knit to first marker, slip marker, knit to next marker, slip marker, purl to next marker, slip marker, work Row
1 of Bobble Vine pattern over next 17 sts, slip marker, purl to next marker, slip marker, knit to next marker, slip marker, purl to next marker, slip marker, work Row 1 of Diamond Cable pattern over next 19 sts, slip marker, purl to next marker, slip marker, knit to next marker, slip marker, purl to next marker, slip marker, work Row 1 of Bobble Vine pattern over next 17 sts, slip marker, purl to next marker, slip marker, knit to next marker, slip marker, knit to end of row.
Row 2 (wrong side): Knit to first marker, slip marker, purl to next marker, slip marker, knit to next marker, slip marker, work Row
2 of Bobble Vine pattern over next 17 sts, slip marker, knit to next marker, slip marker, purl to next marker, slip marker, knit to next marker, slip marker, work Row 2 of Diamond Cable pattern over next 19 sts, slip marker, knit to next marker, slip marker, purl to next marker, slip marker, knit to next marker, slip marker, work Row 2 of Bobble Vine pattern over next 17 sts, slip marker, knit to next marker, slip marker, purl to next marker, slip marker, knit to end of row.
Repeat last 2 rows, working next row of Bobble Vine pattern and Diamond and Cable pattern on each row, until piece measures 25 (26, 27, 28)” (63.5 (66, 68.5, 71) cm) from beginning, end with a wrong side row.
Shape Neck
Row 1 (right side): Work in patterns as established over first 78 (82, 86, 90) sts, join 2nd ball of yarn and bind off center 29 sts (for back neck), work in patterns as established to end of row—78 (82, 86, 90) sts on each side.
Row 2 (wrong side): Work in patterns as established across each side using separate balls of yarn.
Continue to work both sides at the same time using separate balls of yarn.
Row 3 (increase): Work in patterns as established to 1 st before end of first side, M1, work last st; on 2nd side, work first st, M1, work in patterns as established to end of side—79 (83, 87, 91) sts on each side.
Row 4: Work in patterns as established across each side using separate balls of yarn.
Repeat last 2 rows 6 more times—85 (89, 93, 97) sts on each side.
Designer Note: When restarting the Diamond Cable for the center front, plan ahead first. Using the back of the poncho as a template, measure up from the hem to see where the neckline hits on the pattern. Then begin the center cable pattern on the appropriate row, so that the front hem ends with a complete diamond.
Cut ball of yarn attached to 2nd side. Work with ball of yarn attached to first side all the way across.
Next Row (right side): Work in patterns as established across first side, cast on 15 sts at center, work in patterns as established across 2nd side—185 (193, 201, 209) sts.
Work even in patterns as established until front measures 23 (24, 25, 26)” (58.5, 61, 63.5, 66 cm), measured from back neck, finishing last Diamond, if possible, end with a wrong side row.
Continue to slip markers as you come to them.
Next Row (right side): Knit to 2nd marker, slip marker, p37, k10, p28, M1, p11, k10, p37, knit to end of row.
Remove markers as you work the next row.
Next Row: K8, remove first marker, purl to next marker, k37, p10, k40, p10, k37, purl to last marker, k8.
Lower Front Ribbing
Row 1 (right side): K8, *p2, k2; repeat from * to last 10 sts, p2, k8.
Row 2: K8, *p2, p2; repeat from * to last 10 sts, k10.
Repeat last 2 rows until ribbing measures 1” (2.5 cm), end with a wrong side row.
Buttonhole Row (right side): K4, yo, k2tog, k2, *p2, k2; repeat from * to last 6 sts, k1, yo, k2tog, k3.
Row 4: K8, *p2, p2; repeat from * to last 10 sts, k10.
Repeat last 2 rows until ribbing measures 1” (2.5 cm), end with a wrong side row.
Row 5: K8, *p2, k2; repeat from * to last 10 sts, p2, k8.
Repeat last 2 rows until front ribbing measures same as back ribbing.
Bind off.
COLLAR
Designer Notes: This collar is reasonably snug fitting. If you prefer a looser collar, pick up more stitches or use a larger needle. But make sure the number of stitches picked up is divisible by 4 to work 2x2 ribbing. A thick, folded collar can also be worked by continuing in ribbing for 8” (20.5 cm) before binding off. With shorter circular needle and right side facing, pick up a k29 sts across back neck edge, 14 sts across side of neck edge, 15 sts across center front sts, and 14 sts across other side of neck edge—72 sts.
Round 1: *K2, p2; repeat from * around.
Repeat Round 1 until collar measures 3” (7.5 cm) or desired length.
Bind off loosely.
FINISHING
Sew buttons to wrong side (inside) of back ribbing, opposite buttonholes. Weave in ends.
Read NextNeon Accent Cape
Your Recently Viewed Projects
Alysanne
Feb 20, 2017
Now this is a PONCHO. I always think of a poncho as something long and warm and cozy to wear to football or soccer games in the fall and early spring. This one will take a while to make but it will be so worth it.
Report Inappropriate Comment
Are you sure you would like to report this comment? It will be flagged for our moderators to take action.
Thank you for taking the time to improve the content on our site.

